RT-Thread Studio Manual
Create a New Project
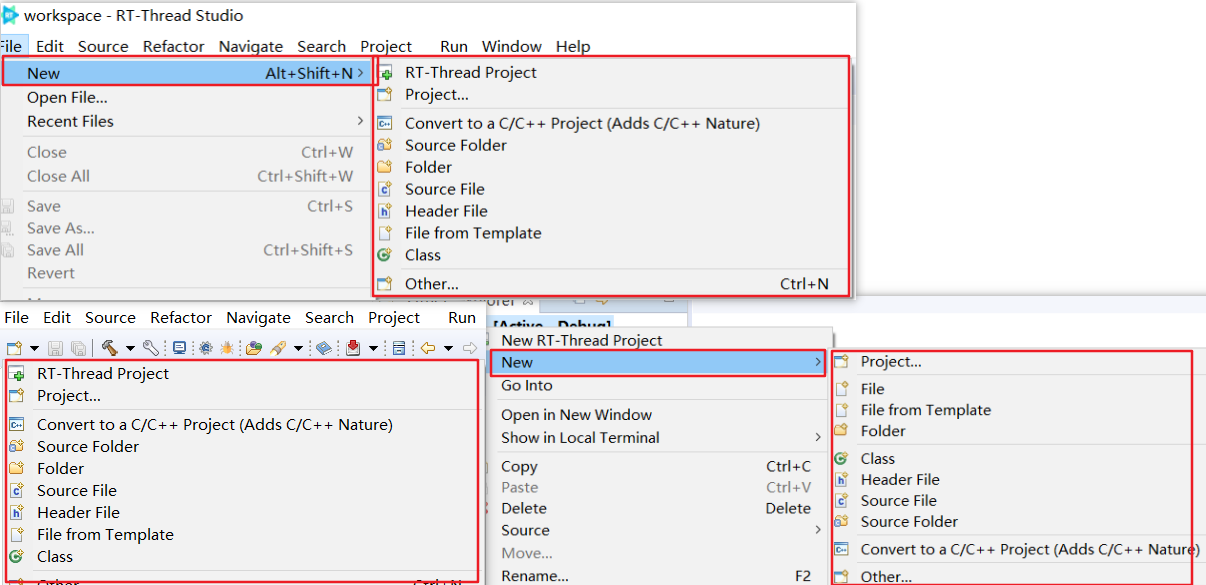
This feature supports creating many resources, such as creating a project, file, folder, etc., and the entrance of New has the menu, toolbar button, and the Project right-click menu, as shown in the following image:
Import MDK Project
Developers can now import existing RT-Thread MDK project into RT-Thread Studio IDE, which will commit the following features:
- Maintain the directory structure of the original project
- Maintain the source file of the original project
- Maintain the header file path of the original project
- Maintain the macro definition of the original project
Sample
We'll take the bsp/stm32l475-atk-pandora project as an example to demonstrate how to import an MDK project into RT-Thread Studio, pre-import project catalog:

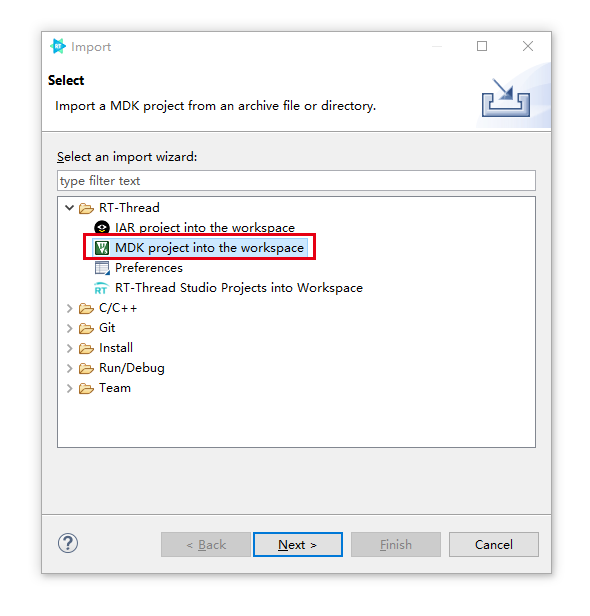
Right-click in the Studio Explorer window, select the import feature in the drop-down menu, then select Import MDK items into the workspace, and then click Next:
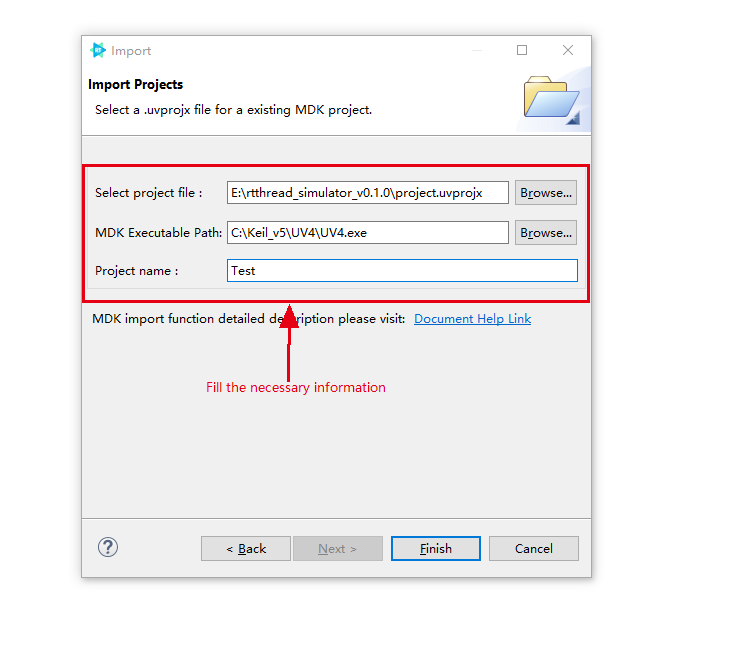
Click to select the MDK project to be imported in the project catalog, select the MDK executable file, and then enter the project name, click Finish.
When the import is successful, the .rtt-studio project directory folder is created in the original project directory, as shown in the following image:

Project Explorer displays the interface as shown below:
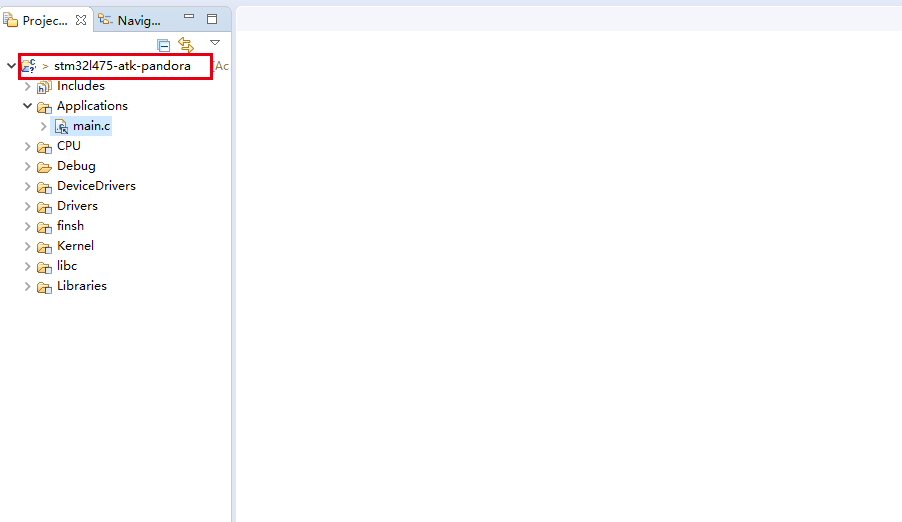
When an MDK project is imported into RT-Thread Studio, the organizational structure of the original project remains the same, as shown in the following image:

As with the original MDK project, the source files in the RT-Thread Studio Group can also be stored in various locations of the project without actually having to store the files in this organizational structure.
The imported Group and the source file with a small square and arrow symbol in the lower right corner indicating a difference from the What You See Is What You Get file organization style of the native Eclipse. This folder or file, identified by a box or arrow in the lower right corner, is called a virtual folder and a linked file in RT-Thread Studio, respectively.
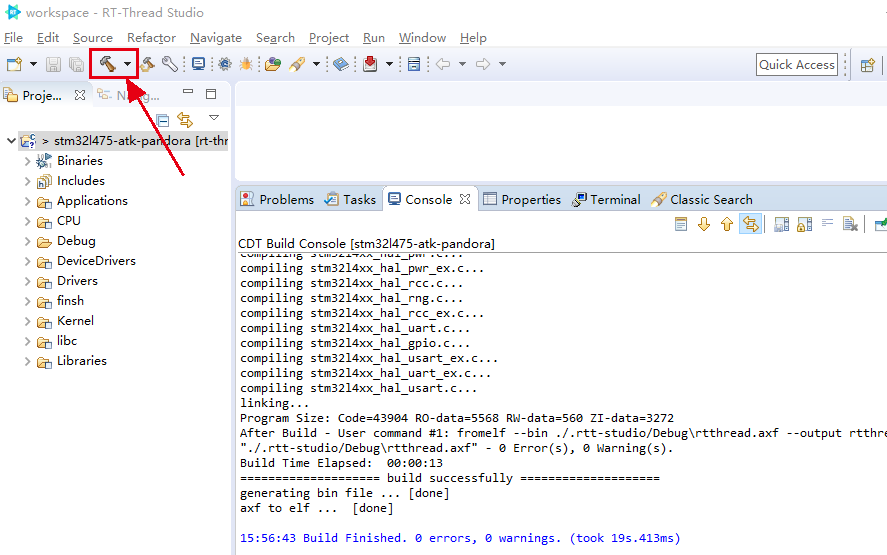
Click the compilation button to directly compile in RT-Thread Studio, as shown in the following image:
RT-Thread Studio Syncs With the MDK Project
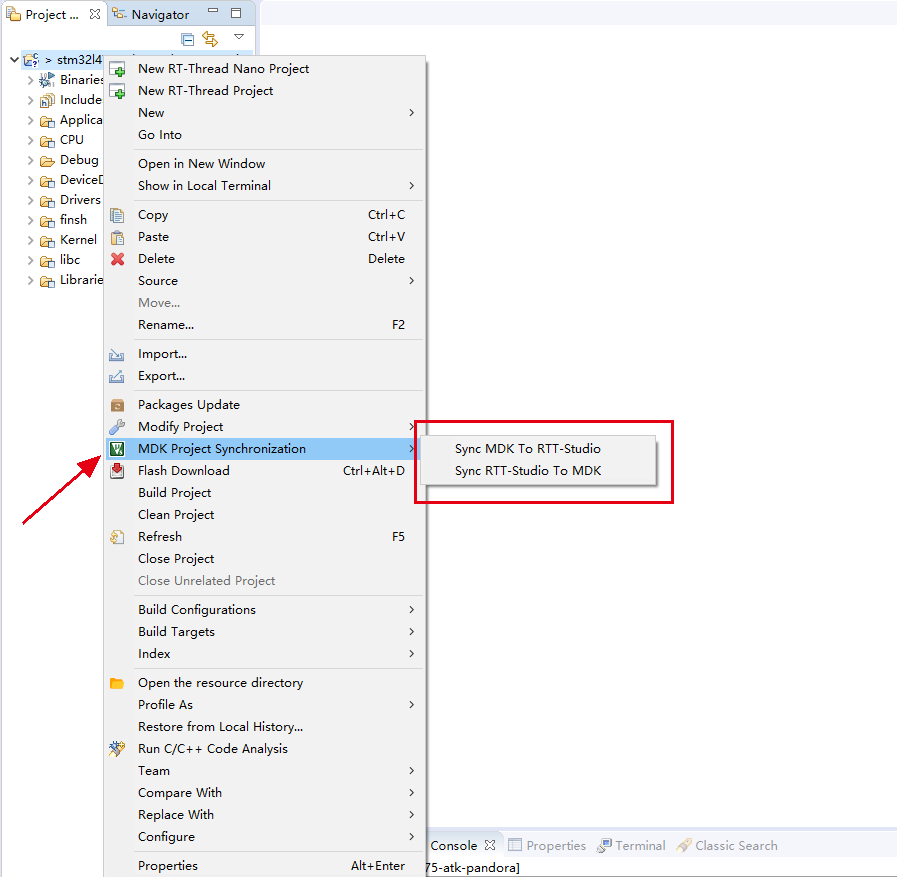
To make it easier for the project to switch between RT-Thread Studio and MDK, v2.1.0 supports to right-click the menu and check the option of MDK Project Synchronization, you can sync project from MDK to RT-Thread Studio and vice versa, as shown in the following image:
MDK Project Configuration
RT-Thread Studio has customized an interface for configuring project by checking the project settings button:
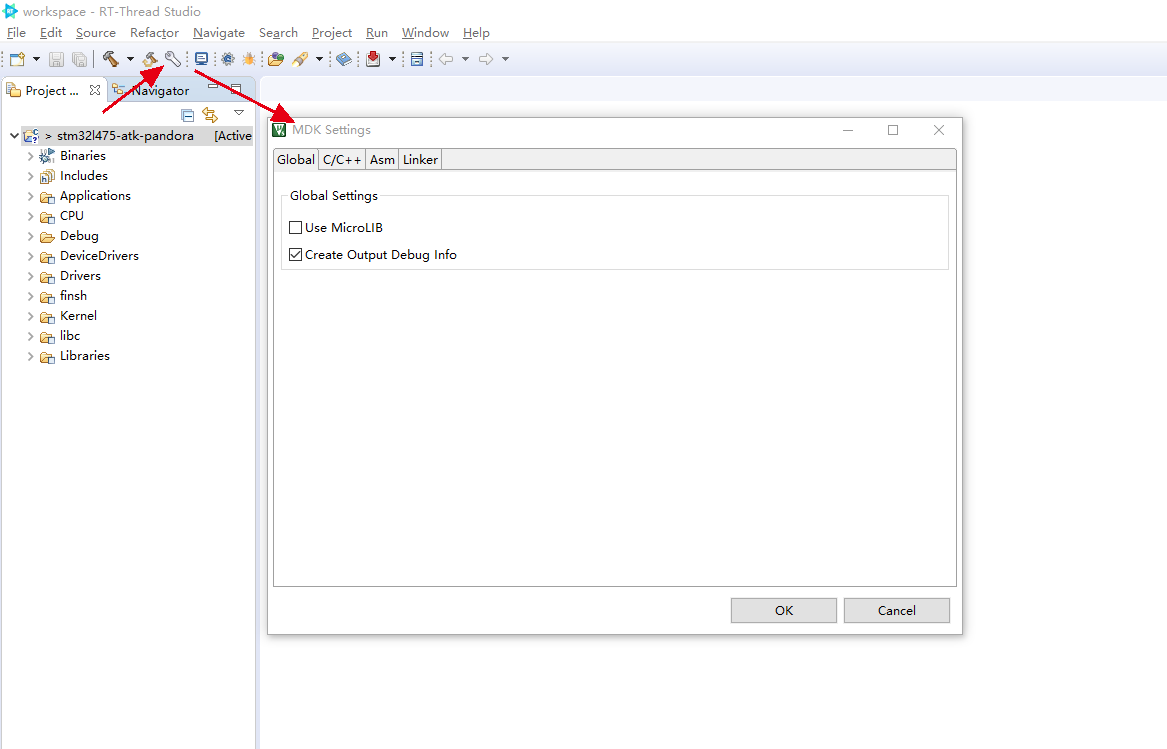
The configuration interface mainly contains global configuration, C/C++configuration, assembly language configuration, linker configuration. In the C/C++configuration, if the value includes path and symbol, you can open Settings to add, edit, and delete existing values, as shown in the following illustration:

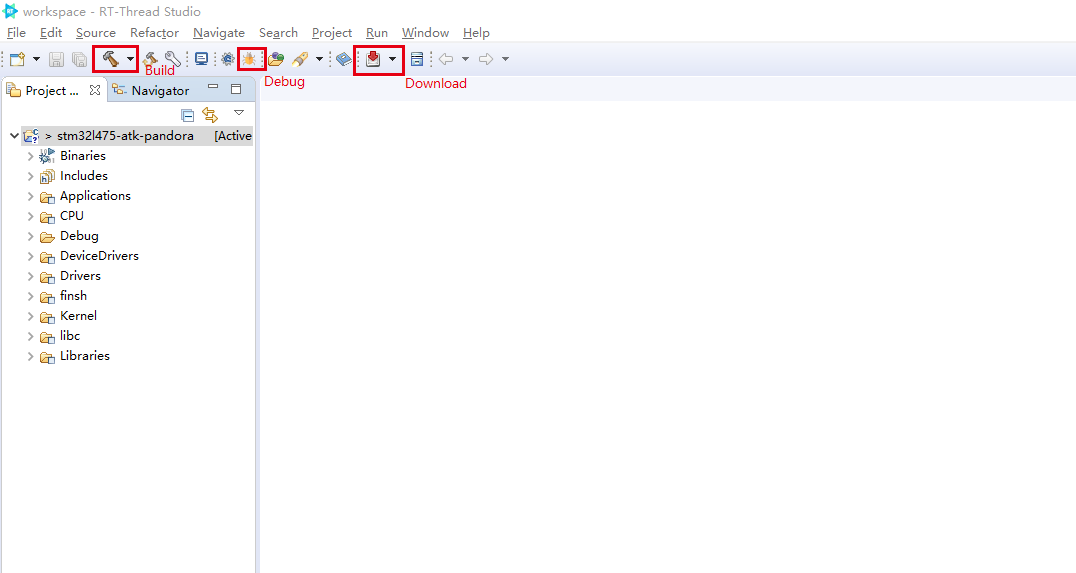
MDK Project Compile、Download、 Debugging
You can compile, download, debug the MDK project as the usual RT-Thread Studio project.
RT-Thread Configuration
Open RT-Thread Configuration Interface
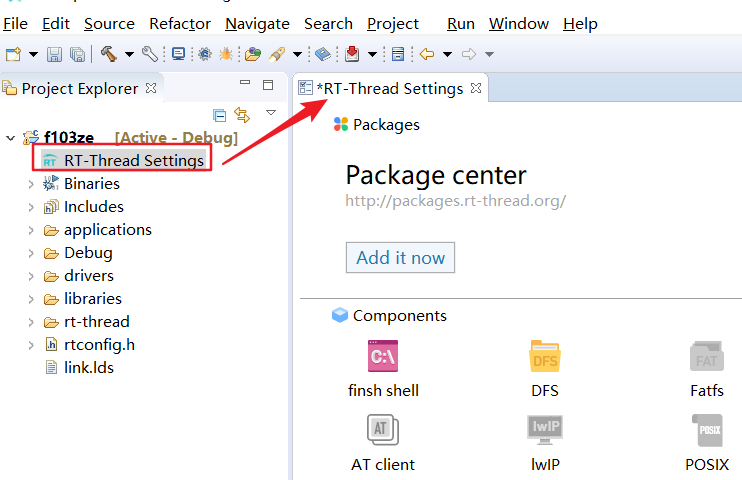
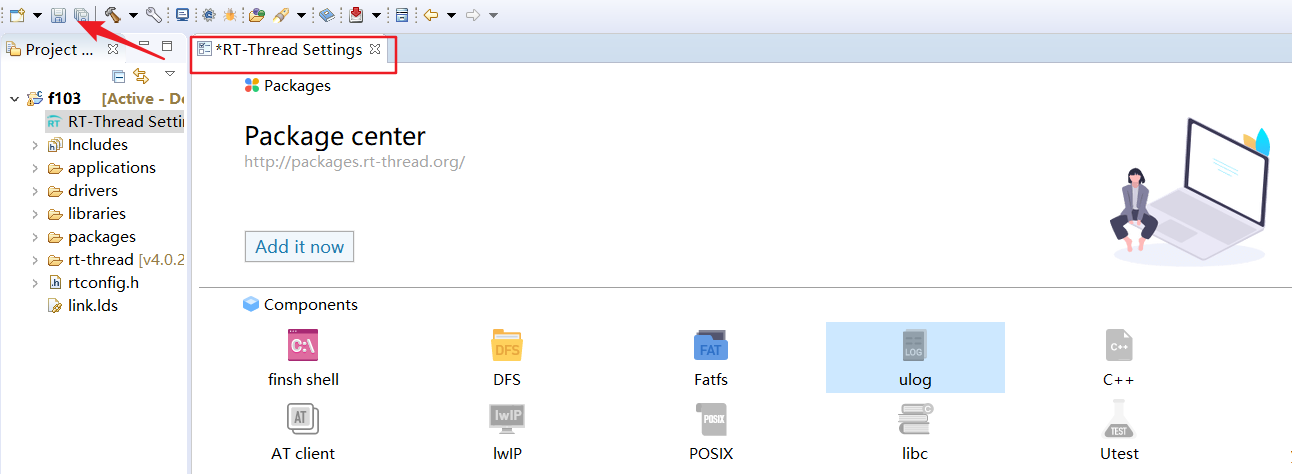
The RT-Thread configuration interface can be opened by double-clicking the RT-Thread Settings file under the project root directory, as shown in the following image:
Software Package Center
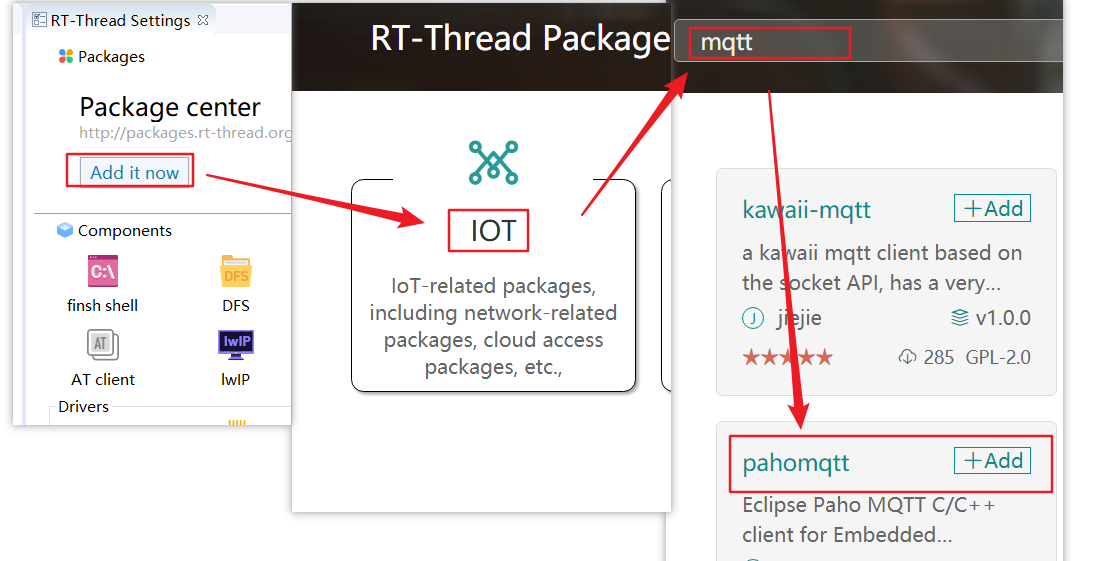
By clicking on Add it now to enter the package center, the package center first shows the categories of those packages. In the package center, you can select a category and then check the package you need, or you can enter the keywords on the search bar to find the package you need, then add the package to the project by clicking the Add button, which is shown as follows:
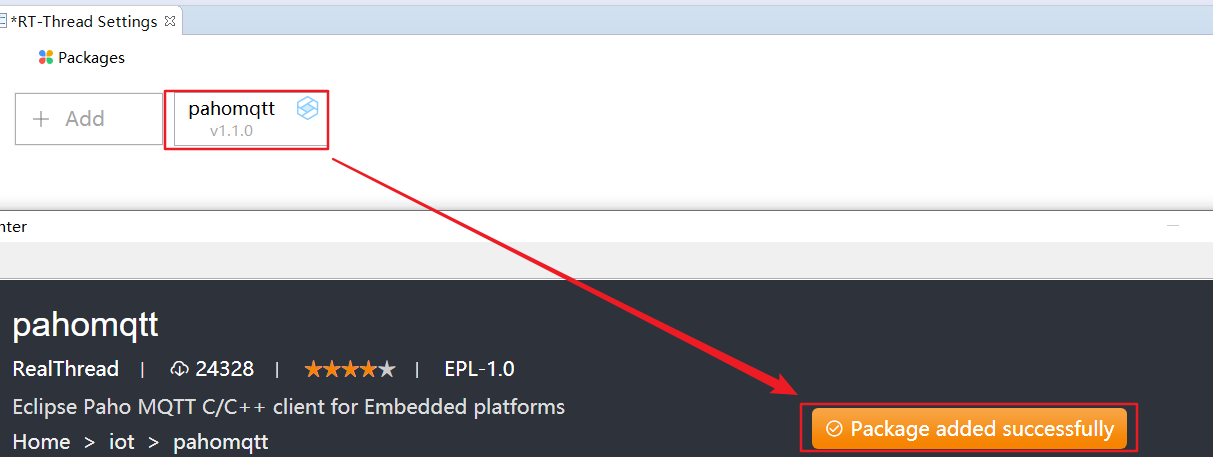
When a package is successfully added to the project, the package center prompts 'Package added successfully' and the added package appears at the package layer, and the components on which the package depends are automatically enabled.
Component and Service Layer
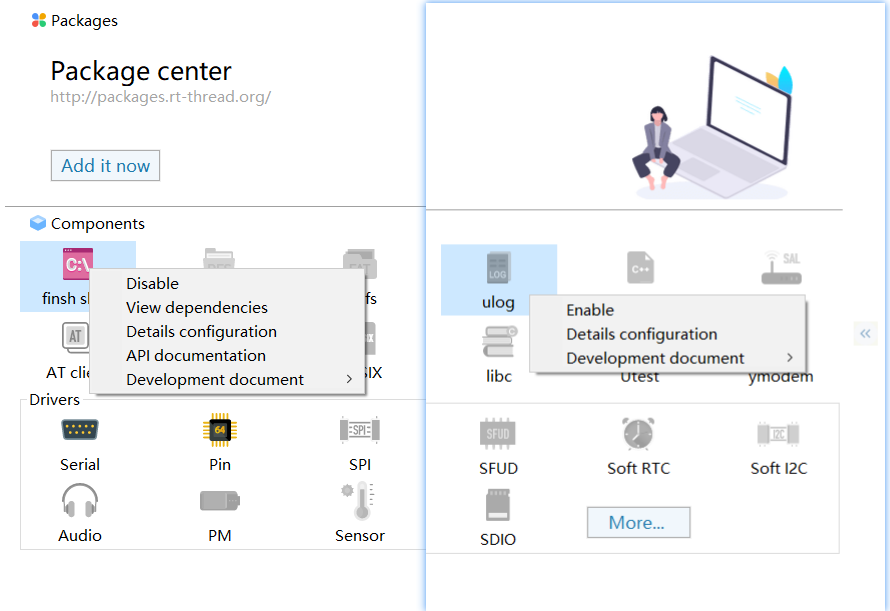
Double-click on the icon to enable the component directly. The enabled component is a bright icon, and the component is not enabled as a gray icon. Right-click on the icon of the component and service layer to pop up the actionable right-click menu, and if the component is enabled, the right-click menu for the component has three options: Disable、View dependencies、API documentation, if the component is not enabled, The right-click menu for this component has only the 'enable' option, as shown in the following image:
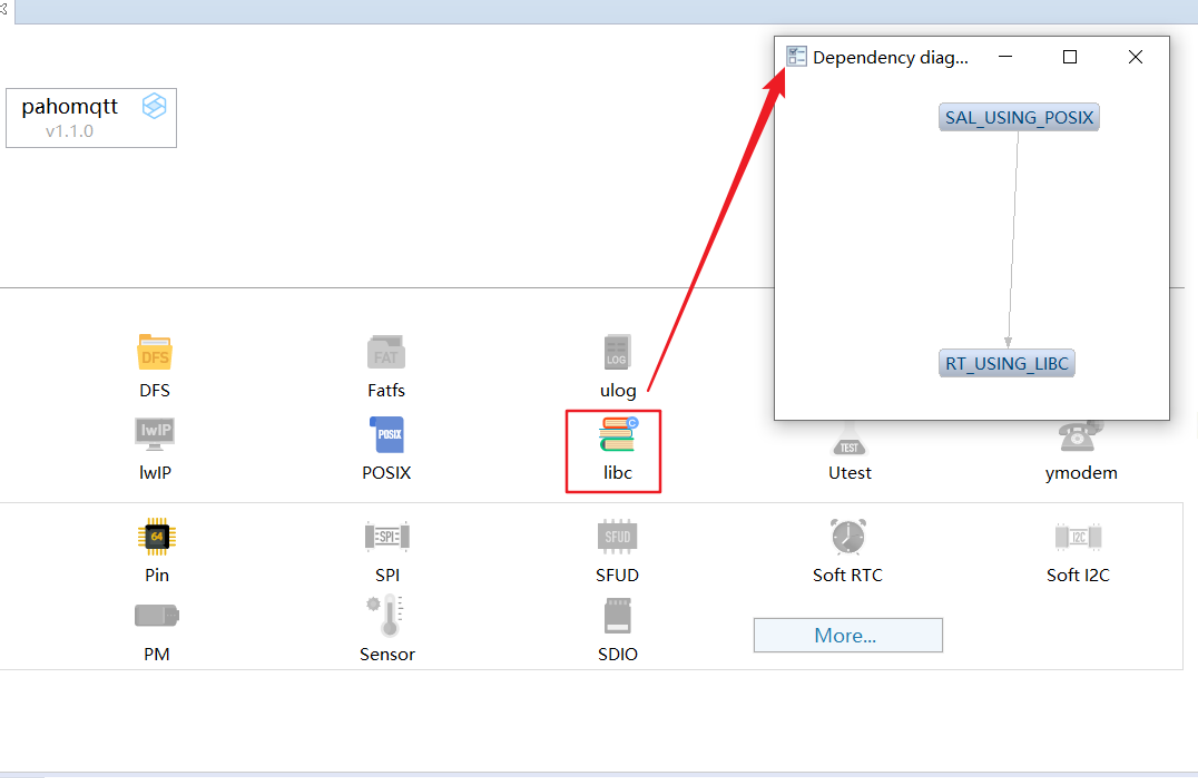
View Dependence
Right-click View dependencies on the enabled component to see which component is dependent on this component. For example, check the dependence of thelibc component, as shown in the following image:
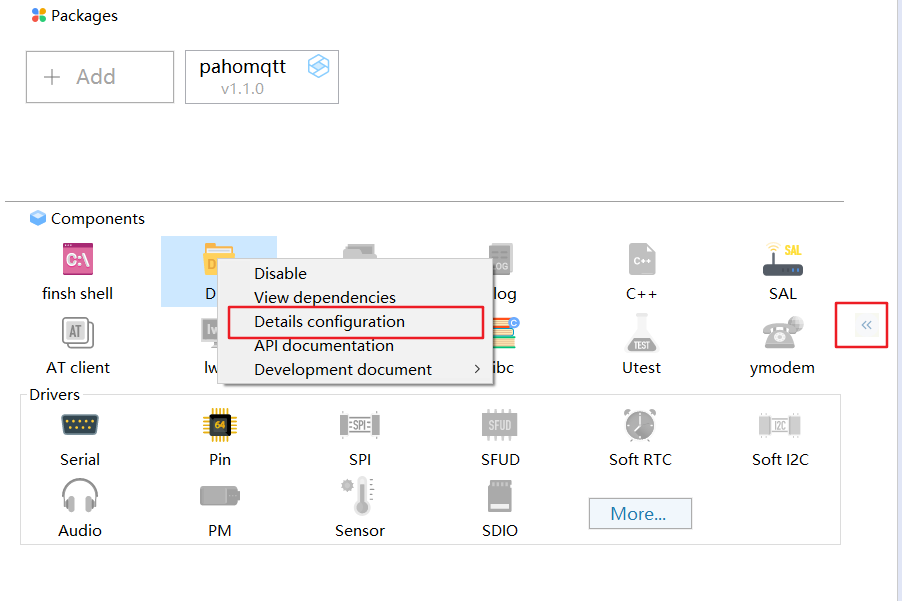
Check Details Configuration
Details Configuration
When the RT-Thread configuration interface is opened, the details configuration default is hidden, and the details configuration interface can be call out by the right-click menu Details configuration of the enabled components or the RT-Thread configuration interface sidebar button, which is located as shown in the following image:
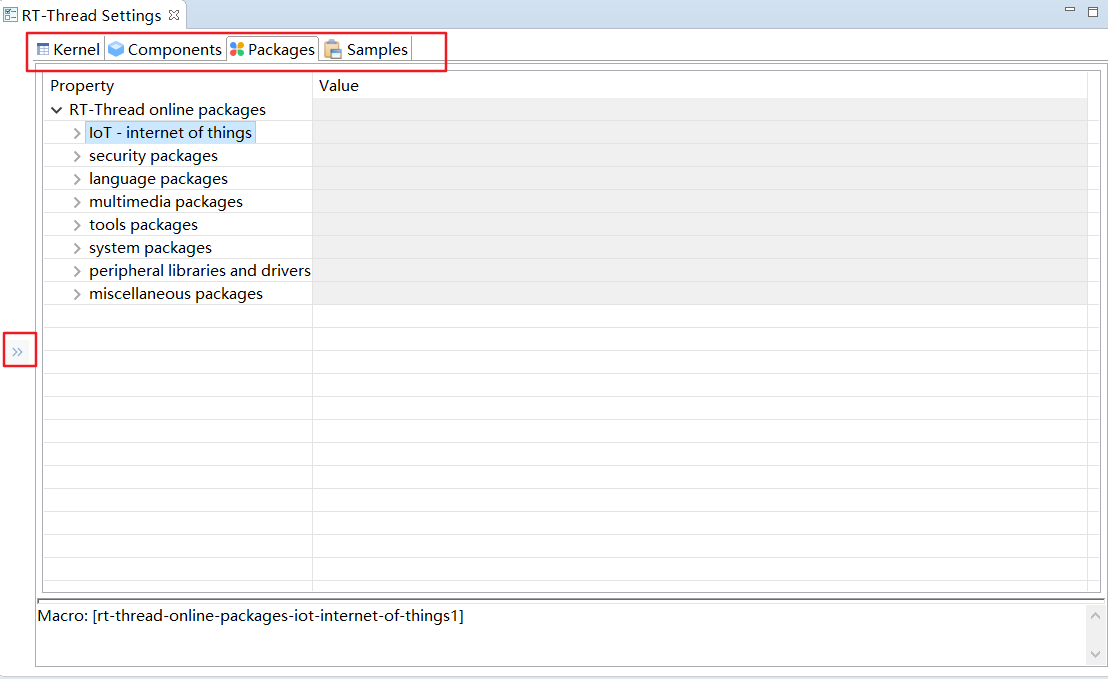
The details configuration interface is a tree form configuration interface on the right, and it is divided into four categories: Kernel, Components, Packages, Hardware. Labels allow you to switch between different configuration categories, and click the sidebar button to hide the property configuration interface, as shown in the following image:
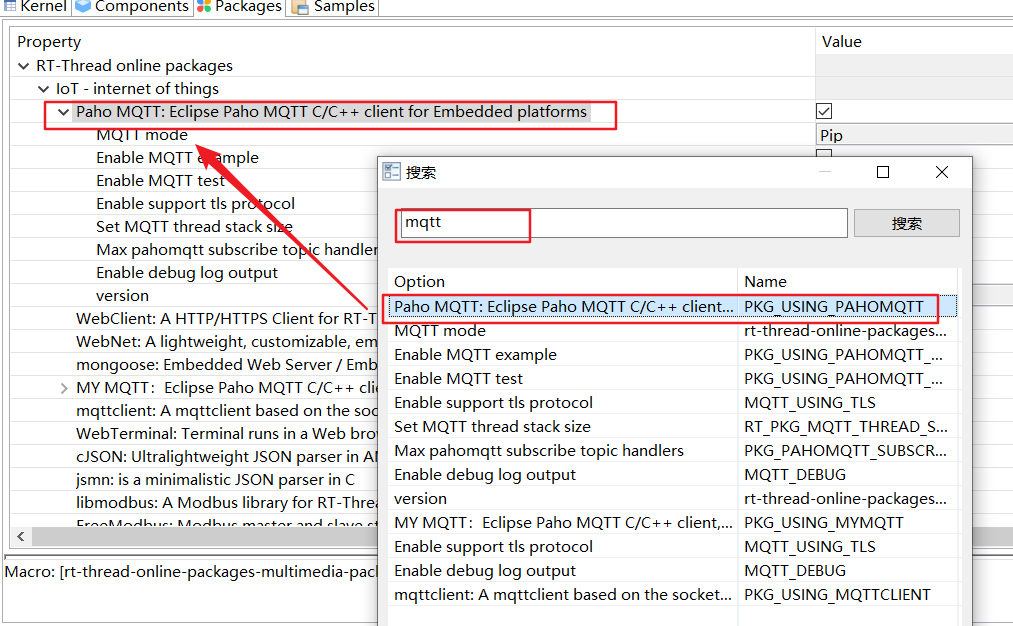
Search Configuration
When you need to search for a certain configuration, you need to select any configuration tree node in the details configuration, and then right-click, it will pop up the 'Search' menu, or after checking any configuration tree node in the details configuration, press the shortcut Ctrl + F to pop up the configuration search bar. Enter the keywords and click search to find all the matching configuration, in the results list selects different results to view, the configuration tree will automatically jump to the corresponding configuration location, as shown in the following image:
Save Configuration
When the configuration is modified, the RT-Thread Configuration label is dirty marked, and when the configuration is complete, remember to click the 'Save' button to save the configuration and apply it to the project. A progress box pops up when you save, prompting you to save progress, as shown in the following image:
CubeMX Configuration
RT-Thread Studio v2.1.0 is also in collaboration with STM32CubeMX, where you can open CubeMX Settings directly in RT-Thread Studio. RT-Thread Studio provides a quick configuration entry for the STM32CubeMX, which supports applying the configuration info of the STM32CubeMX to RT-Thread Studio projects instead of typing code manually, provided that the STM32CubeMX software is installed on your computer. Currently, it is available for RT-Thread Standard and RT-Thread Nano, the RT-Thread Smart is not yet supported.
Start STM32CubeMX
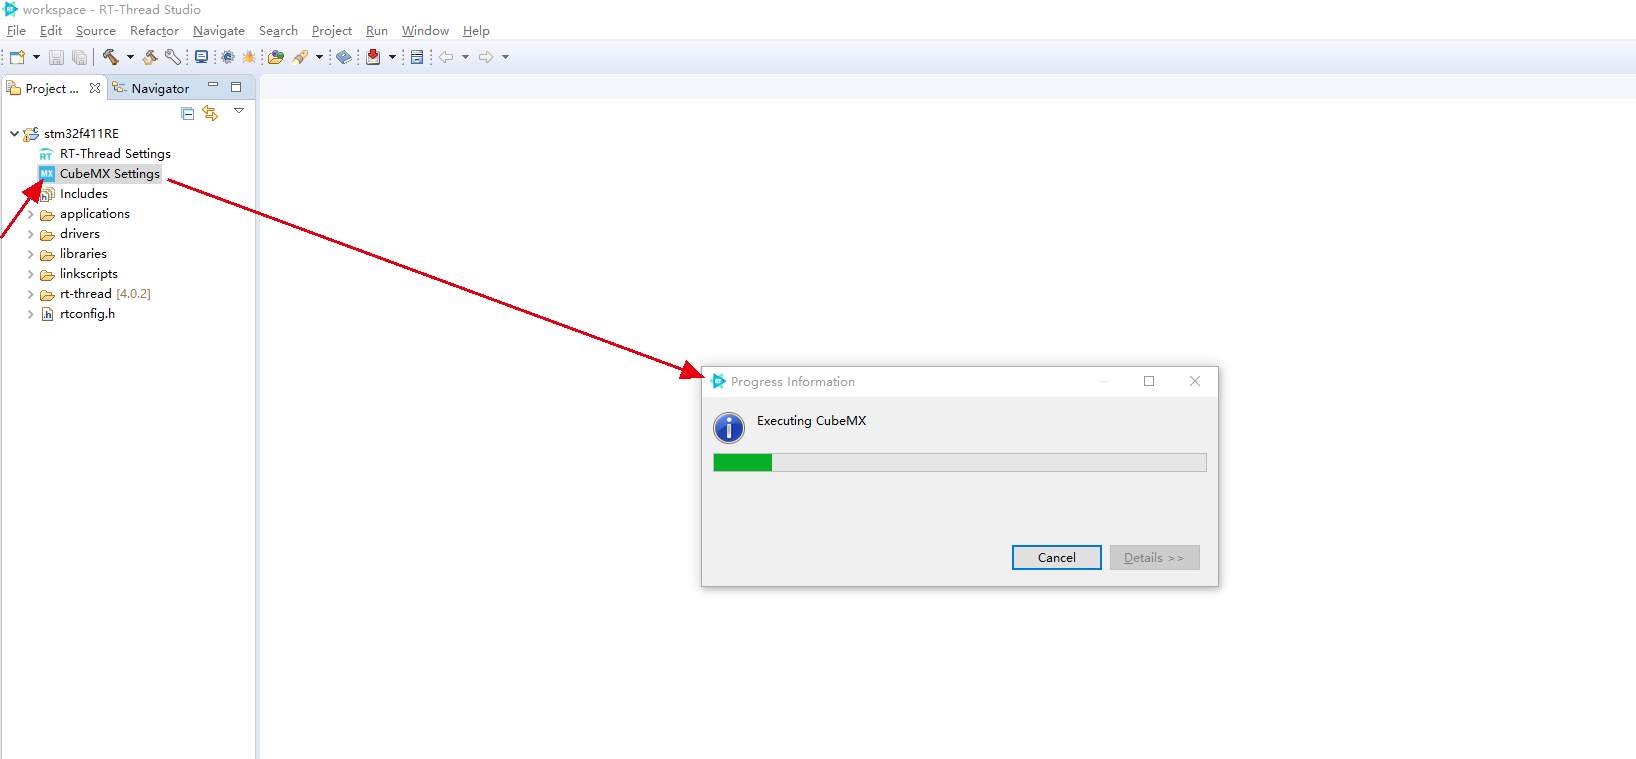
We're taking the example of stm32f411RE to demonstrate how to turn on the CubeMX configuration.
Double-click cubeMX Settings in the project catalog and you may find the progress box for executing CubeMX:
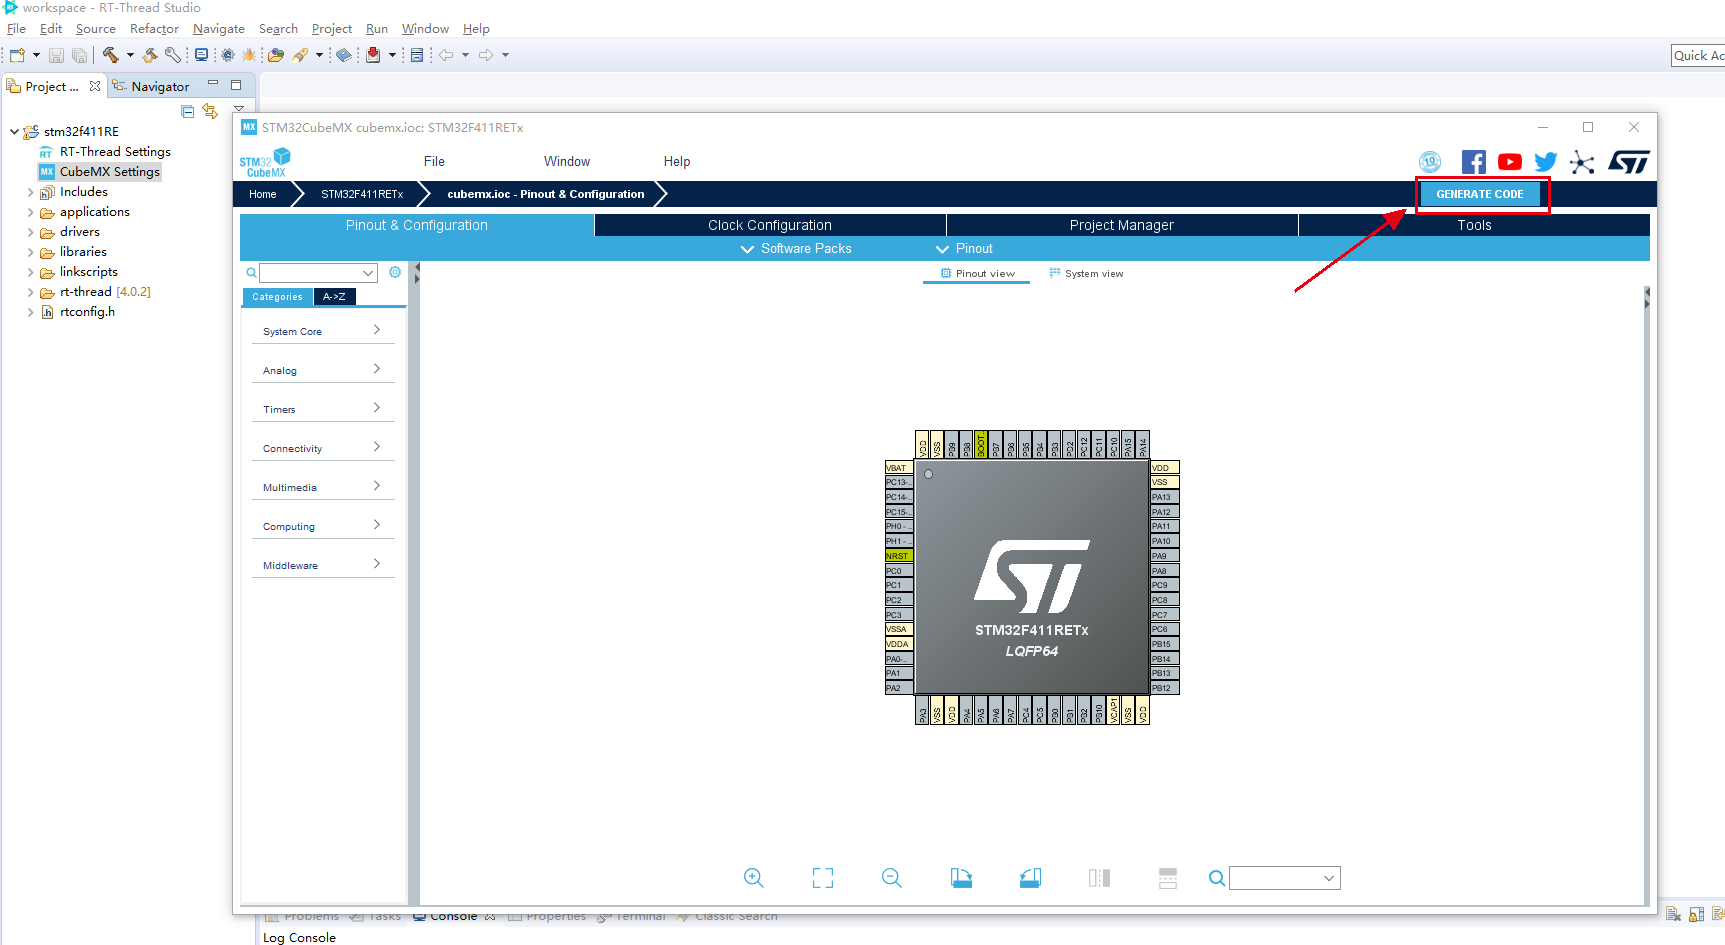
Configure STM32CubeMX
Configure according to your needs, once the configuration is completed, click GENERATE CODE, and then check out the button on the upper right corner to close:
STM32CubeMX will prompt a warning inform that cubemx.ioc has been modified and would you like to save the configuration or not, click Yes so that the configuration you do will take effect in RT-Thread Studio project:
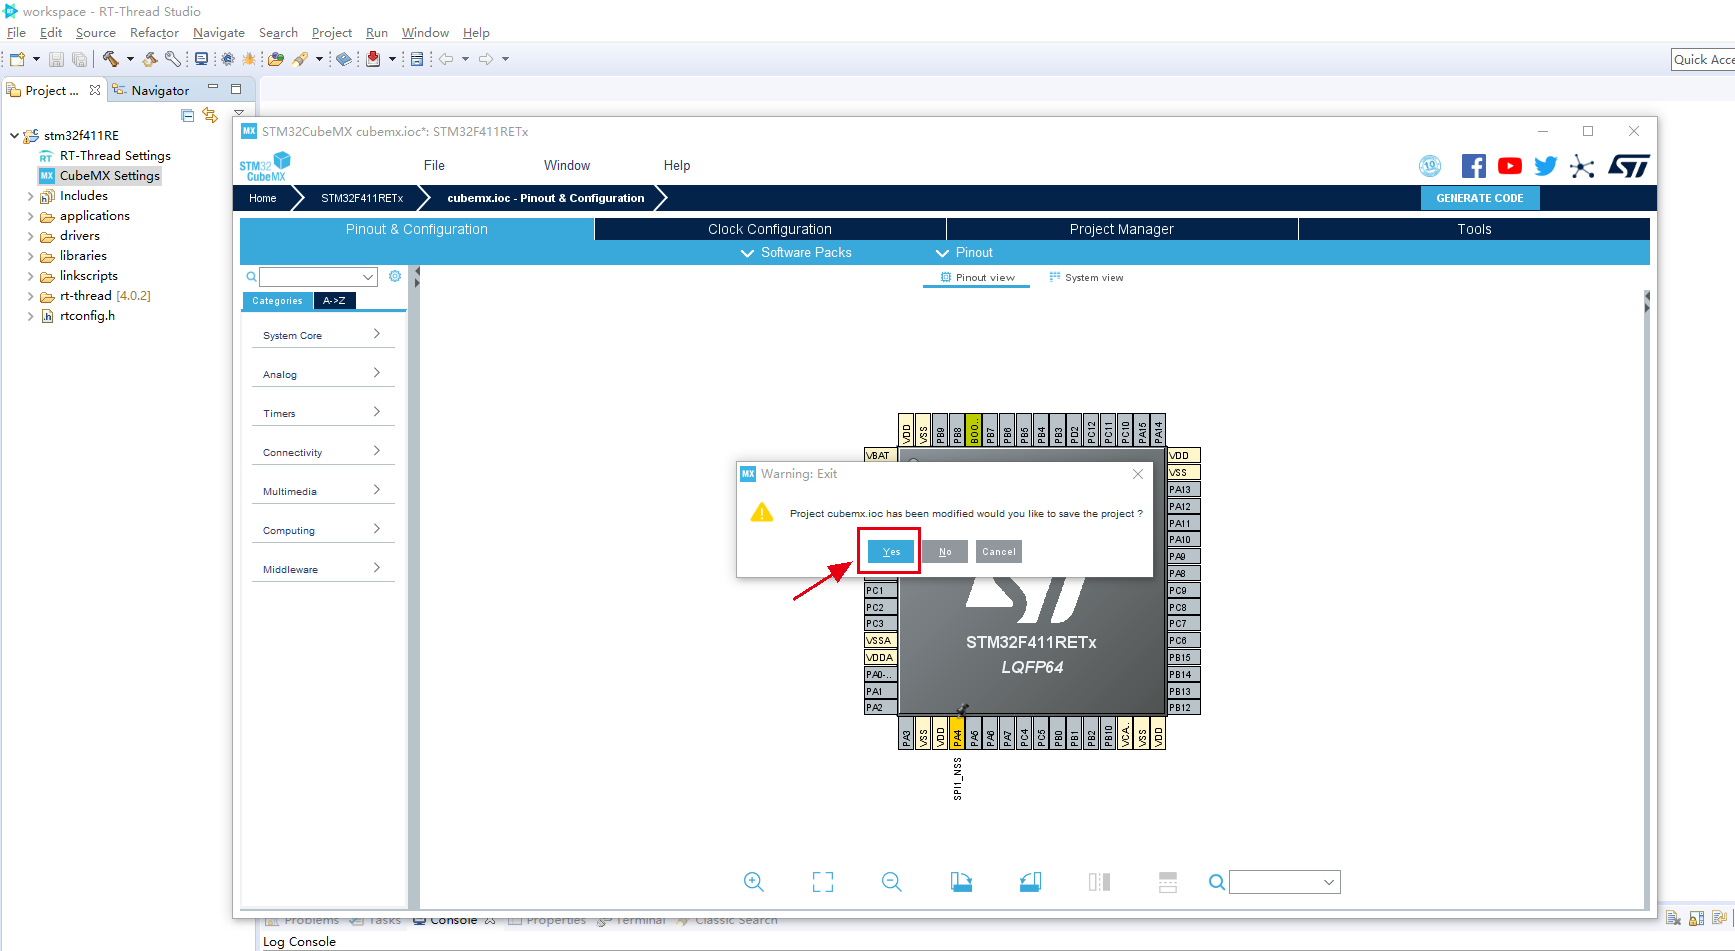
Check out the project catalog, you'll find that the code for STM32CubeMX is automatically generated in the project catalog, you can start compiling.

Build Configuration
The Entrance of Building Configuration
If you need to configure the build parameters for the project before building, click the 'Open Build Configuration' button on the toolbar to configure the project's build parameters, as shown in the following image:
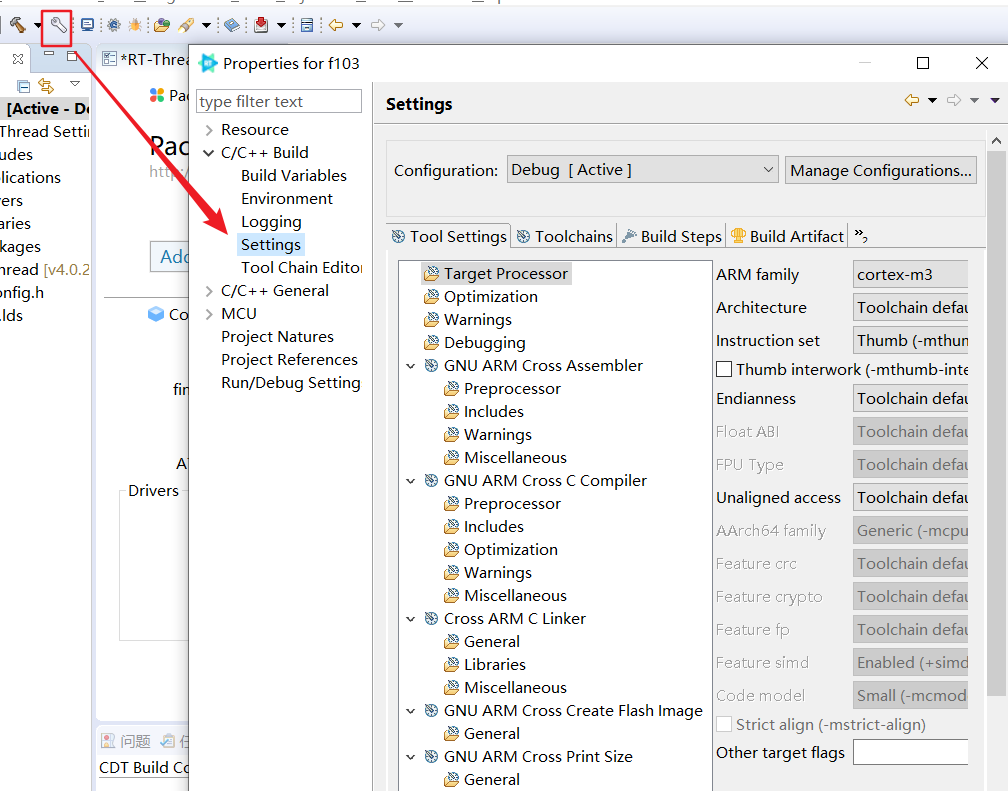
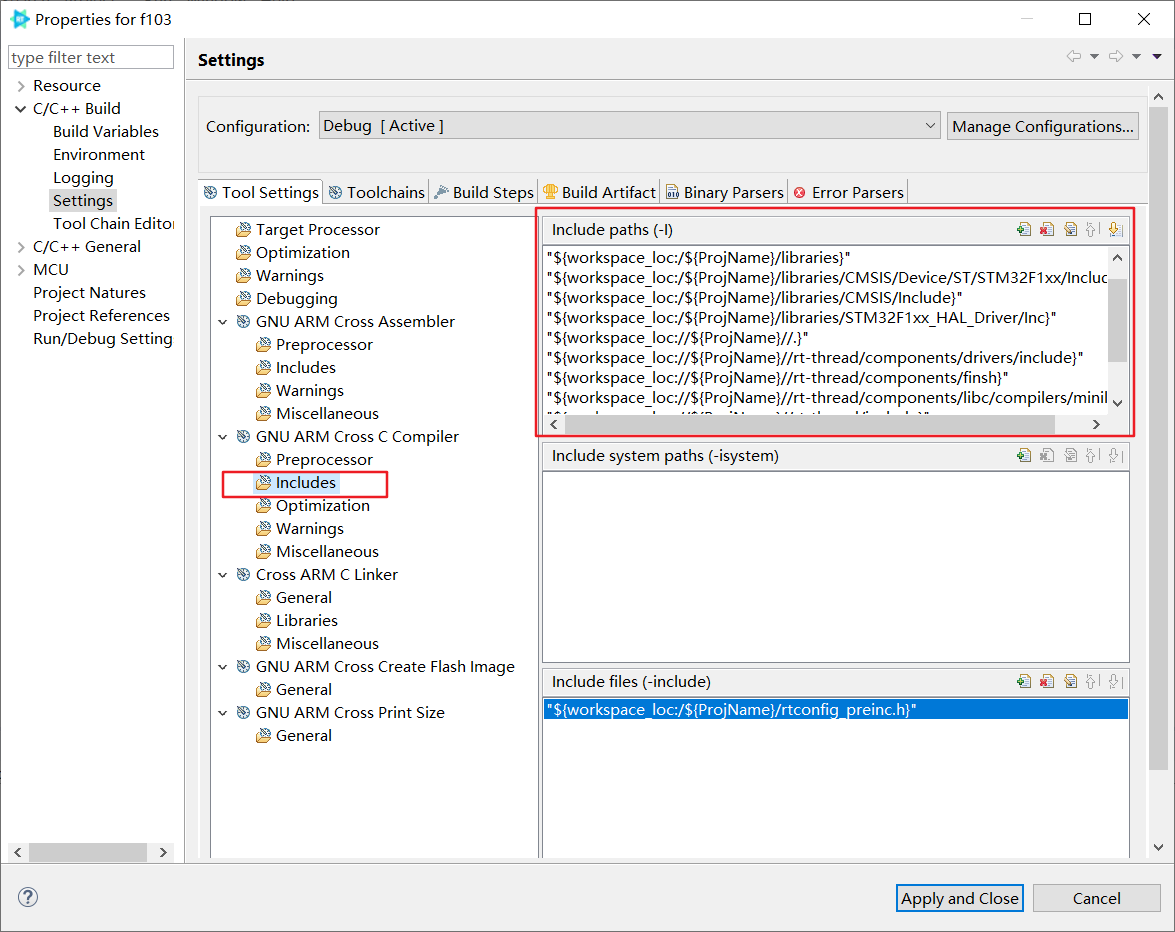
Configure Header File Includes
To add and delete the header file path, go to the 'Settings' configuration page, click on the Includesconfiguration item under GNU ARM Cross C Compiler to open the header file path configuration parameters, click on Inlucde paths(-I), the corresponding buttons in the configuration bar allow for the addition and deletion of the header file, as shown in the following image:
Configure Macro Definition
To add and delete macro definitions, go to the 'Settings' configuration page, click on the Preprocessorconfiguration item under GNU ARM Cross C Compiler to open the macro definition configuration parameters, click onDefine symbols(-D), the corresponding buttons in the configuration bar allow for the addition and deletion of the macro definition, as shown in the following image:

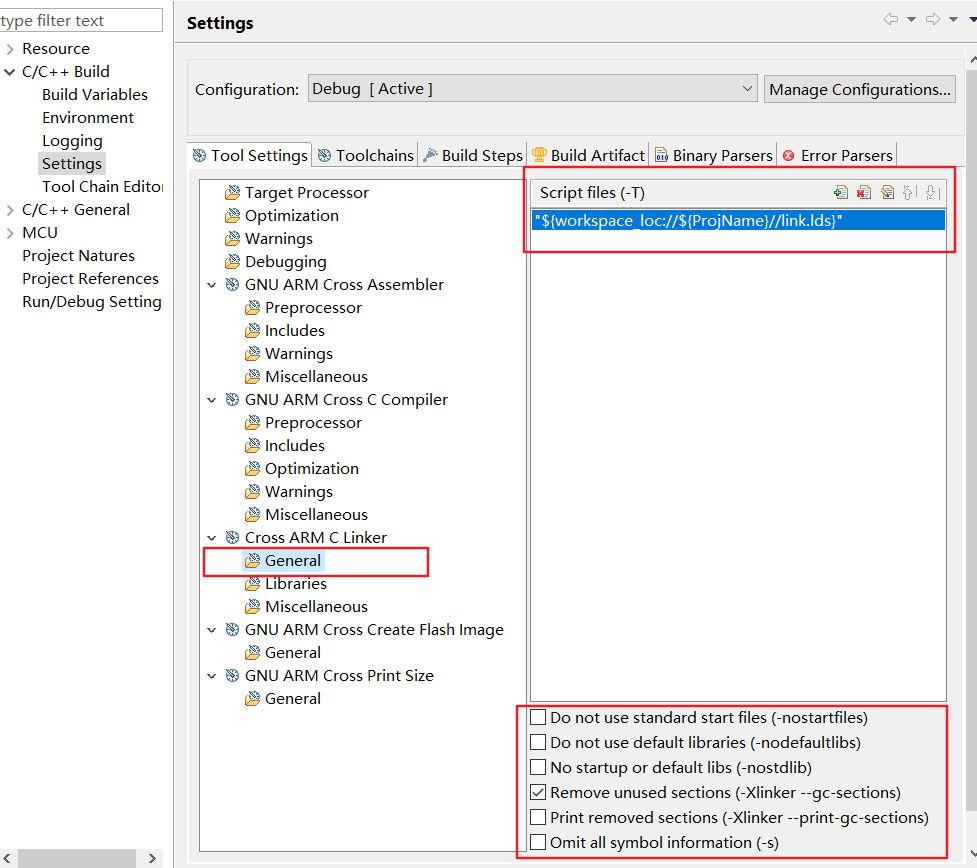
Configure Linker Script
To add and delete the linker script configuration, go to the 'Settings' configuration page, click on the General configuration under Cross ARM C Linker to set up the linker script file, click on the corresponding button in the Script files(-T)configuration bar to make the linker script addition and deletion. Some basic link parameters that can be configured under Script files(-T), which is shown as follows:
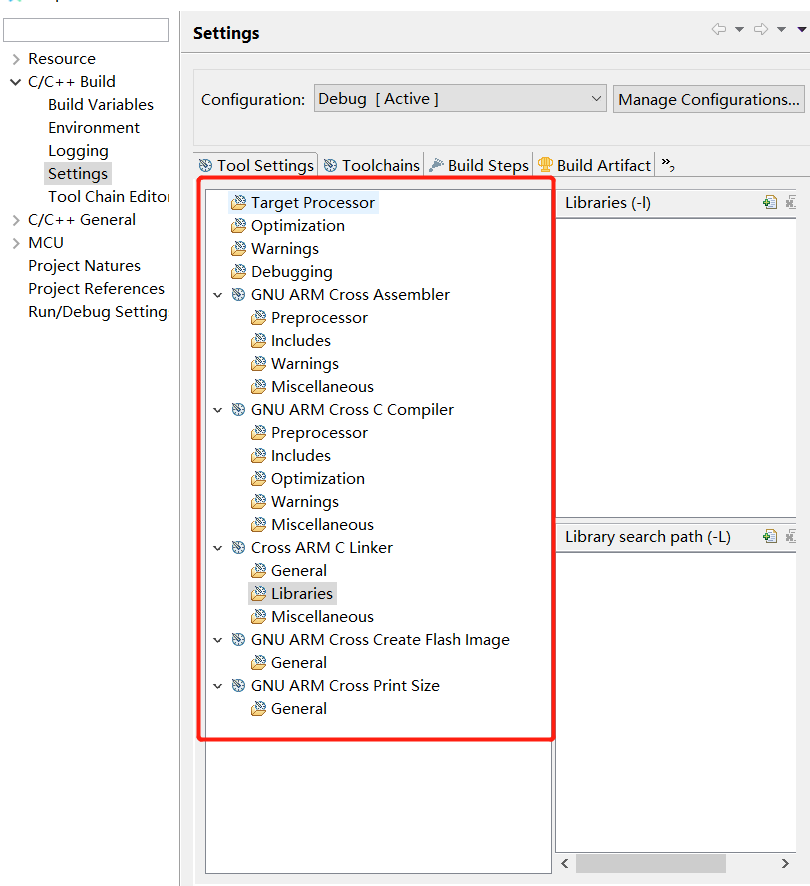
Configure Others
Configuring additional build parameters can directly select the appropriate type of the configuration tree node on the 'Settings' configuration page, and set the details configuration items as it provides, once the configuration is complete, click on the 'Apply and Close' button, the configuration is taking effect. As shown in the following image:
Debug Configuration
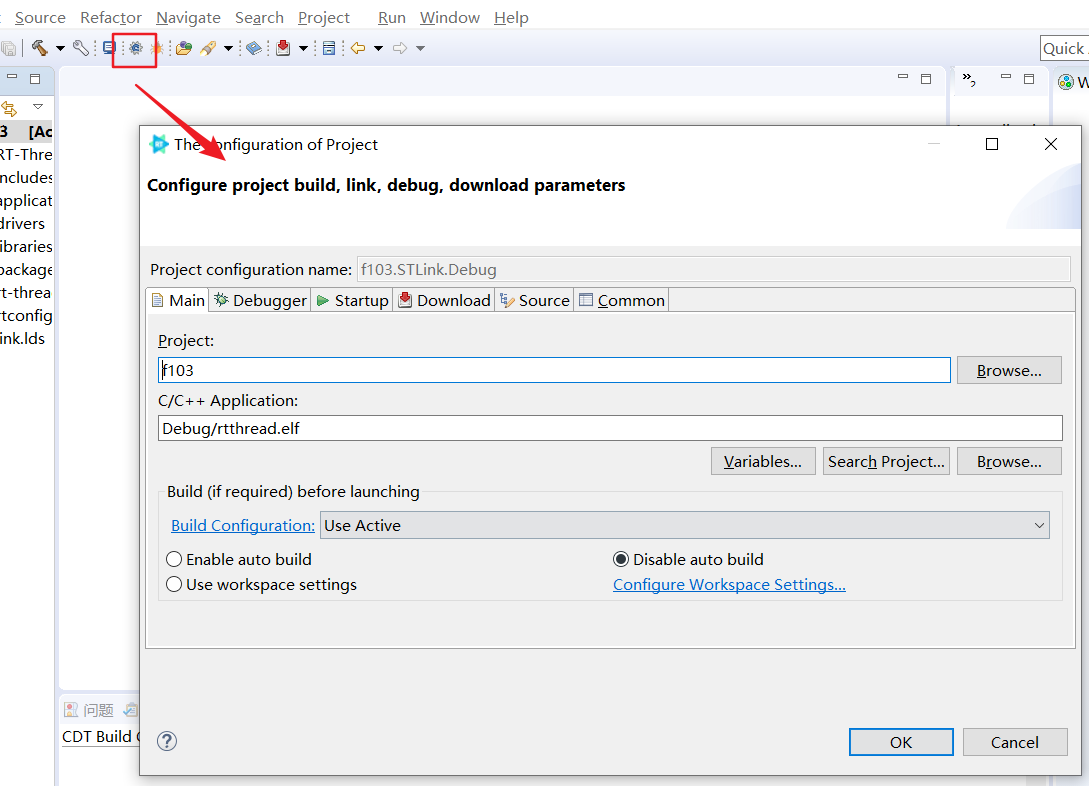
The Entrance of Debug Configuration
If you need to configure the relevant debug parameters for your project before downloading or starting debugging, you can open the debug configuration dialog interface by clicking the 'Debug Configuration button on the toolbar, as shown in the following image:
Download
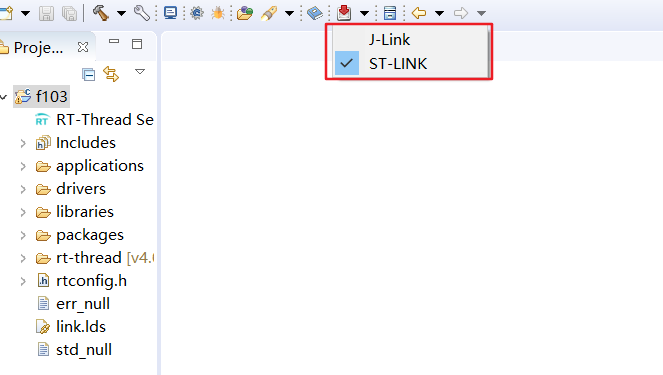
Switch Debugger
Currently, RT-Thread Studio supports JLink and ST-Link, the debugger can be selected in the new project wizard when you are creating new project. After the project is created, and if you want to switch the debugger, you can switch the debugger by using the triangular drop-down button next to the toolbar download button, as shown in the following image:
Debugging
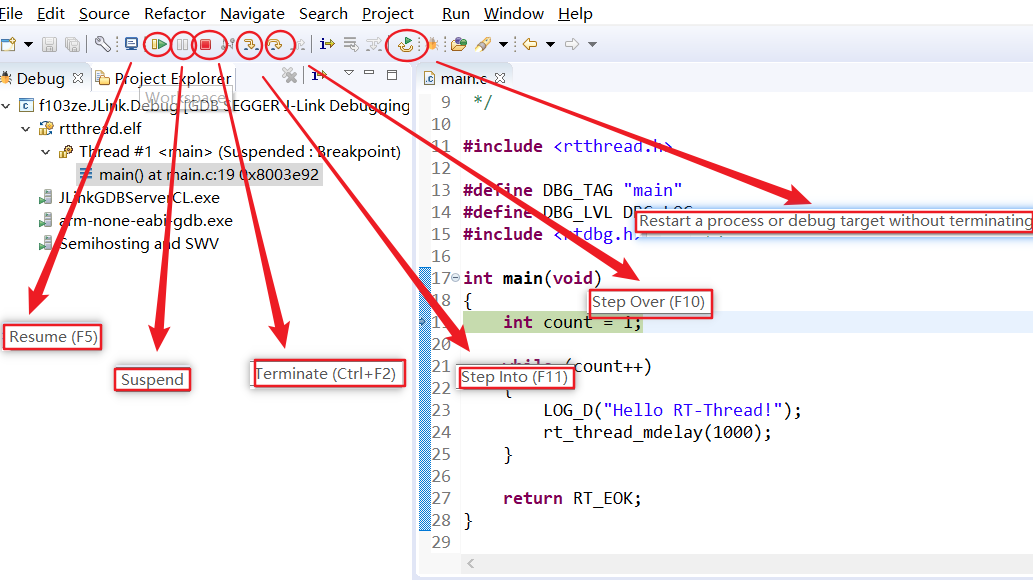
Debugging Common Operation
When debugging successfully startup, the program hangs at the main method, at this point, you can operate debugging with the debugging-related action buttons or shortcuts on the toolbar, as shown in the following image:
Enable Assemble Step Debugging Mode
Clicking on the 'Assemble Step Mode' button on the toolbar will automatically open the 'Disassembler' function window, at which point the 'Assemble Step Mode' button is in a concave state, representing system is currently under 'Assemble Step Mode, as shown in the following image:
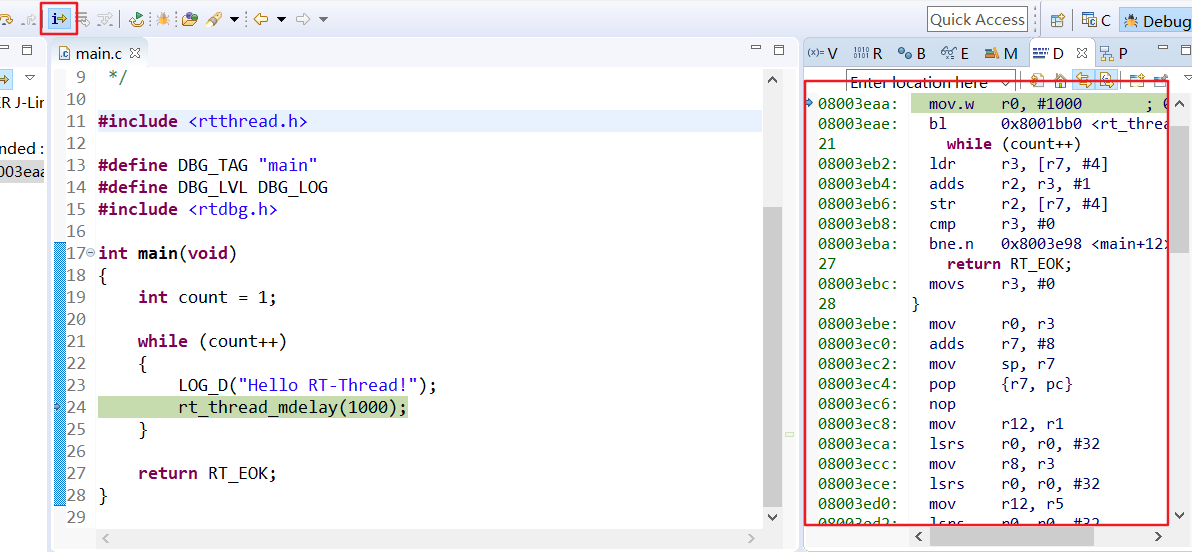
When entered 'Assemble Step Mode', all step debugging operations become a single step in one assemble instruction, where the instruction jump can be viewed in the 'Disassembler' window.
To exit 'Assemble Step Mode', just click the 'Assemble Step Mode' button again.
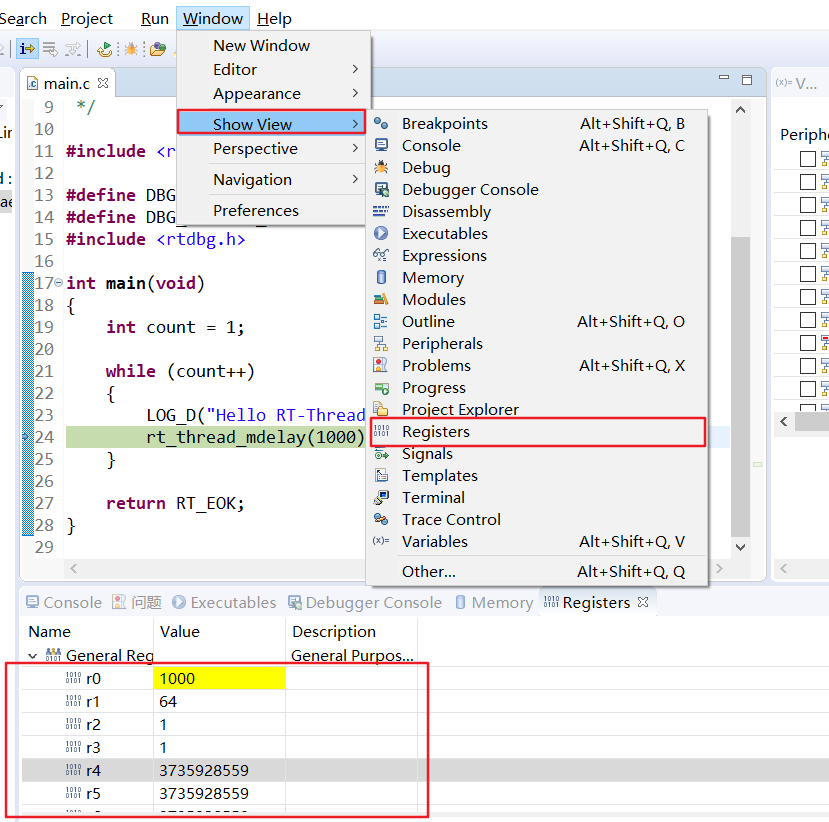
Check Register
Through the Show View submenu of the Window menu, select Registers to view the core registers, as shown in the following image:
Check Peripheral Register
Click on the 'Peripherals' window to show the 'Peripherals' window at the top, and if RT-Thread Studio has the appropriate svd file, the window will display all peripheral names and their addresses and descriptions. The peripheral you want to view can be checked in the 'Peripherals' window, and the memory window will display the names of all registers for the peripheral, and their addresses and current values, as shown in the following image:
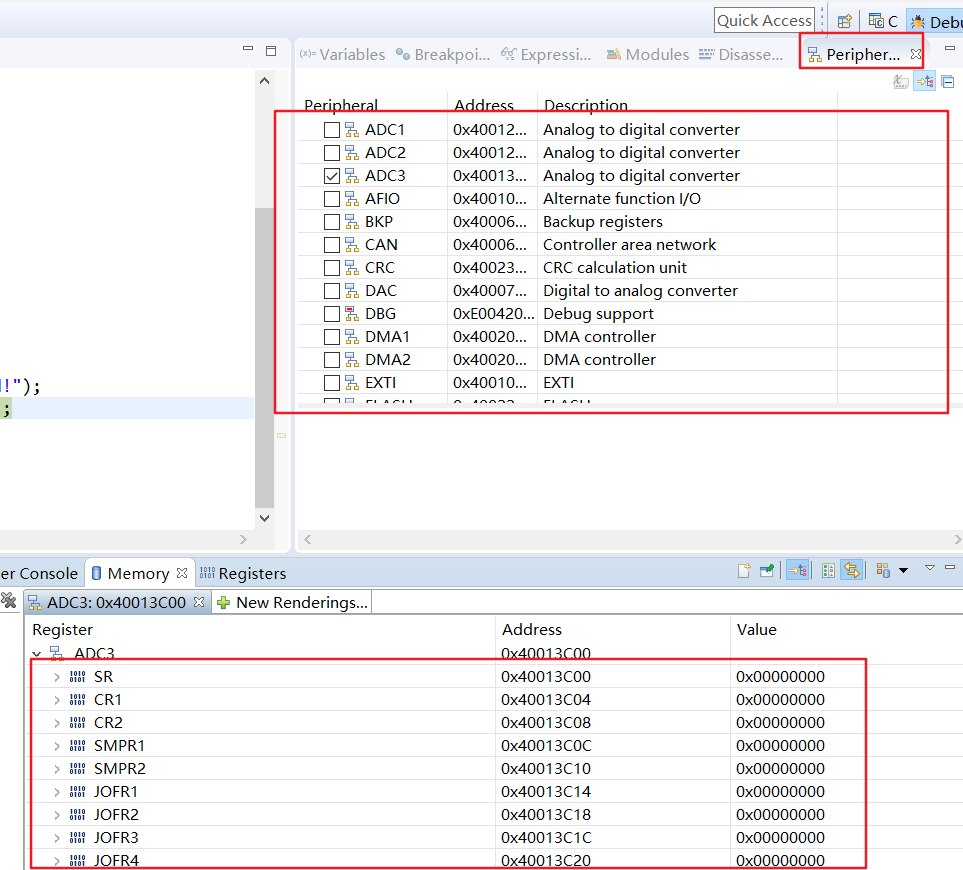
If you need to modify the current value of a register, you can click the column of the register Value and enter the value you want, and tap the enter key to modify. (Note: Only readable registers can modify values, and read-only registers cannot modify values.) )

Check Variable
Click on the Variables window to show the Variables window at the top, to see all the visible variables when the current program hangs, click on the Variables window on the right of the triangular drop-down menu, you can set the value format of the variable, as shown in the following image

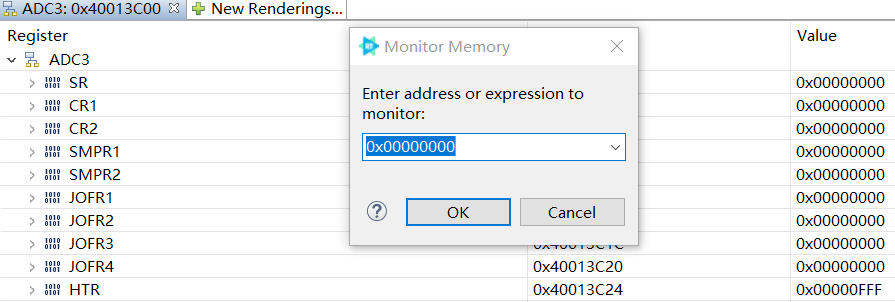
Check Memory
Click the 'Memory' window to show the 'Memory' window at the top. Click the 'Add Monitor Memory' button, enter the beginning address of the memory you want to view in the pop-up input box, and click 'OK', as shown in the following image:
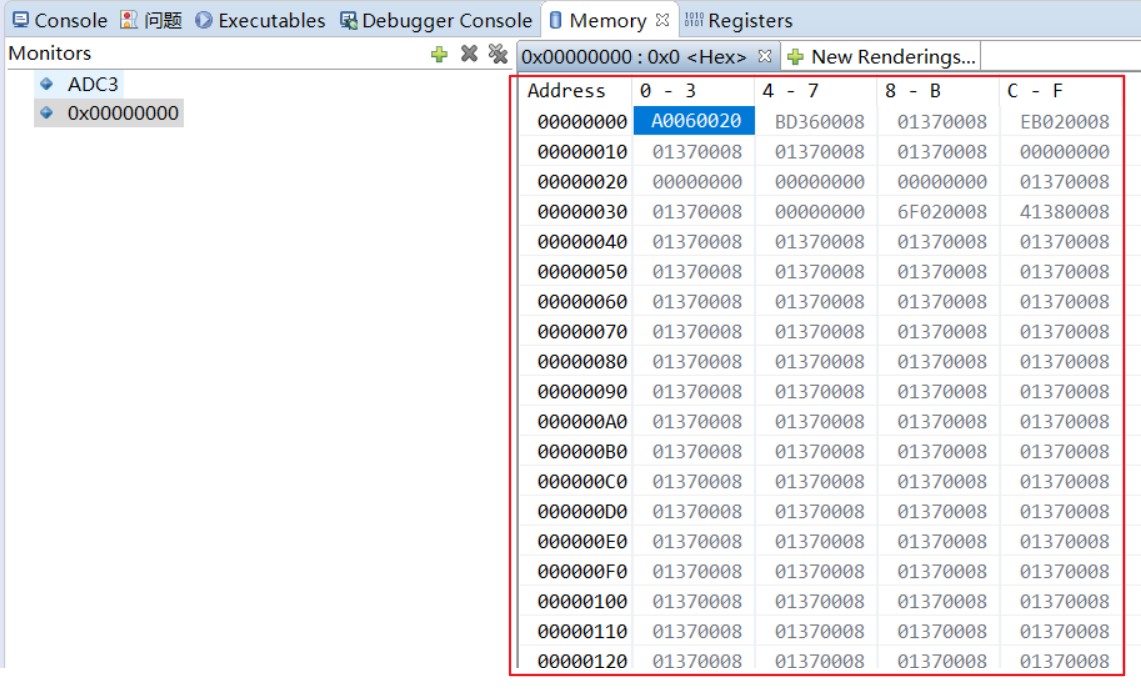
When you add a monitor memory, the memory window immediately shows a piece of memory from the beginning address of the memory you just entered, as shown in the following image:
Breakpoint
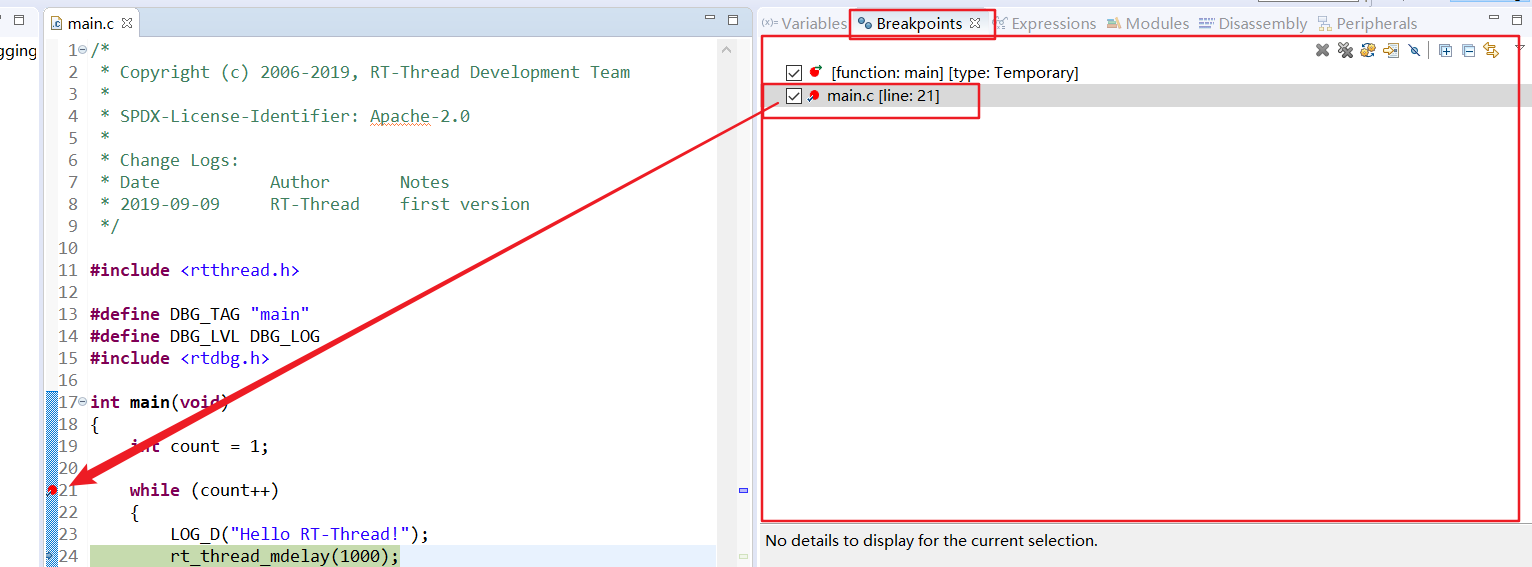
In the source editor window sidebar, double-click to set breakpoints, double-click again to delete breakpoints, open the 'breakpoints' window to view and manage all breakpoints, through the 'breakpoints' window toolbar can delete, cancel and process some other breakpoint management operations, as shown in the following image:
Expression
After selecting the expression within the source code, right-click and select 'Add Watch Expression' to add the expression to the 'Expression' window, or simply click on the 'Add New Expression' within the 'Expression' window to enter the value of the expression you want to view.

SDK Manager
SDK Manager Introduction
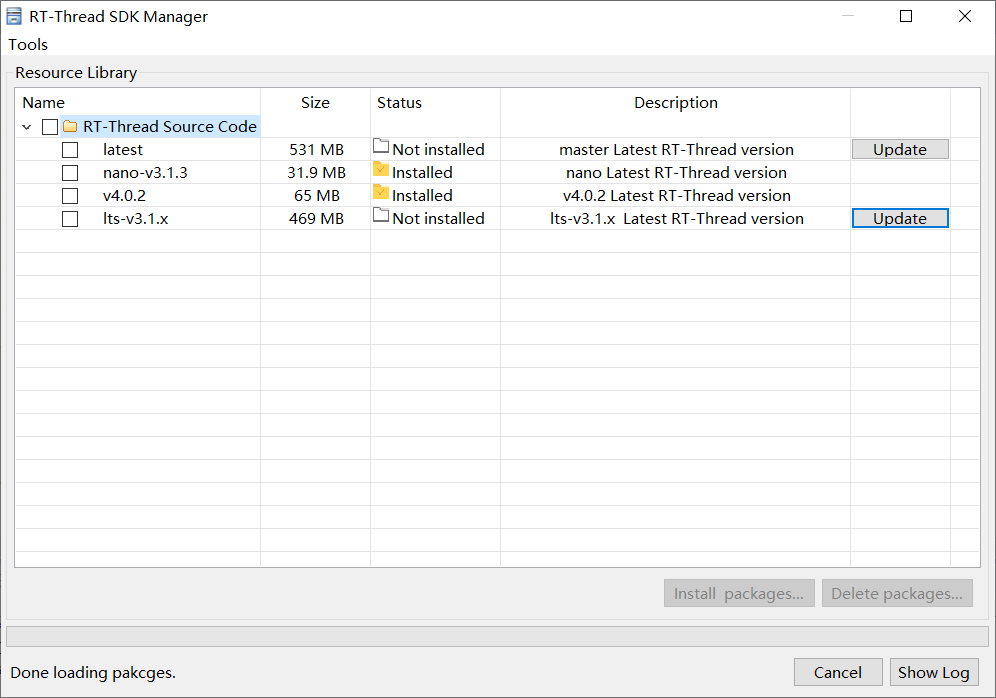
Maintain RT-Thread SDK resource packs inside RT-Thread Studio through SDK Manager, including installing, downloading, and upgrading various resource packs. The SDK Manager feature interface is opened via the SDK Manager button of the toolbar, as shown in the following image:
Make Board Supported Package(BSP)
This tutorial will introduce how to switch the BSP into RT-Thread Studio project, and then build on the Studio project to create a board resource pack by the tool.
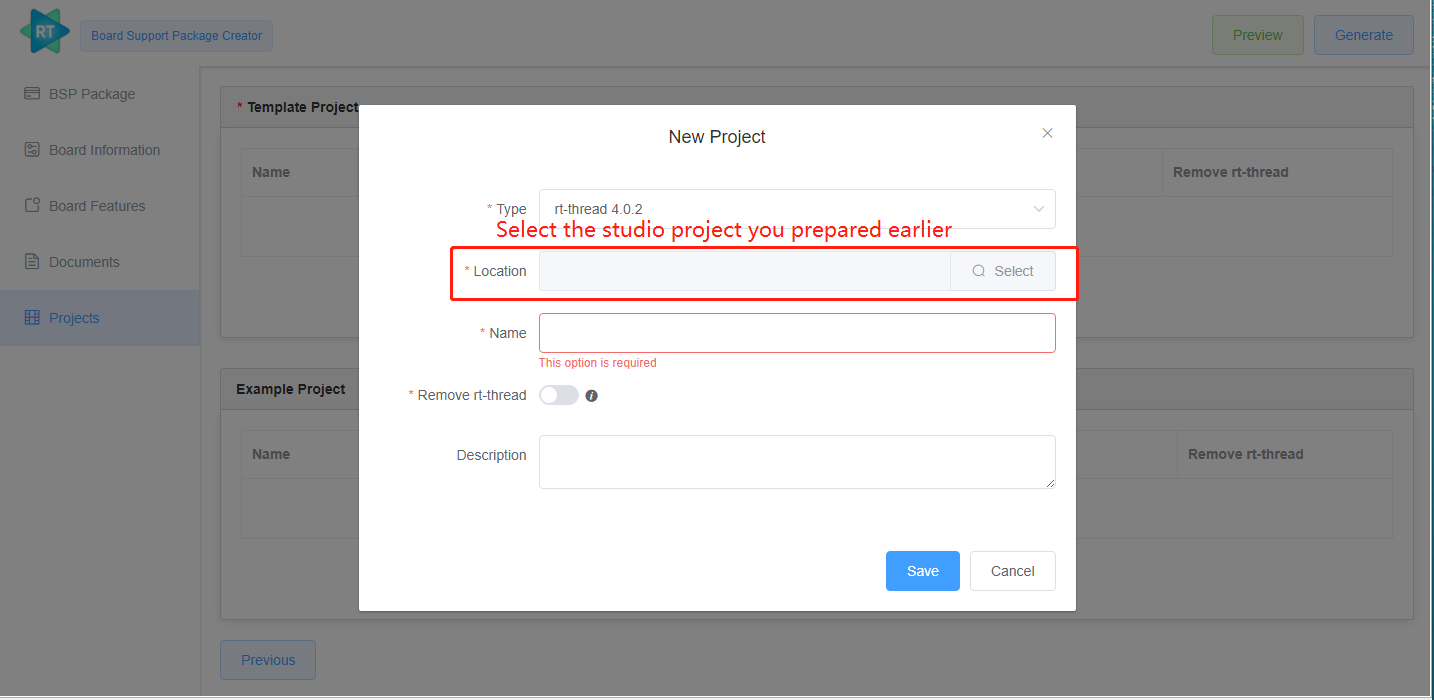
1. Make a Studio Project
Pre-conditions: RT-Thread versions after 2021-01-18 enhanced support for --dist-ide can convert a BSP to studio project via scons--dist-ide, using the following methods
- git pull syncs the latest rt-thread code
- Enter the directory of the bsp folder and open the env tool to enter
scons --dist-ide --project-path=dist_studio--project-name=project_name_xxxto generate the studio project
Preparation
- RT-Thread Studio V2.1.0 and its after version
- Studio project
- Basic info about the board, such as board name, vendor, debugger, debugging interface, etc.
- Basic info about the chip used in the development board, such as chip manufacturer, chip name, etc.
- The pictures of dev board, a large size and a small size, the small size can be 200x300
- The documentation for the board
2. Get Started
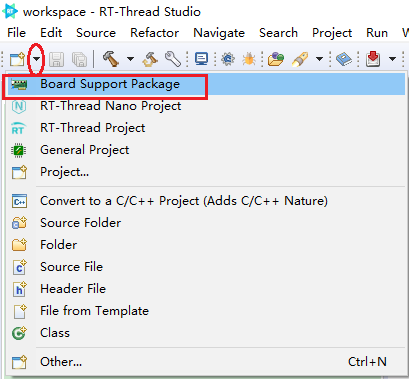
Open Studio, click New button in toolbar and select Board Support Pack.
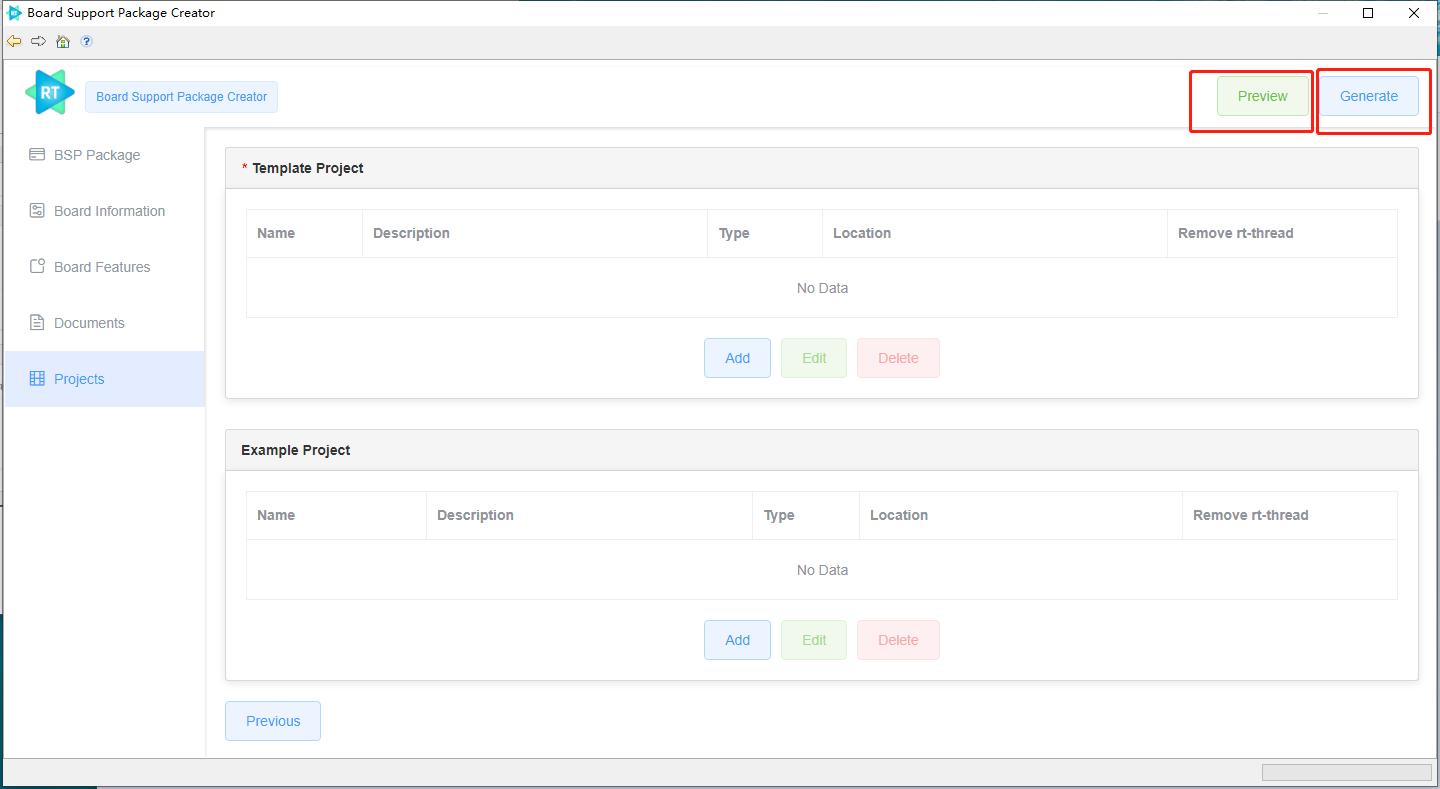
Then you come to the Package Production tool page, there's a total of five columns of information need to be filled in, * required fields.

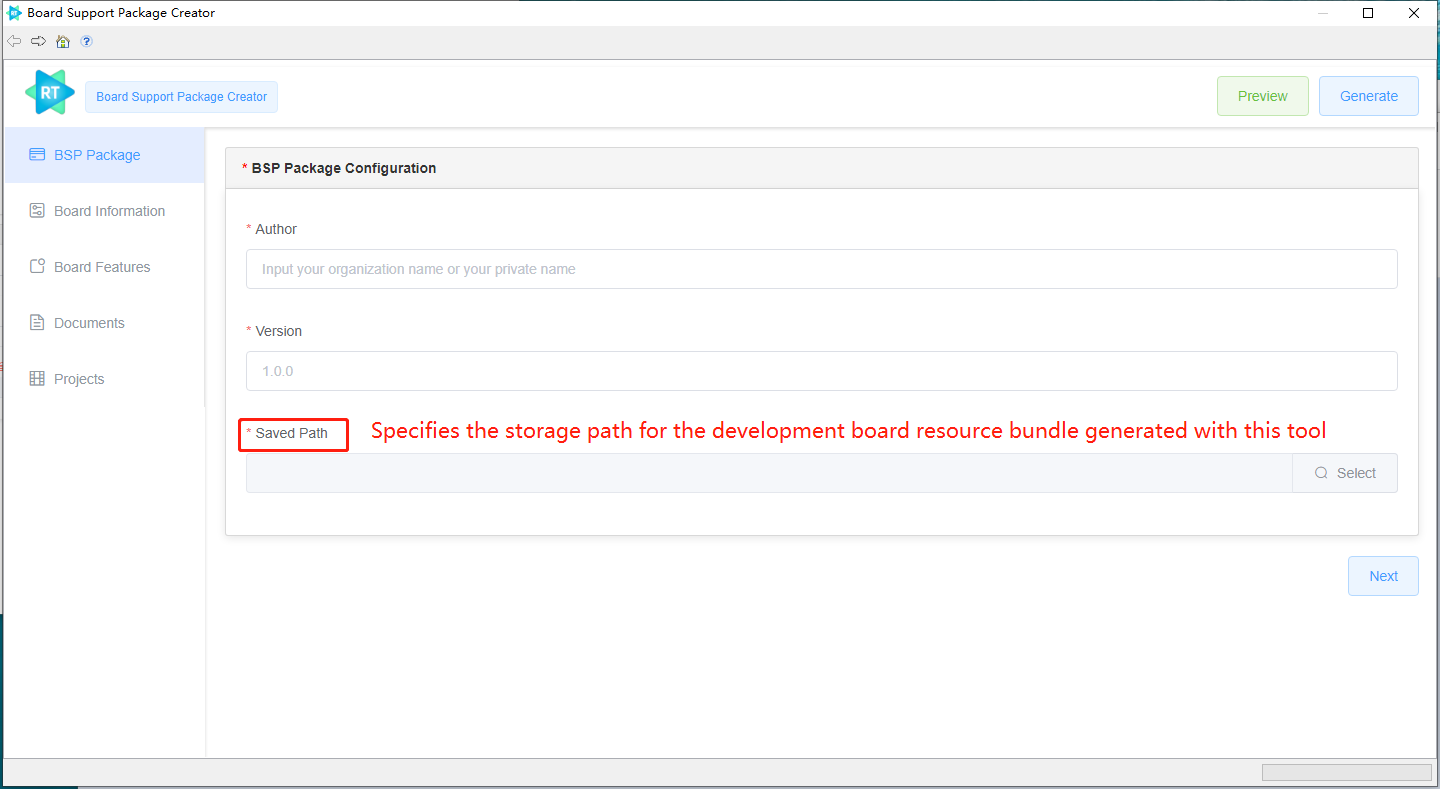
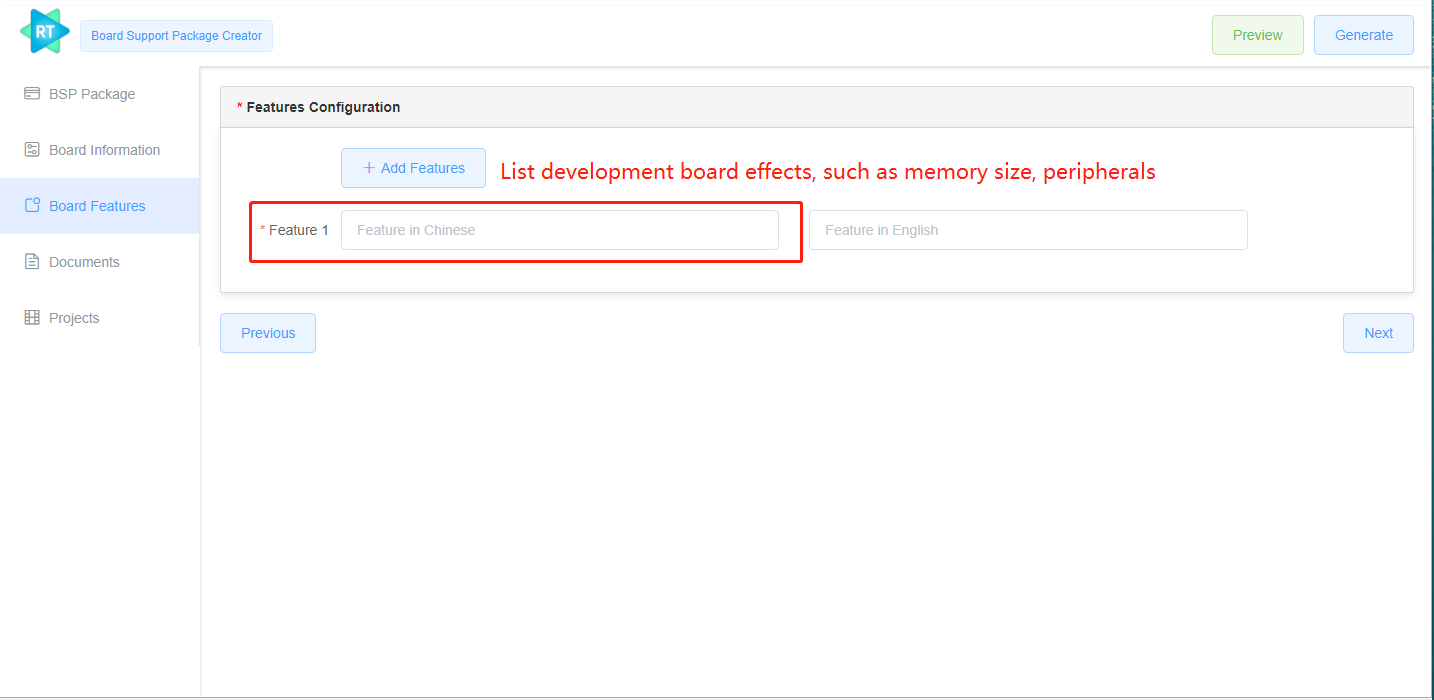
After filling out the infomation, you can click the Preview button in the upper right corner to check that the board information is filled in correctly. Clicking the Generate button can generate the board resource pack.
3. Deploy the BSP to SDK Manager
Create a New repository in GiThub to store the well-made board supported package that needs to be in the following format:
- The name of the repository should with "sdk-bsp-", e.g. sdk-bsp-stm32h750-realthread-artpi
- The board support package description file (yaml) needs to be located at the root of the repository
Reference: https://github.com/RT-Thread-Studio/sdk-bsp-stm32h750-realthread-artpi
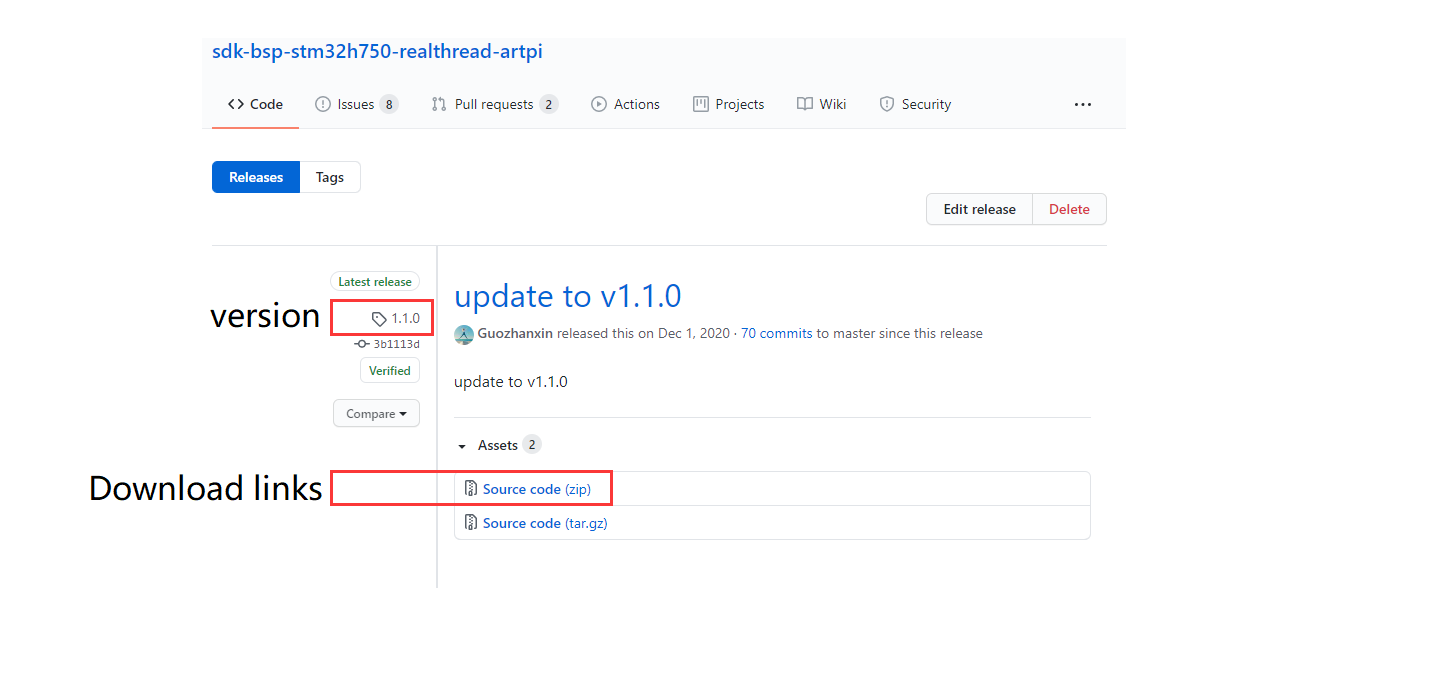
Push the BSP into GiThub repository and release it according to the following format:
- Release version tag should consistent with the pkg version in yaml and must be formatted in three digits . [0-9]. 0-9, e.g. 1.0.0
- Record the download link for Source code, which you can use in the next steps
- Fork a copy of RT-Thread Studio's SDK index https://github.com/RT-Thread-Studio/sdk-index to your personal GiThub account
- Add a new board information under
sdk-index/Board_Support_Packagesin the local sdk-index repository - Check if
Board_Support_Packageshas the chip folder for the newly added BSP, and if not, add a new chip vendor folder with reference to the existing chip - In the chip vendor folder, check if there are development boards that need to be added, and if not, refer to other boards to add one
- In the folder of the dev board, add a new board support package release information, url is a download link to Source code when it is releasing
{
    "name": "STM32H750-RT-ART-Pi",
    "vendor": "RealThread",
    "description": "STM32H750-RT-ART-Pi Board Support Packages",
    "license": "",
    "repository": "https://github.com/RT-Thread-Studio/sdk-bsp-stm32h750-realthread-artpi.git",
    "releases": [
        {
            "version": "1.1.0",
            "date": "2020-12-01",
            "description": "released v1.1.0",
            "size": "152 MB",
            "url": "https://github.com/RT-Thread-Studio/sdk-bsp-stm32h750-realthread-artpi/archive/1.1.0.zip"
        },
        {
            "version": "1.0.1",
            "date": "2020-10-23",
            "description": "released v1.0.1",
            "size": "136 MB",
            "url": "https://github.com/RT-Thread-Studio/sdk-bsp-stm32h750-realthread-artpi/archive/1.0.1.zip"
        }
    ]
}
- Notes:
- No non-ascii characters appear in the index repository
- The BSP name characters need combines capital letters and midscore
- Push the modified sdk-index repository to GiThub and submit a PR to the official sdk-index
- After the PR is merged, the board support package will be updated in Studio's SDK Manager interface
Common Used Shortcuts
Code Reading
-
Ctrl+H Global Open Search Dialog
-
Ctrl+Shift+T Global Open Type
-
Ctrl+Shift+R Global Open Resources
Code Editing
-
Ctrl+D Delete the current line
-
Ctrl+/ Comment the current line, and double-click to cancel comment
-
Ctrl+Shift+F Formating
-
Alt+→ /← Global Forward/Back record
-
Ctrl+Q Locate the place where the final editor is
-
Ctrl+K Quickly navigates to the next word with the selected Word
-
Ctrl+L Positioned in a specific line
-
Alt+→ /← Check the previous/next edited page
-
Shift+Enter Insert an empty line on the next line of the current line