This project is working with RT-Thread v4.1.0, the latest LVGL graphics libraries can be supported through simple configuration, LVGL graphics libraries are added to the project as a package!

Preamble
● This project is working with RT-Thread v4.1.0, the latest LVGL graphics libraries can be supported through simple configuration, LVGL graphics libraries are added to the project as a package!
● LVGL is an excellent open-source and free GUI graphics library. It has a small memory footprint and is suitable for embedded devices.
Development Environment
When it comes to developing hardware products, the debugging process can be a bit of a hassle. With circuit board-based debugging, you need to constantly verify the page display effect by compiling and downloading the program, which can be quite time-consuming and inefficient.
But don’t worry, there are other ways to develop and debug your product! For instance, you can use LVGL’s official simulator for simulator-based development and debugging. This is a great way to save time and increase your development efficiency.
Another option is to use the RT-Thread simulator. This simulator is based on the RT-Thread operating system, which means you can develop your LVGL program on this simulator, verify it, and then change the compiler to download the debugger. This way, you can quickly verify it on the RT-Thread operating system hardware board!
Minimum RT-Thread System
● If you’re looking to build an RT-Thread minimal system, you can opt for the RT-Thread kernel and BSP simulator. This will help keep the size of your system relatively small, while also allowing you to use code search, project management, Git and other software version control tools.
● To get started, create a new project directory. Then, under the project directory, create a new rt-thread and simulator directory. This will help you keep your project organized and easy to manage.
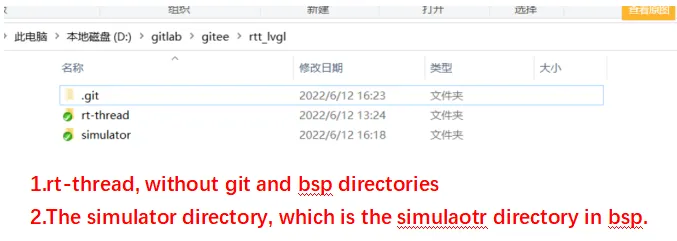
● If you’ve recently changed directories, you may have noticed that RT-Thread menuconfig and scons builds are now reporting path errors. But don’t worry, this is a simple fix! All you need to do is update the paths in your configuration files to reflect the new directory structure. Once you’ve done that, you should be good to go!

Open LVGL
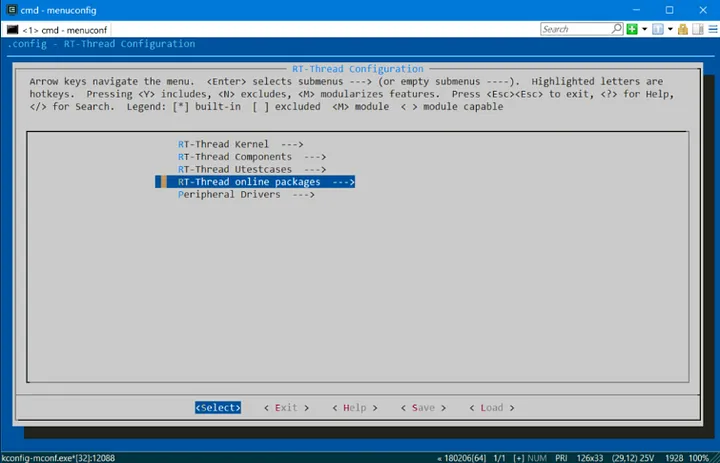
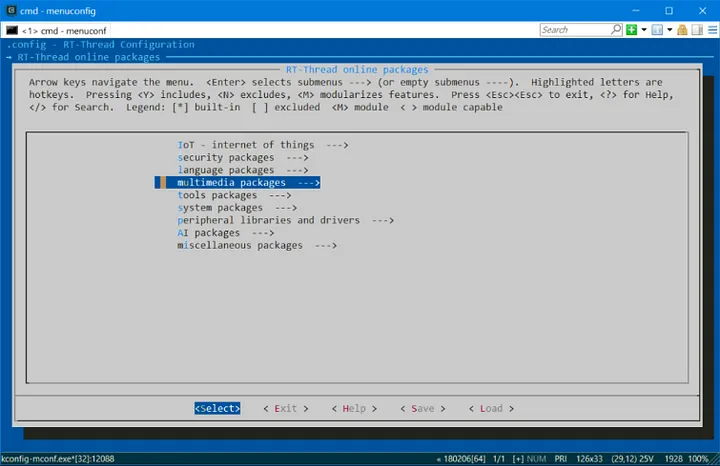
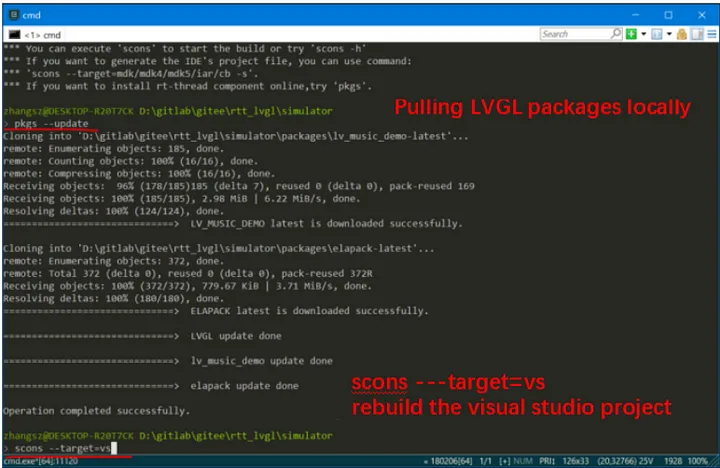
● If you’re looking to use LVGL with RT-Thread, you’ll need to enable the LVGL package and pull the remote package to your local directory. This will allow you to use LVGL with RT-Thread and take advantage of all its features.
● RT-Thread ENV tool: menuconfig -> RT-Thread online packages — -> -> multimedia packages — ->
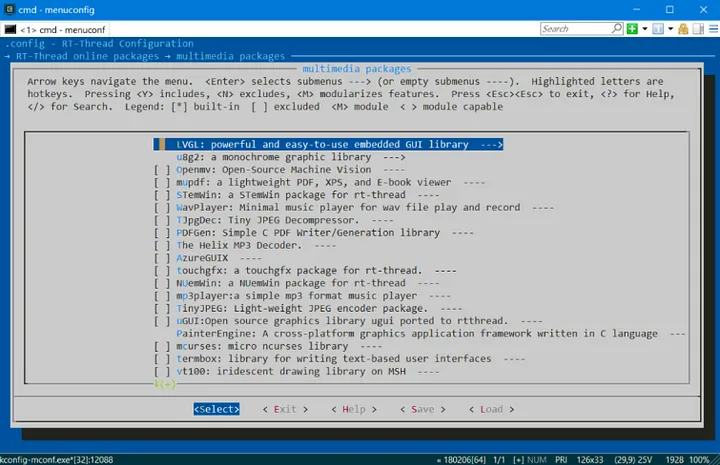
● It’s important to note that simply turning on the LVGL package configuration will result in an error when compiling. This is because turning on the package configuration only enables the LVGL package, but doesn’t pull it locally.
● To fix this, you’ll need to use the RT-Thread ENV tool and run the command pkgs — update to pull the LVGL package locally. This will ensure that you can use LVGL with RT-Thread without any issues.
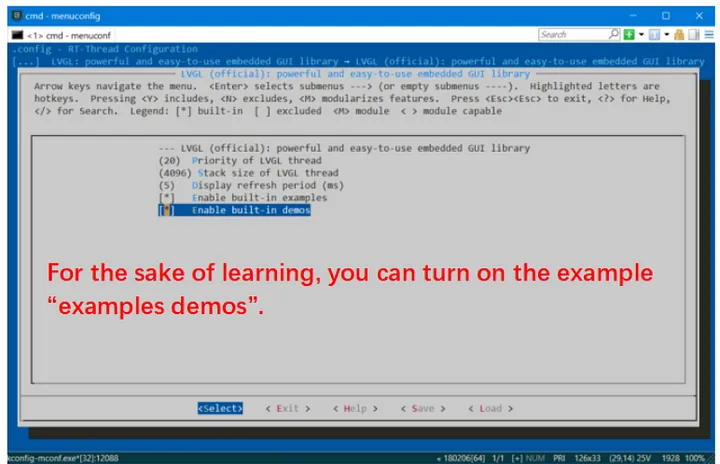
● Note that even though the LVGL package is available, you may still encounter compilation errors. This is because you need to turn on the [BSP_USING_LVGL] macro, which enables the RT-Thread Demo configuration for LVGL. Once you’ve turned on this macro, you should be able to use LVGL with RT-Thread without any issues.
● Once you’ve made changes to your menuconfig, you can save them and run the RT-Thread ENV tool again. This time, use the command scons — -target=vs to generate a Visual Studio project. I recommend using Visual Studio 2022 to open the project.vcproj file.
● Once you’ve compiled your project, it’s ready to be debugged and run. Happy coding!
Button Demo
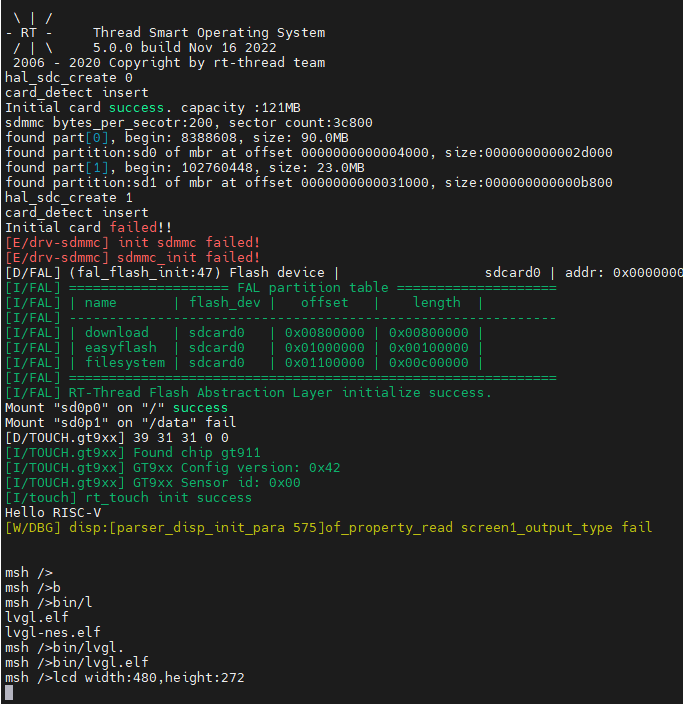
● When it comes to learning new things, it’s always best to take things step-by-step. So, let’s start by running a simple button display demo.
● To add the demo of the button display, you’ll need to modify lv_user_gui_init in simulator\applications\lvgl\demo\lv_demo.c. This will help you get started with LVGL and give you a better understanding of how it works.
1void lv_user_gui_init(void)
2{
3 /* display demo; you may replace with your LVGL application at here */
4 //extern void lv_demo_music(void).
5 //lv_demo_music().
6 extern void lv_example_btn_1(void).
7 lv_example_btn_1().
8}
● Running effects:

Summary
● If you’re looking to create new demo files based on LVGL demos, you can do so by copying the relevant code, modifying it, and running it. This is a great way to get started with LVGL and learn more about how it works.
● One of the best things about the PC-based RT-Thread simulator is that it doesn’t require frequent downloads. This means that you can compile and run your code immediately after modifying it, which can greatly improve your efficiency when it comes to running, verifying, and debugging your code.
Let’s Connect!
This Halloween, we’re excited to announce the RT-Thread Hack Halloween Event! We invite you to create anything on RT-Thread and share it with our community on the RT-Thread Club.

Hello RT-Thread Engineers,
This Halloween, we’re excited to announce the RT-Thread Hack Halloween Event! We invite you to create anything on RT-Thread and share it with our community on the RT-Thread Club.
How to Participate:
-
Create a project using open-source RT-Thread RTOS. It could be anything — a new application, an interesting algorithm, or even a spooky Halloween-themed creation!
- Share your project on the RT-Thread Club or any platform and email to RT-Thread at contact@rt-thread.org.
- Include a brief description of your project, how you created it, and any challenges you overcame.
The most innovative and engaging project will win an RT-Thread Art-Pi STM32H750 Board or an RA6M3 HMI Board! 🏆 They are also available to order on RT-Thread Aliexpress Store.
We can’t wait to see what you’ll create.
Let’s make this Halloween a Hack-o-ween! Happy hacking!
Author: Jiligulu
I’ve recently decided to start working on a small car powered by a brushless motor. Instead of using an existing solution, I plan to start from scratch and develop my own. For the hardware, I’m considering using the GD32E503 and EG2134 gate drive ICs among other components. This presents a challenge as it’s not easy to run SimpleFOC quickly with Arduino for prototyping. Therefore, I’m thinking of developing the software based on the open-source operating system RT-Thread. This way, I only need to port some hardware drivers and algorithms like FOC and Kalman filter. Many other features can be implemented using RT-Thread components, avoiding the cost of reinventing the wheel 😅. My goal in playing with this small car is to delve deeper into control algorithms. The entire development cycle of this small car may be quite long, at least measured in years. Firstly, because I’m quite busy with work and can only use some spare time to work on it. Secondly, because I plan to learn as I go, researching interesting areas in depth rather than rushing through. I’ll document the entire development process. The documentation in the form of pictures and text will likely be recorded on the RT-Thread forum. I hope interested folks can join me in this endeavor, and you’re free to choose your own hardware.
Author: Jiligulu
Introduction
I’ve recently decided to start working on a small car powered by a brushless motor. Instead of using an existing solution, I plan to start from scratch and develop my own. For the hardware, I’m considering using the GD32E503 and EG2134 gate drive ICs among other components. This presents a challenge as it’s not easy to run SimpleFOC quickly with Arduino for prototyping. Therefore, I’m thinking of developing the software based on the open-source operating system RT-Thread. This way, I only need to port some hardware drivers and algorithms like FOC and Kalman filter. Many other features can be implemented using RT-Thread components, avoiding the cost of reinventing the wheel 😅. My goal in playing with this small car is to delve deeper into control algorithms. The entire development cycle of this small car may be quite long, at least measured in years. Firstly, because I’m quite busy with work and can only use some spare time to work on it. Secondly, because I plan to learn as I go, researching interesting areas in depth rather than rushing through. I’ll document the entire development process. The documentation in the form of pictures and text will likely be recorded on the RT-Thread forum. I hope interested folks can join me in this endeavor, and you’re free to choose your own hardware.
Preliminary Work
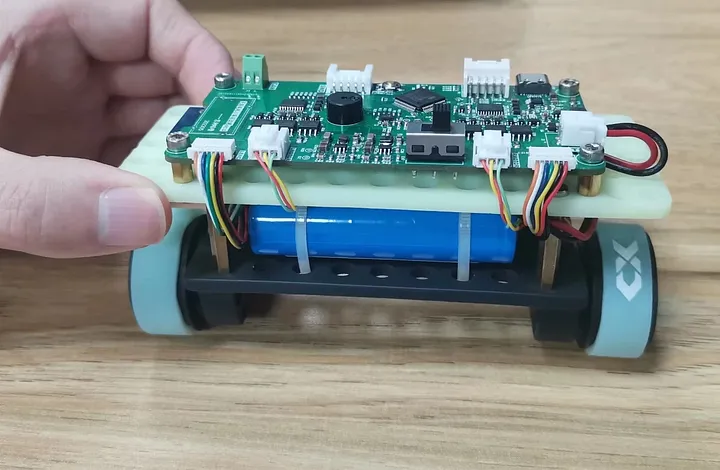
I’ve spent about a week designing the first version of the test hardware circuit and mechanical structure.
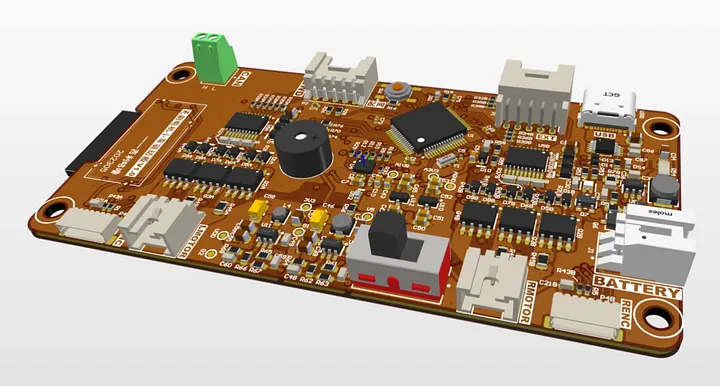
Below is a 3D view of the hardware circuit.
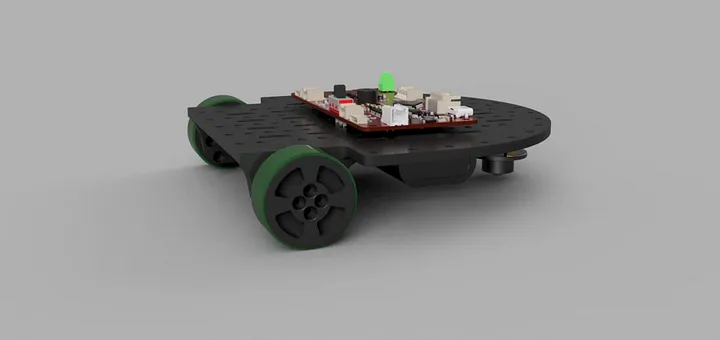
Below is a 3D rendering of the chassis of the three-wheeled car:
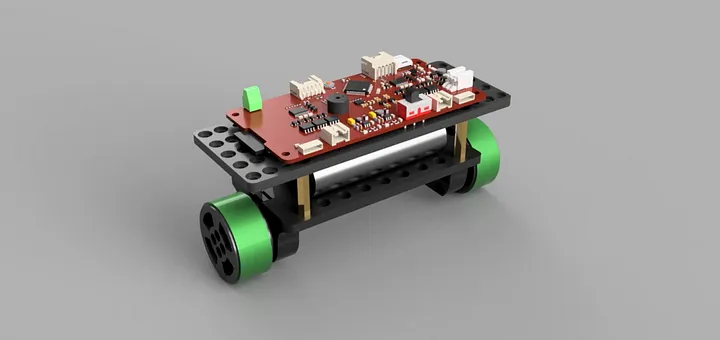
The following image is a 3D rendering of the chassis of the two-stage self-balancing car:
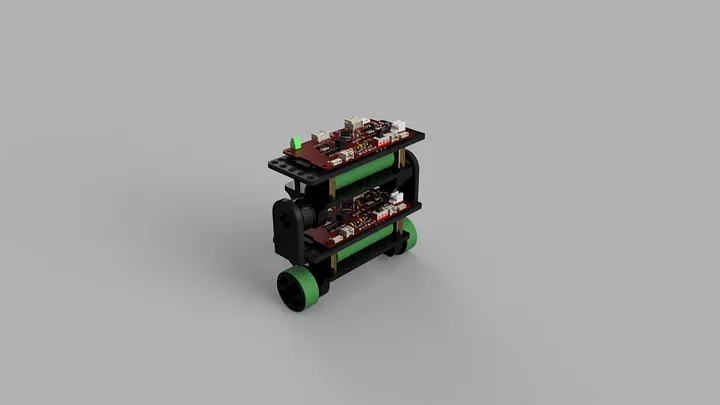
At present, the first version of the hardware test circuit has been soldered, and the first version of the test car has also been assembled. The image below shows the newly assembled self-balancing brushless motor car. I plan to start with it first, and then gradually explore other forms. The car is quite compact, and once testing is complete, I plan to make a more integrated and smaller version for further experimentation.
The Journey of a Thousand Miles Begins with Creating BSP
Everything is ready, and it’s time to start writing the program. The first problem I encountered is that the GD32E503 processor I want to use is not currently in the RT-Thread’s BSP form. So, the first step is to learn how to add my own BSP.
Download GD32E503 Firmware Library and RT-Thread Source Code
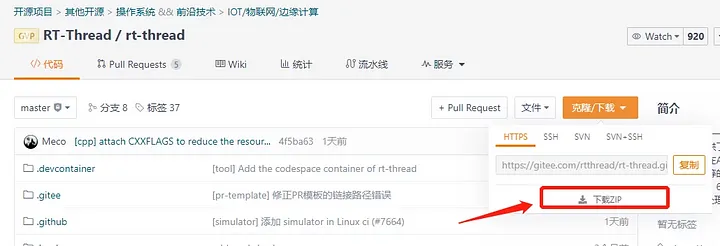
The first step in creating a BSP is naturally to download the RT-Thread source code and the GD32E503 firmware library. The current stable release of RT-Thread should be 4.1.0, but since I’m just experimenting and don’t require high stability, I decided to download the latest master version from Github.
	/* RT-Thread version information */
	#define RT_VERSION_MAJOR                5               /**< Major version number (X.x.x) */
	#define RT_VERSION_MINOR                0               /**< Minor version number (x.X.x) */
	#define RT_VERSION_PATCH                1               /**< Patch version number (x.x.X) */
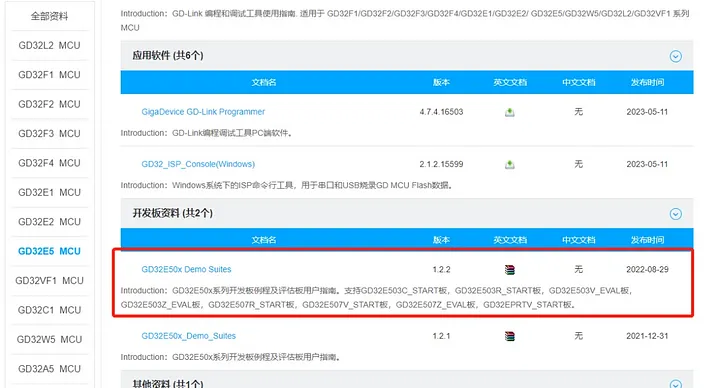
The GD32E503 firmware library is included in the demo materials for the development board, and the latest version is V1.2.2.
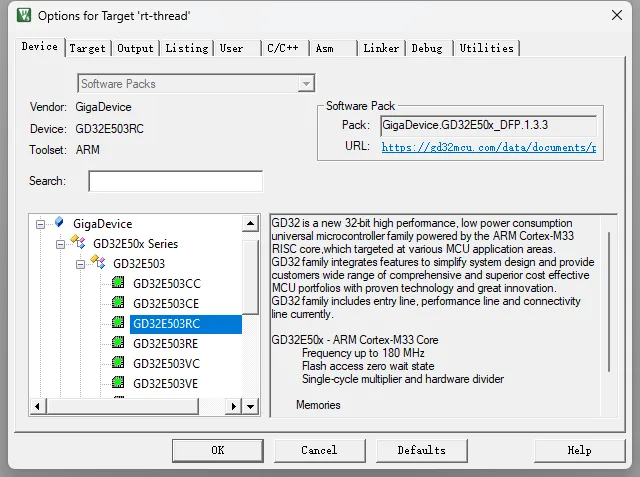
Add GD32E503 Device to MDK
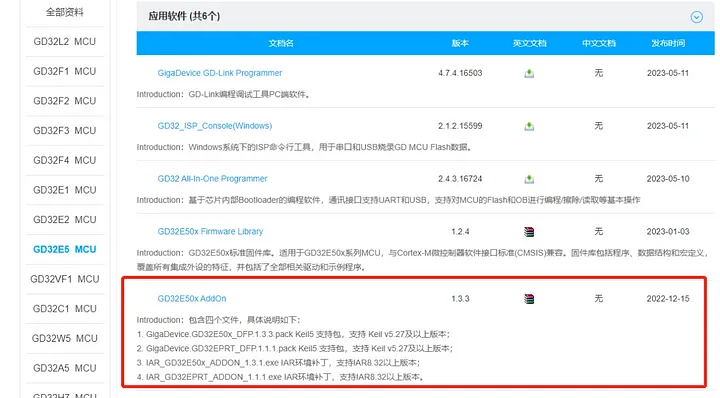
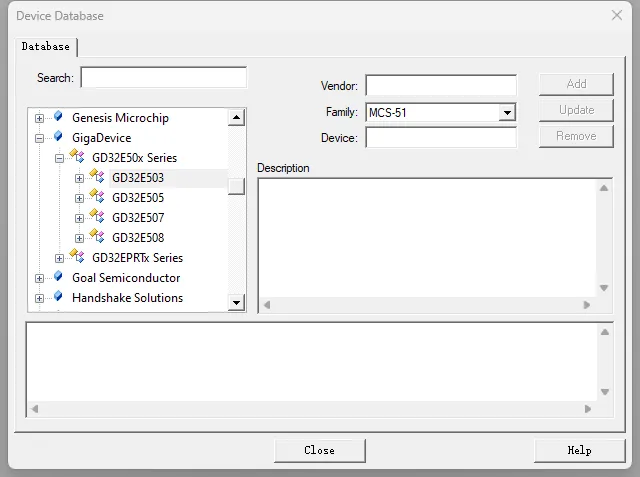
The AddOn resource package for GD32E50x is currently at version 1.3.3. If you haven’t installed MDK yet, you’ll need to do that first (I won’t go into detail here), and then install the two “.pack” files included in the AddOn resource package (you can also just install the E50x version):
As shown in the figure below, you can find a list of GD32E50x series devices in MDK’s DeviceDatabase, which means that the resource package has been successfully installed.
Add libraries
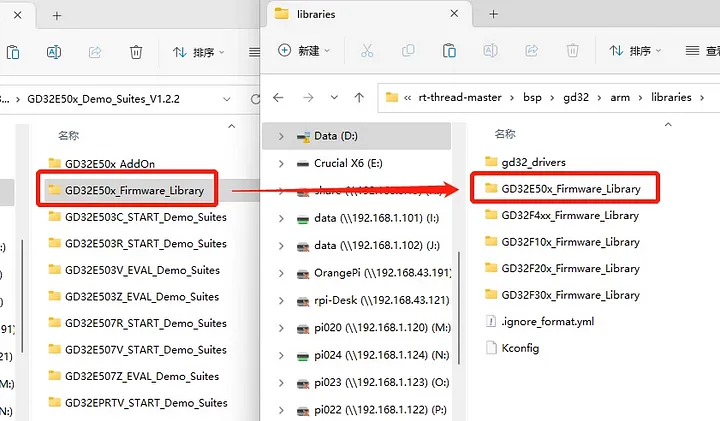
Copy the firmware library to the libraries directory of the BSP. Unzip the RT-Thread source code package and firmware library zip package, and first copy the “GD32E50x_Firmware_Library” folder from the firmware library to the “bsp/gd32/arm/libraries/” path in the RT-Thread source code package:
Modify the configuration files in the libraries directory
Here you can see that there are two configuration files in the libraries directory, “Kconfig” and “.ignore_format.yml”. The Kconfig file will definitely be used later when configuring with menuconfig or RT-Thread Studio IDE. The other file’s purpose is not known for now, but it doesn’t hurt to modify it as well. Modify the Kconfig file as follows (add GD32E5 configuration information at the end of the document):
		config SOC_FAMILY_GD32
		bool
	config SOC_SERIES_GD32F1
		bool
		select ARCH_ARM_CORTEX_M3
		select SOC_FAMILY_GD32
	config SOC_SERIES_GD32F2
		bool
		select ARCH_ARM_CORTEX_M3
		select SOC_FAMILY_GD32
	config SOC_SERIES_GD32F3
		bool
		select ARCH_ARM_CORTEX_M4
		select SOC_FAMILY_GD32
	config SOC_SERIES_GD32F4
		bool
		select ARCH_ARM_CORTEX_M4
		select SOC_FAMILY_GD32
	config SOC_SERIES_GD32E5    #add by cjl
		bool
		select ARCH_ARM_CORTEX_M33
		select SOC_FAMILY_GD32
Add the path name of GD32E50x’s firmware library to the end of the array in “.yml” file:
	dir_path:
	- GD32F10x_Firmware_Library
	- GD32F20x_Firmware_Library
	- GD32F30x_Firmware_Library
	- GD32F4xx_Firmware_Library
	- GD32E50x_Firmware_Library
Add SConscript Build Configuration File to Firmware Library
Copy an “SConscript” file from another firmware library (I used F4xx) to the newly added firmware library path:
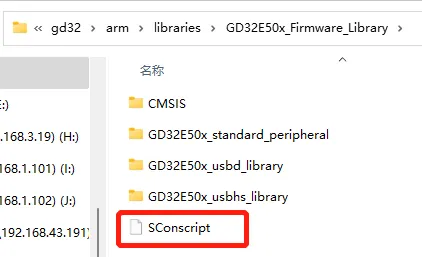
Modify its content (replace F4xx with E50x):
	import rtconfig
	from building import *
	# get current directory
	cwd = GetCurrentDir()
	# The set of source files associated with this SConscript file.
	src = Split('''
	CMSIS/GD/GD32E50x/Source/system_gd32e50x.c
	GD32E50x_standard_peripheral/Source/gd32e50x_gpio.c
	GD32E50x_standard_peripheral/Source/gd32e50x_rcu.c
	GD32E50x_standard_peripheral/Source/gd32e50x_exti.c
	GD32E50x_standard_peripheral/Source/gd32e50x_misc.c
	''')
	# remove: GD32E50x_standard_peripheral/Source/gd32e50x_syscfg.c
	if GetDepend(['RT_USING_SERIAL']):
		src += ['GD32E50x_standard_peripheral/Source/gd32e50x_usart.c']
	if GetDepend(['RT_USING_I2C']):
		src += ['GD32E50x_standard_peripheral/Source/gd32e50x_i2c.c']
	if GetDepend(['RT_USING_SPI']):
		src += ['GD32E50x_standard_peripheral/Source/gd32e50x_spi.c']
	if GetDepend(['RT_USING_CAN']):
		src += ['GD32E50x_standard_peripheral/Source/gd32e50x_can.c']
	if GetDepend(['BSP_USING_ETH']):
		src += ['GD32E50x_standard_peripheral/Source/gd32e50x_enet.c']
	if GetDepend(['RT_USING_ADC']):
		src += ['GD32E50x_standard_peripheral/Source/gd32e50x_adc.c']
	if GetDepend(['RT_USING_DAC']):
		src += ['GD32E50x_standard_peripheral/Source/gd32e50x_dac.c']
	if GetDepend(['RT_USING_RTC']):
		src += ['GD32E50x_standard_peripheral/Source/gd32e50x_rtc.c']
		src += ['GD32E50x_standard_peripheral/Source/gd32e50x_pmu.c']
	if GetDepend(['RT_USING_WDT']):
		src += ['GD32E50x_standard_peripheral/Source/gd32e50x_wwdgt.c']
		src += ['GD32E50x_standard_peripheral/Source/gd32e50x_fwdgt.c']
	if GetDepend(['RT_USING_SDIO']):
		src += ['GD32E50x_standard_peripheral/Source/gd32e50x_sdio.c']
		src += ['GD32E50x_standard_peripheral/Source/gd32e50x_dma.c']
	path = [
		cwd + '/CMSIS/GD/GD32E50x/Include',
		cwd + '/CMSIS',
		cwd + '/GD32E50x_standard_peripheral/Include',]
	CPPDEFINES = ['USE_STDPERIPH_DRIVER']
	group = DefineGroup('Libraries', src, depend = [''], CPPPATH = path, CPPDEFINES = CPPDEFINES)
	Return('group')
Create BSP
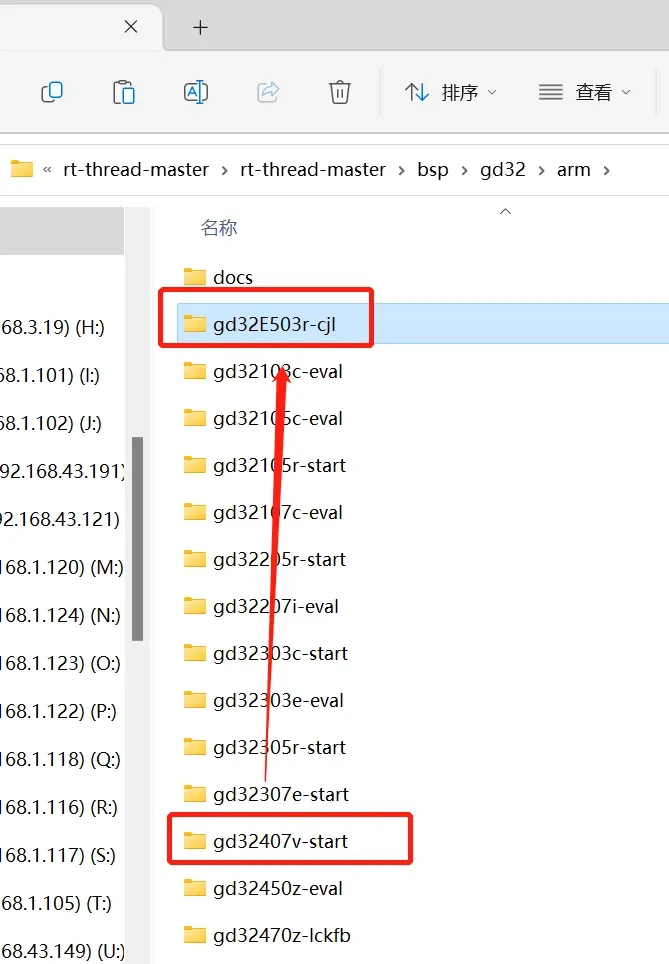
Copy BSP Template
Arbitrarily copy a BSP folder (I also used 407) and rename it to E503:
Modify board.h Header File
The main content that needs to be modified is under the board path. First, look at the board.h file. I didn’t do external SDRAM here, so I commented out the related definitions. My board is actually soldered with GD32E503RCT6, so the SRAM size is changed to 96KB, and then the related header file names are modified:
	#ifndef __BOARD_H__
	#define __BOARD_H__
	#include "gd32e50x.h"
	#include "drv_usart.h"
	#include "drv_gpio.h"
	#include "gd32e50x_exti.h"
	//#define EXT_SDRAM_BEGIN    (0xC0000000U) /* the begining address of external SDRAM */
	//#define EXT_SDRAM_END      (EXT_SDRAM_BEGIN + (32U * 1024 * 1024)) /* the end address of external SDRAM */
	// <o> Internal SRAM memory size[Kbytes] <8-64>
	//  <i>Default: 64
	#ifdef __ICCARM__
	// Use *.icf ram symbal, to avoid hardcode.
	extern char __ICFEDIT_region_RAM_end__;
	#define GD32_SRAM_END          &__ICFEDIT_region_RAM_end__
	#else
	#define GD32_SRAM_SIZE         96      //96 for GD32E503xC         128 for GD32E503xE  ...
	#define GD32_SRAM_END          (0x20000000 + GD32_SRAM_SIZE * 1024)
	#endif
	#ifdef __ARMCC_VERSION
	extern int Image$$RW_IRAM1$$ZI$$Limit;
	#define HEAP_BEGIN    (&Image$$RW_IRAM1$$ZI$$Limit)
	#elif __ICCARM__
	#pragma section="HEAP"
	#define HEAP_BEGIN    (__segment_end("HEAP"))
	#else
	extern int __bss_end;
	#define HEAP_BEGIN    (&__bss_end)
	#endif
	#define HEAP_END          GD32_SRAM_END
	#endif
Add gd32e50x_libopt.h
Copy a “gd32e50x_libopt.h” from any example path in the firmware library to the current bsp’s board path, replacing the original “gd32f4xx_libopt.h”
Modify Kconfig and SConscript Configuration Files in board Directory
The “Kconfig” and “SConscript” configuration files in the board directory also need to be slightly modified. Basically, all F4xx strings are changed to E50x. It should be noted that there are two versions of E50x in the “SConscript” file for startup file related configuration, high density (hd) and interconnect (cl). I used E503RC or RE here, which are high-density versions, so I chose the hd assembly startup file. And what needs to be explained is that although I did not comment out the startup file under the gcc compiler here, in fact, there is no gcc version of the startup file in the E503 firmware library, which means that RT-Thread’s IDE cannot be used for development later. When it’s available, add it. Or if necessary, modify a version of the gcc compiler’s startup file yourself. For now, these two files are just modified like this, and if there are any problems later, they will be modified. The modification of the “SConscript” file is as follows:
	import os
	import rtconfig
	from building import *
	Import('SDK_LIB')
	cwd = GetCurrentDir()
	# add general drivers
	src = Split('''
	board.c
	''')
	path =  [cwd]
	startup_path_prefix = SDK_LIB
	if rtconfig.PLATFORM in ['gcc']:
	  src += [startup_path_prefix + '/GD32E50x_Firmware_Library/CMSIS/GD/GD32E50x/Source/GCC/startup_gd32e50x_hd.s']
	elif rtconfig.PLATFORM in ['armcc', 'armclang']:
	  src += [startup_path_prefix + '/GD32E50x_Firmware_Library/CMSIS/GD/GD32E50x/Source/ARM/startup_gd32e50x_hd.s']
	elif rtconfig.PLATFORM in ['iccarm']:
	  src += [startup_path_prefix + '/GD32E50x_Firmware_Library/CMSIS/GD/GD32E50x/Source/IAR/startup_gd32e50x_hd.s']
	CPPDEFINES = ['GD32E50X','GD32E50X_HD']
	group = DefineGroup('Drivers', src, depend = [''], CPPPATH = path, CPPDEFINES = CPPDEFINES)
	Return('group')
Modify Link Scripts for Three Compilers
Modify the link files in the “board/linker_scripts” directory. If there are no special requirements, you don’t need to make too many modifications to the link script. You just need to modify the RAM and ROM addresses and sizes. Take “link.sct” as an example:
	LR_IROM1 0x08000000 0x00040000  {    ; load region size_region  256KB
		ER_IROM1 0x08000000 0x00040000  {  ; load address = execution address
			*.o (RESET, +First)
			*(InRoot$$Sections)
			.ANY (+RO)
		}
		RW_IRAM1 0x20000000 0x00018000  {  ; RW data  96KB
			.ANY (+RW +ZI)
		}
		}
Modify Top-level SConstruct and rtconfig.py Files of BSP
Modify the SConstruct file and rtconfig.py file in the newly created bsp directory:
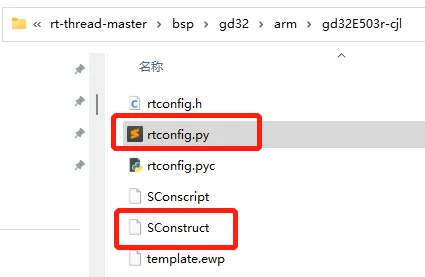
The SConstruct file only needs to modify the value of “gd32_library”:
gd32_library = 'GD32E50x_Firmware_Library'
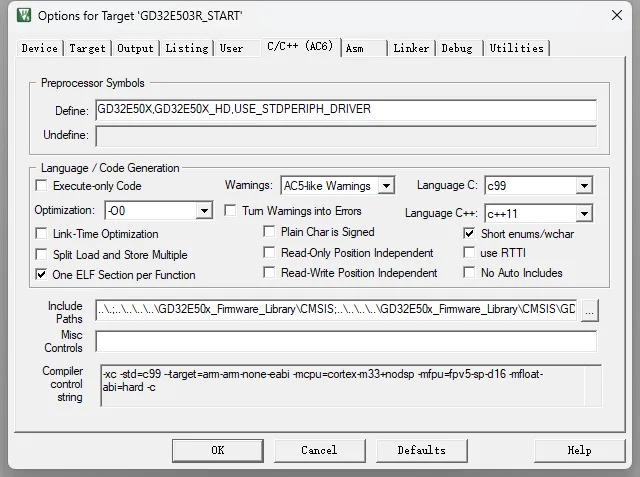
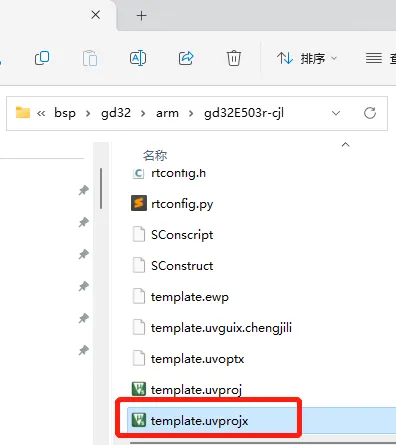
Modify Project Template
Next, modify the project template file. I only modify the MDK5 version of the project template here:
Modify Device to actual use GD32E503RC:
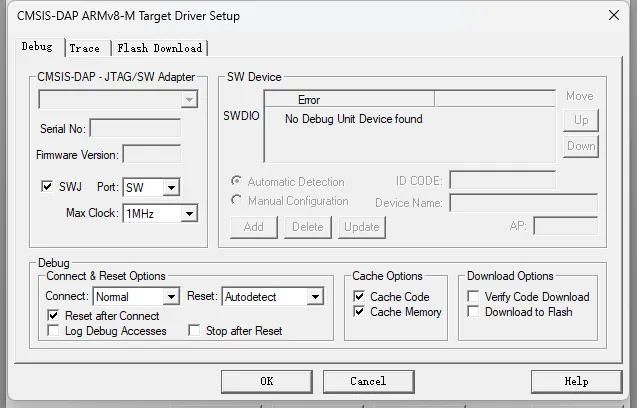
Change debugging tool to DAP:
Use RT-Thread Env Tool to Configure RT-Thread and Generate MDK Project
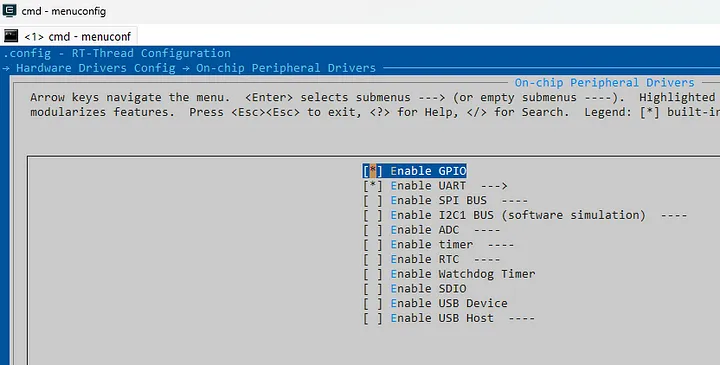
Run env tool in new bsp directory (for installation and use of env tool, please refer to RT-Thread official document), make preliminary configuration for RT-Thread:
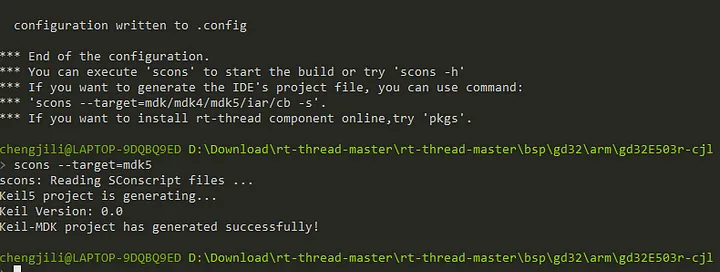
Finally, according to the prompt, enter command to generate mdk5 project (if you want to submit your own made BSP, please refer to official BSP production specification):
Download & Verification
Finally open project, slightly modify content inside main.c, add a debug statement, modify corresponding LED pin. Compile it. If it can be compiled successfully, it means that there is no problem with the above modification. If there is an error, please carefully check whether the content of each configuration file modified above is correct or modify it according to error prompt. Burn program can see running effect.
#include <stdio.h>
#include <rtthread.h>
#include <rtdevice.h>
#include <board.h>
/* defined the LED2 pin: PC6 */
#define LED_PIN GET_PIN(B, 11)
#define BUZZER_PIN GET_PIN(B, 12)
int main(void)
{
int count = 1;
/* set LED2 pin mode to output */
rt_pin_mode(LED_PIN, PIN_MODE_OUTPUT);
rt_pin_write(BUZZER_PIN, PIN_LOW);
rt_pin_mode(BUZZER_PIN, PIN_MODE_OUTPUT);
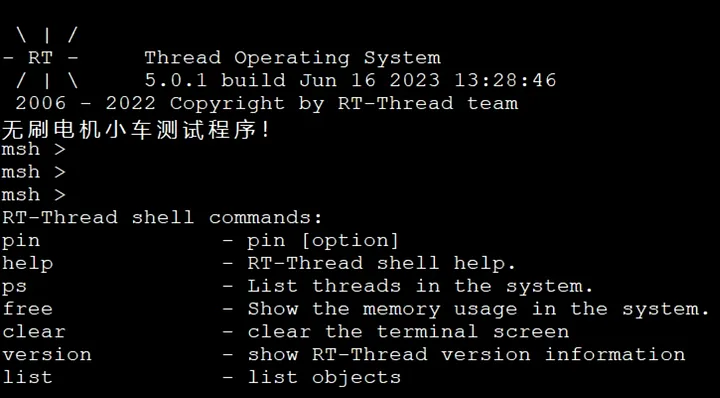
rt_kprintf("无刷电机小车测试程序!\n");
while (count++)
{
rt_pin_write(LED_PIN, PIN_HIGH);
rt_thread_mdelay(500);
rt_pin_write(LED_PIN, PIN_LOW);
rt_thread_mdelay(500);
}
return RT_EOK;
}
This article will stop here for now. I will continue updating this part later! Welcome everyone’s feedback!
This article provides a guide on how to develop the RT-Thread qemu-vexpress-a9 BSP project on the Windows platform using VS Code.

This article provides a guide on how to develop the RT-Thread qemu-vexpress-a9 BSP project on the Windows platform using VS Code.
Introduction
VS Code (Visual Studio Code) is a lightweight yet powerful code editor that supports Windows, OS X, and Linux. It comes with built-in support for JavaScript, TypeScript, and Node.js, and boasts a rich ecosystem of extensions. By installing these extensions, you can add support for other languages such as C++, C#, Python, PHP, etc.
The resources prepared for this article are as follows:
Step One: Install Debugging Extension
Download and install the C/C++ debugging extension in VS Code Extensions:
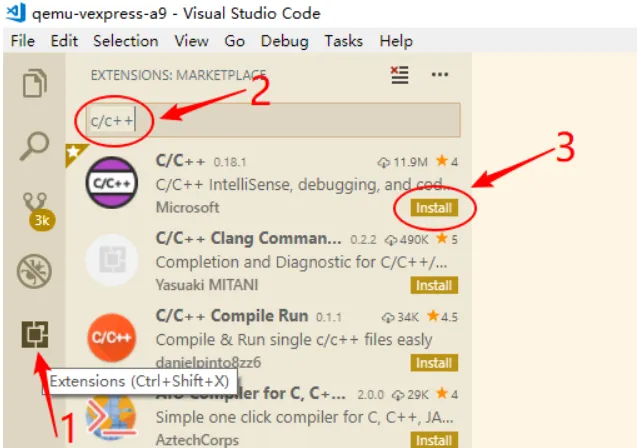
After installation, make sure the extension is in the following state. If not, click to reload:

Step Two: Open VS Code Project
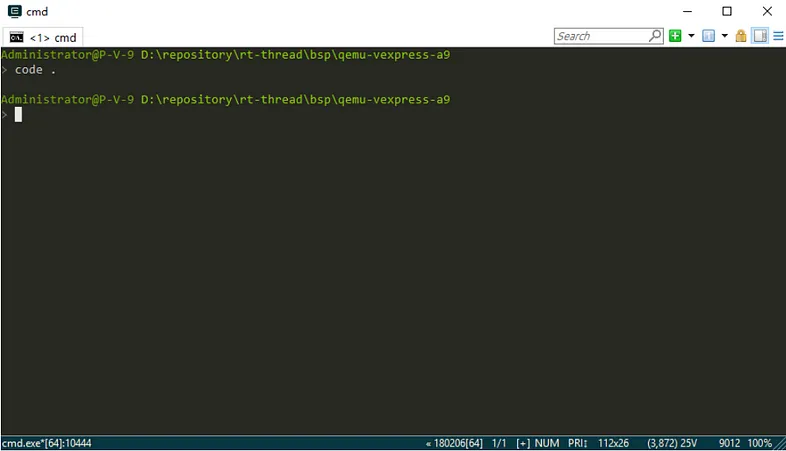
Enter the qemu-vexpress-a9 BSP root directory in the Env console, then type code . (Note: there is a dot after code) to open VS Code. This command opens the current directory with VS Code.
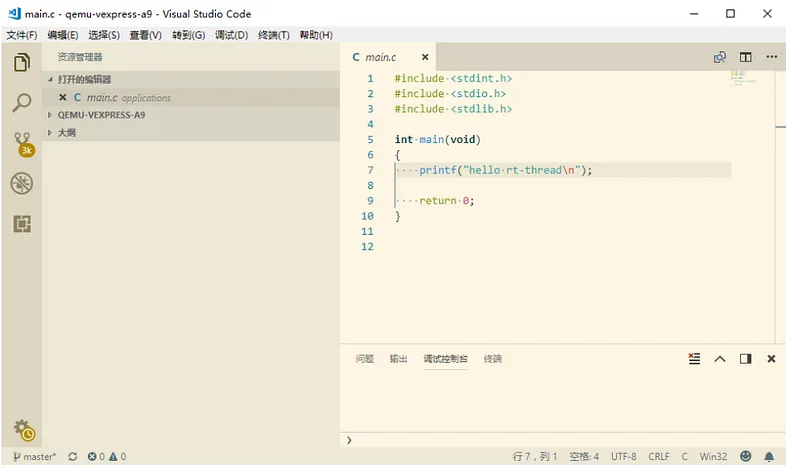
After opening VS Code, it will automatically open the qemu-vexpress-a9 BSP folder as shown below.
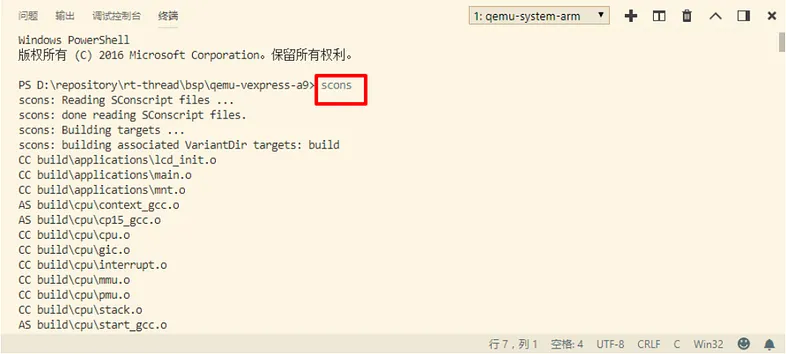
Step Three: Compile RT-Thread
Click on “View -> Terminal” in VS Code to open the internal terminal of VS Code. Type scons in the terminal to compile the project. The terminal will print out the compilation information.
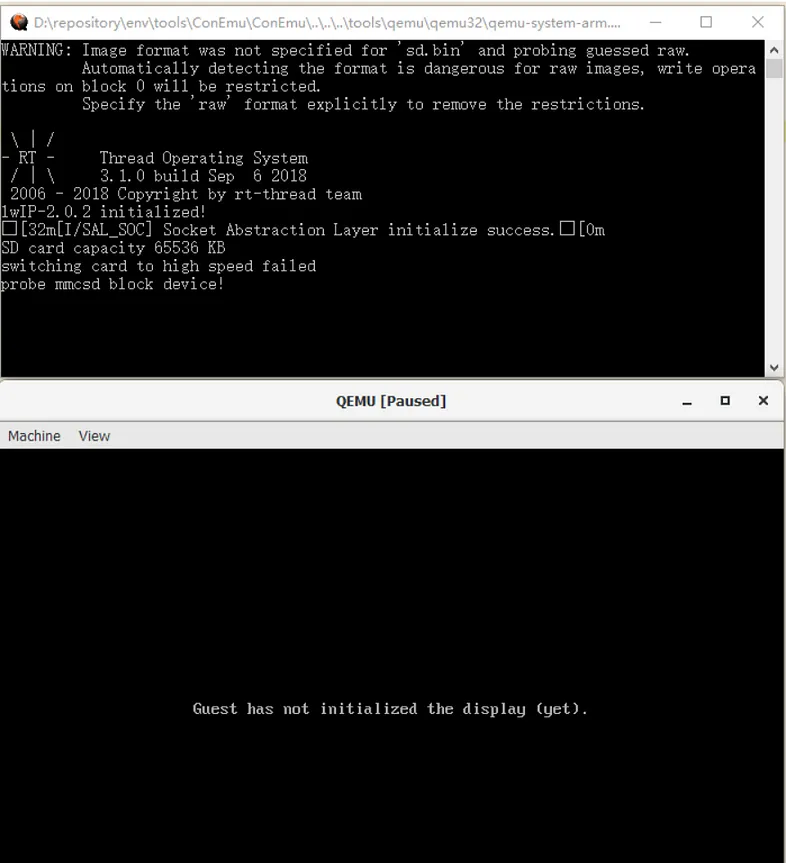
After compilation, enter .\qemu.bat command to run the project. The terminal will output RT-Thread startup logo information and QEMU will start running.

Note: Before debugging the BSP project, you need to compile the project to generate rtthread.elf file first. You can use scons --target=vsc -s command to update C/C++ header file search path information required by VS Code. It’s not necessary to update every time, only when you have reconfigured RT-Thread using menuconfig or changed rtconfig.h header file.
Step Four: Modify qemu-dbg.bat File
Before starting debugging, you need to edit qemu-dbg.bat file in qemu-vexpress-a9 directory. Add start before qemu-system-arm:
						@echo off
						if exist sd.bin goto run
						qemu-img create -f raw sd.bin 64M
						:run
						start qemu-system-arm -M vexpress-a9 -kernel rtthread.elf -serial stdio -sd sd.bin
						-S -s
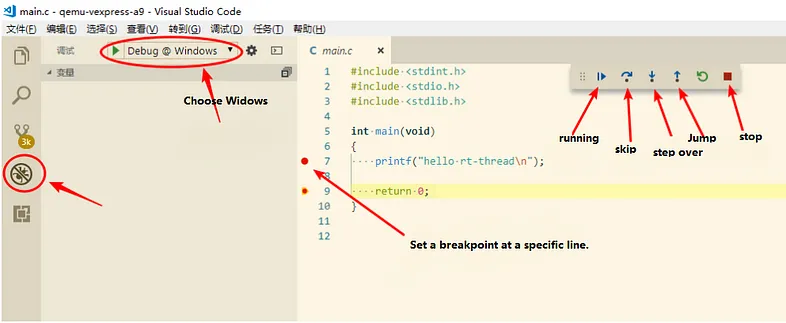
Step Five: Debug Project
As shown below, click on the debug menu (bug icon) in VS Code, select Windows as the debug platform, then press F5 to start QEMU debug mode. The breakpoint will stop at main function. The debug options of VS Code are shown below:
QEMU will also start running as shown below.
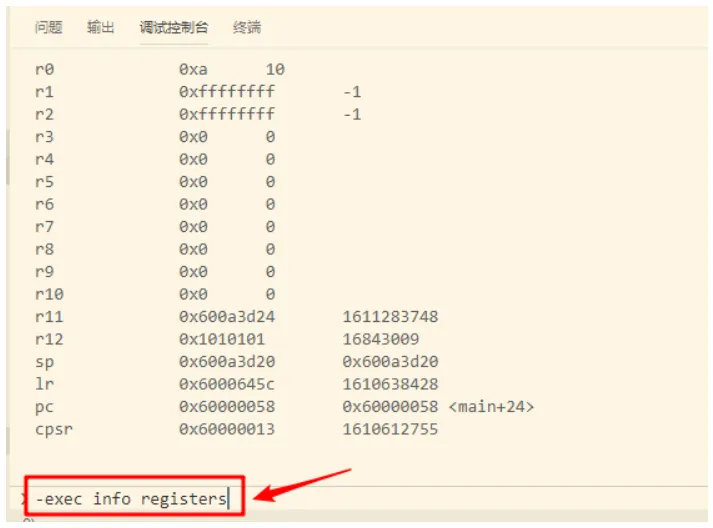
In VS Code, you can use GDB commands by adding -exec at the beginning. For example, -exec info registers command can be used to view the contents of registers:
Here are some other key commands:
View the contents of a memory address: x/, with the parameters explained as follows:
- n is a positive integer, representing the number of memory units to be displayed, i.e., how many memory units to display from the current address, with the size of a memory unit defined by the following u.
- f represents the display format, as shown below. If the address points to a string, then the format can be s. Other formats are shown in the table below:
- u represents the number of bytes requested from the current address. If not specified, GDB defaults to 4 bytes. The u parameter can be replaced with the following characters: b represents a single byte, h represents two bytes, w represents four bytes, and g represents eight bytes. Once we specify the byte length, GDB will read and write the specified bytes from the specified memory address and take it out as a value.
- addr represents a memory address.
Note: Strictly distinguish between n and u. n represents the number of units, and u represents the size of each unit.
Example: x/3uh 0x54320 means to read content from memory address 0x54320, h means to use two bytes as a unit, 3 means to output three units, and u means to display in hexadecimal.
- View the current program stack content: x/10x $sp–> Print the first 10 elements of the stack
- View current program stack information: info frame — — list general info about the frame
- View current program stack parameters: info args — lists arguments to the function
- View current program stack local variables: info locals — list variables stored in the frame
- View current register values:info registers (does not include floating point registers) info all-registers (includes floating point registers)
- View exception handlers in current stack frame:info catch(exception handlers)
Tip: When entering commands, you can just enter the first letter of each command. For example: info registers can be entered as i r.
Note: If you add extra folders in the VS Code directory, it will prevent debugging from starting. Each time you start debugging, you need to use Env tool in BSP root directory to open VS Code with code . command for normal project debugging.
References
Author: Wu Han
I’ve recently been exploring the prediction aspect of autonomous driving, which can utilize the EKF (Extended Kalman Filter) to merge data from various sensors, such as IMU, Lidar, and GNSS, to provide more precise state predictions.
Author: Wu Han
I’ve recently been exploring the prediction aspect of autonomous driving, which can utilize the EKF (Extended Kalman Filter) to merge data from various sensors, such as IMU, Lidar, and GNSS, to provide more precise state predictions.
I have a 6-axis IMU on my development board and initially planned to experiment with the Kalman Filter. However, it is better suited for 9-axis sensors, where a 3-axis magnetometer is fused with a 6-axis sensor (3-axis Accel + 3-axis Gyro).
For an MCU with only a 6-axis IMU, a lightweight Complementary Filter is more appropriate. It employs a 3-axis gyroscope and a 3-axis accelerometer to estimate the development board’s orientation (Pitch, Roll, Yaw).

The process is straightforward: Start by using RT-Thread’s icm20608 package to read data from the Gyroscope and Accelerometer. Then, calculate the estimated angles separately and use the Complementary Filter to merge the two angle estimates and calibrate them. The core algorithm is concise, with only 7 lines of code. Finally, transmit the data to your computer via a serial port and visualize it using Python + OpenGL.
Check out our Github page for more information: https://link.zhihu.com/?target=https%3A//github.com/wuhanstudio/stm32-imu-filter
Inertial Measurement Unit SensorFirst, let’s discuss how to process raw sensor values from the I2C bus to determine acceleration and angular velocity.
A 6-axis IMU can measure gravitational acceleration along the x, y, and z axes, as well as angular velocity around each axis. For instance, if the development board is stationary on a desk, it will detect gravitational acceleration along the z-axis.
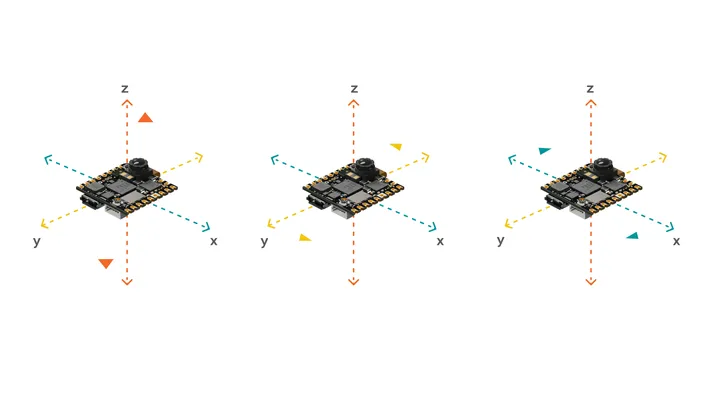
Measuring acceleration across three axes
Naturally, if the development board remains still, the rotational velocity around each of the three axes will be zero.
Measuring angular velocity across three axes
The sensor’s output is a 16-bit digital signal from the ADC, which must be converted to gravitational acceleration (g). You can select the measurement range (±2�,±4�,±8�), with the default being ±2�. This maps the sensor’s 16-bit output [−215,215) to [-2g, 2g), resulting in 215LSB / 2�=16384 LSB/�. This is the Sensitivity Scale Factor specified in the icm20608 chip manual.
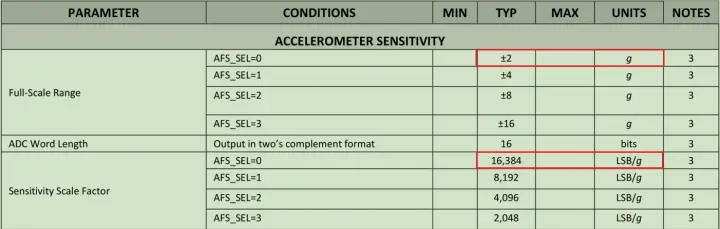
As a result, the raw int16 acceleration data is divided by 16384 within the code.
double aSensitivity = 16384;
accel_x = accel_x / aSensitivity;
accel_y = accel_y / aSensitivity;
accel_z = accel_z / aSensitivity;
In the same way, we can figure out the angular speed (which can be measured within a range of plus or minus 250 degrees per second): 215 divided by 250 equals 131.072.
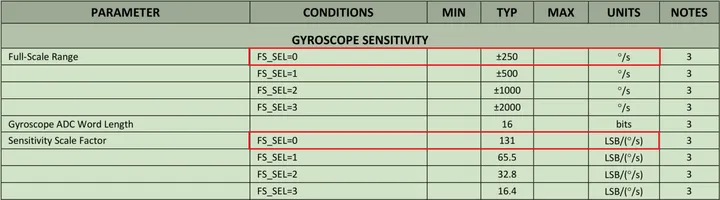
So, in the code, we take the initial int16 data for the angular speed and divide it by 131.
double gSensitivity = 131;
gyrX = gyro_x / gSensitivity;
gyrY = gyro_y / gSensitivity;
gyrZ = gyro_z / gSensitivity;
By doing this, we change the int16 raw data that the ADC puts out into units of acceleration (g) and rotational speed (degrees per second).
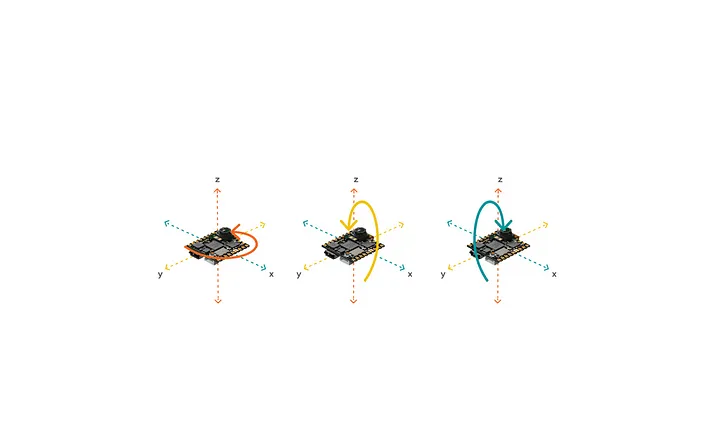
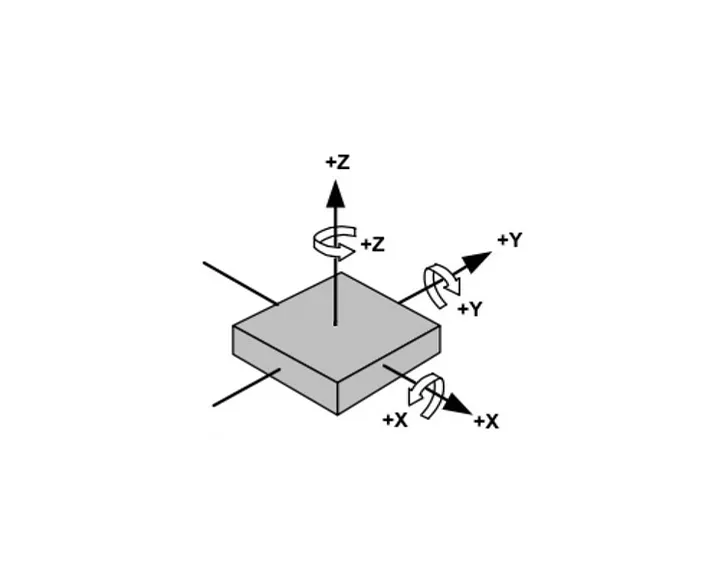
Complementary FilterWe use the coordinate system shown in the picture below. The angle of rotation around the x-axis is called roll, the rotation around the y-axis is pitch, and the rotation around the z-axis is yaw. If it rotates counterclockwise, it’s positive. If it rotates clockwise, it’s negative.
 Gyroscope Estimates Posture
The gyroscope takes the measurement of the rotational speed at that moment, so to estimate the position, we add up the measurements over time. For instance, if we measure the rotational speed every 100ms, we can multiply the rotational speed by the time to get the rotational angle.
						// angles based on gyro (deg/s)
						gx = gx + gyrX * TIME_STEP_MS / 1000;
						gy = gy + gyrY * TIME_STEP_MS / 1000;
						gz = gz + gyrZ * TIME_STEP_MS / 1000;
Because there’s a lot of noise around, the measurements from the gyroscope can be a bit all over the place. These little bits of noise add up over time and can make the position start to drift.
Take the picture below, for instance. After a while, even though the development board isn’t moving, the position that the gyroscope on the right estimates can’t get back to where it started. This happens because of all the little errors adding up over time.
 Accelerometer Estimates Posture
We don’t have to add up the measurements from the accelerometer. We can just take the arctan of the angle of acceleration at that moment to find the angle:

						// angles based on accelerometer
	ax = atan2(accelY, accelZ) * 180 / M_PI;                                     // roll
	ay = atan2(-accelX, sqrt( pow(accelY, 2) + pow(accelZ, 2))) * 180 / M_PI;    // pitch
Even if our development board spins around the z-axis, gravity always pulls it toward the ground. So, when the development board isn’t moving, we can’t use gravity to figure out the angle of rotation around the z-axis (yaw). That means we only calculate roll and pitch, and the final angle of rotation around the z-axis (yaw) will have errors that add up over time.
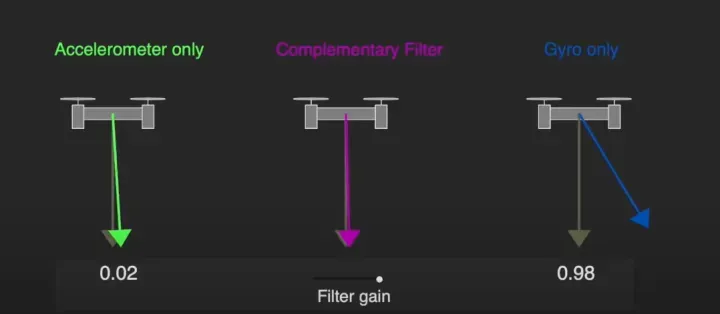
Complementary FilterWe have to use two measurements because: the rotational speed is pretty accurate over a short time, but because of all the noise around, it can start to move randomly and drift off course. The acceleration might not be spot on over a short time, but it’ll stay steady in the end.
So we can use each measurement to make up for what the other one lacks. We add them together to get a better estimate.
						// complementary filter
						gx = gx * 0.96 + ax * 0.04;
						gy = gy * 0.96 + ay * 0.04;
For a little while, we rely on the measurement of rotational speed from the gyroscope (with a weight of 0.96). But over time, the drift that happens because of all the noise around us is slowly fixed by the accelerometer (with a weight of 0.04).
SummaryTo sum it up, there are really only 7 lines of code that matter. We start by using acceleration to figure out posture, then we use rotational speed to do the same thing. In the end, we add them together using a complementary filter.
// angles based on gyro (deg/s)
gx = gx + gyrX * TIME_STEP_MS / 1000;
gy = gy + gyrY * TIME_STEP_MS / 1000;
gz = gz + gyrZ * TIME_STEP_MS / 1000;
// angles based on accelerometer
ax = atan2(accelY, accelZ) * 180 / M_PI; // roll
ay = atan2(-accelX, sqrt( pow(accelY, 2) + pow(accelZ, 2))) * 180 / M_PI; // pitch
// complementary filter
gx = gx * 0.96 + ax * 0.04;
gy = gy * 0.96 + ay * 0.04;
Introduction:
This is a high-cost-performance graphic evaluation kit brought to you by RT-Thread in collaboration with Renesas and LVGL. Say goodbye to traditional HMI + main control board hardware and hello to the full capabilities of HMI + IoT + control with just one set of hardware. With Renesas’ high-performance RA6M3 chip and RT-Thread’s software ecosystem at its core, the HMI Board packs a punch with its strong hardware performance and rich software ecosystem. This makes it easier than ever for developers to create cutting-edge GUI smart hardware products.
But that’s not all. The HMI-Board comes equipped with a 2M Flash large-capacity main control chip RA6M3, featuring built-in modules like 2D acceleration, JPEG encoder/decoder, and LCD controller to help with graphic application development. Plus, with an onboard TFT display and audio interface, developers can flex their skills in the HMI field. And let’s not forget about IoT connectivity: the HMI-Board has an onboard Ethernet interface and high-speed WIFI module, keeping the development board connected to the cloud 24/7. The HMI-Board also supports various control methods, including CAN interface, Arduino interface, and two PMOD interfaces. This allows developers to easily expand various peripherals and achieve more flexible control methods. With the HMI-Board development board, creating GUI smart hardware products has never been easier.

Discover Its Amazing Advantages and Features:
When you hear “HMI screens,” what comes to mind? For many, it’s configuration screens or serial screens. These screens are known for their efficient GUI development and are widely used in industries such as automation and healthcare. But there’s a catch: the hardware cost for HMI + main control board mode can be high, and the GUI development can be simple and inflexible. That’s why RT-Thread has teamed up with Renesas and LVGL to introduce a new HMI Board development mode that replaces traditional HMI + main control board hardware. With just one set of hardware, you can achieve the full capabilities of HMI + IoT + control. And with Renesas’ high-performance RA6M3 chip and RT-Thread’s software ecosystem, the HMI Board boasts not only powerful hardware performance but also a rich software ecosystem. This makes it easier than ever for developers to create cutting-edge GUI smart hardware products.
Video Demo
Get it now for only $25 during our limited pre-sale (shipping fees not included).
Take advantage of our special price from May 16th to May 23rd, 2023. To reserve your board, simply fill out our form and we’ll send you an email with payment information once we receive your order. Please note that shipping fees are not included, but we’ve partnered with EMS to ensure affordable shipping rates.


Hardware Framework

- RA6M3(R7FA6M3AH3CFB): Cortex-M4F core, 120Mhz main frequency, with 2MB Flash/640KB RAM, integrated TFT controller, 2D accelerator, and JPEG decoder.
- 4.3 inch LCD (RGB 888)
- On-board emulator
- Ethernet
- RW007 (SPI high-speed WIFI)
- USB-Device
- TF Card
- CAN
- 1 microphone, 1 speaker
- Arduino expansion interface
- 2 PMOD expansion interfaces
- 4 buttons: 3 user buttons, one reset button
Extension Interface Description
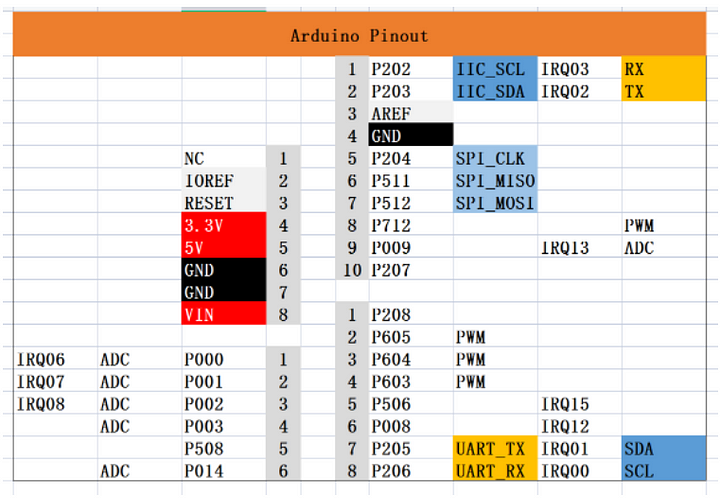
The HMI-Board has rich expansion interface support, including one Arduino interface and two PMOD interfaces. The specific pin definitions are as follows:

Development Board Example List
The HMI-Board comes pre-burned with the RT-Thread 5.0.0 release version and has the Finsh component enabled by default (connected to the DAP-Link virtual serial port). It also comes with a series of demo examples.
● LVGL official demo
● Video player
● Factory firmware
There is also a series of examples scheduled to be added soon.
● OTA remote upgrade
● Ardunio compatibility layer
● Webnet gateway: Built-in web server, after successful networking, it can display basic information about the development board through a web page and perform simple control of the onboard LED of the development board. And display the control results on the screen in real time.
RT-Thread is giving away 5 RT-Thread × Renesas × LVGL HMI Board for 5 Lucky Registrations for the 2023 RT-Thread Global Tech Conference, free register to win: https://bit.ly/404xwI5

When you hear “HMI screens,” you might think of Human Machine Interface or Touch Screen Display. They are known for their efficient GUI development and are widely used in fields like industrial automation and healthcare. But there’s a catch: the hardware cost of the HMI + main control board mode can be a bit steep, and the GUI development can be a bit basic and inflexible.
When you hear “HMI screens,” you might think of Human Machine Interface or Touch Screen Display. They are known for their efficient GUI development and are widely used in fields like industrial automation and healthcare. But there’s a catch: the hardware cost of the HMI + main control board mode can be a bit steep, and the GUI development can be a bit basic and inflexible.
That’s where RT-Thread, Renesas, and LVGL come in. We’ve cooked up a new HMI Board development mode to replace the traditional HMI + main control board hardware. With just one set of hardware, you can achieve the full capabilities of HMI + IoT + control. And with Renesas’ high-performance RA6M3 chip, RT-Thread’s software ecosystem and LVGL GUI ecosystem, the HMI Board packs a punch in both hardware performance and software ecosystem. It’s never been easier for developers to quickly create GUI smart hardware products.


Hardware Framework
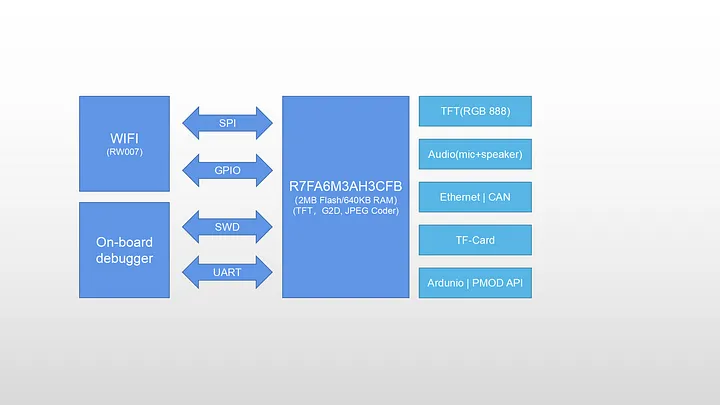
- RA6M3(R7FA6M3AH3CFB): Cortex-M4F core, 120Mhz main frequency, with 2MB Flash/640KB RAM, integrated TFT controller, 2D accelerator, and JPEG decoder.
- 4.3 inch LCD (RGB 888)
- On-board emulator
- Ethernet
- RW007 (SPI high-speed WIFI)
- USB-Device
- TF Card
- CAN
- 1 microphone, 1 speaker
- Arduino expansion interface
- 2 PMOD expansion interfaces
- 4 buttons: 3 user buttons, one reset button
** **
Software Resources
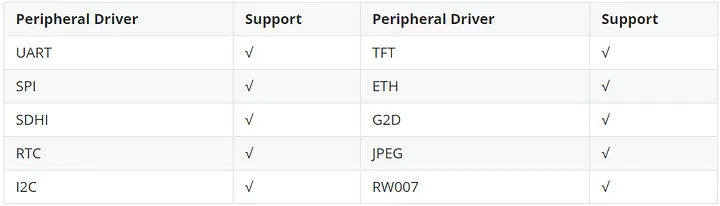
The RT-Thread team has provided complete support for RA6M3 peripheral drivers:
The HMI Board is currently undergoing LVGL certification. When it is officially released, there will also be a very cool LVGL demo showcase. Please stay tuned.
RT-Thread is giving away 5 RT-Thread × Renesas × LVGL HMI Board for 5 Lucky Registrations for the 2023 RT-Thread Global Tech Conference, free register to win: https://bit.ly/404xwI5

We’re so happy to share with you that the 2023 RT-Thread Global Tech Conference(RGTC) will be virtually held on June 1-June 3, 2023.
We welcome engineers from all over the world to join an exclusive journey to learn all about the latest advancement in IoT and embedded development!
This year we have 30 Topics will be covered + 9 Times Dev Boards Giveaway Online + Certificates will be issued to every participant.
Join us: https://bit.ly/404xwI5
Author: tyustli- RT-Thread Community Developer
The order of this initialization is relatively clear, and it is quite easy to figure out the peripherals that have been initialized and the order in which they are initialized. However, the main function is particularly cumbersome, especially when there are a lot of peripherals that need to be initialized.
Source: tyustli- RT-Thread Community Developer
General initialization
During the embedded development, we're mainly taking this approach to initialize a peripheral
int main(int argc, char *argv[])
{
  clk_init();
  led_init();
  beep_init();
  key_init();
  .....
  while(1)
  {
    ...
  }
}
The order of this initialization is relatively clear, and it is quite easy to figure out the peripherals that have been initialized and the order in which they are initialized. However, the main function is particularly cumbersome, especially when there are a lot of peripherals that need to be initialized.
Auto-Initialization
Programming C on the computer, to print a hello world
#include
int main(int argc, char *argv[])
{
  printf("hello world\r\n");
  return 1;
}
Here we can directly use printf to print without any initialization steps, this idea leads to the RT-Thread automatic initialization mechanism.
RT-Thread Auto-Initialization
int led_init()
{
  ...
}
INIT_APP_EXPORT(led_init);
int main(int argc, char *argv[])
{
  led_on();
  rt_kprintf("hello rt thread\r\n");
  return 1;
}
The central thought of automatic initialization is that the initialization of each peripheral is completed before executing to the main function, and all the peripherals can be used directly in the main function. For example, the above program directly uses rt_kprintf for output, and lit the LED.
Auto-initialized API
The auto-initialized API intercepted from the RT-Thread source code, as shown as follows:
/* board init routines will be called in board_init() function */
#define INIT_BOARD_EXPORT(fn)           INIT_EXPORT(fn, "1")
/* pre/device/component/env/app init routines will be called in init_thread */
/* components pre-initialization (pure software initilization) */
#define INIT_PREV_EXPORT(fn)            INIT_EXPORT(fn, "2")
/* device initialization */
#define INIT_DEVICE_EXPORT(fn)          INIT_EXPORT(fn, "3")
/* components initialization (dfs, lwip, ...) */
#define INIT_COMPONENT_EXPORT(fn)       INIT_EXPORT(fn, "4")
/* environment initialization (mount disk, ...) */
#define INIT_ENV_EXPORT(fn)             INIT_EXPORT(fn, "5")
/* appliation initialization (rtgui application etc ...) */
#define INIT_APP_EXPORT(fn)             INIT_EXPORT(fn, "6")
API functions list is shown in the following table
| Order | API | Description |
|---|---|---|
| 1 | INIT_BOARD_EXPORT(fn) | Initialization in the very early stage, when the scheduler has not yet started |
| 2 | INIT_PREV_EXPORT(fn) | Mainly used for pure software initialization that does not require many dependencies on functions |
| 3 | INIT_DEVICE_EXPORT(fn) | Peripheral driver initialization related, such as network card devices |
| 4 | INIT_COMPONENT_EXPORT(fn) | Component initialization, such as file systems or LWIP |
| 5 | INIT_ENV_EXPORT(fn) | System environment initialization, such as mounting file systems |
| 6 | NIT_APP_EXPORT(fn) | Application initialization, such as GUI application |
Mechanism Analysis
INIT_EXPORT Function
Seeing from the initialization functions, we're getting to know that their final call is the INIT_EXPORT function, only the entered parameters are different. Let's take a look at the definition of this function
#define INIT_EXPORT(fn, level)                                                       \
RT_USED const init_fn_t __rt_init_##fn SECTION(".rti_fn." level) = fn
The INIT_EXPORT() function has two parameters, the first parameter indicates which function needs to be initialized, delivering the function pointer(the function name), and the second parameter indicates which segment to place the function pointer into. Let's get into the Macro next, and there are several prerequisites required to know before we jump to the macro.
-
RT_USED
#define RT_USED __attribute__((used))The
attribute__(used)function has been marked in the object file to prevent the linker from deleting unused sections. -
init_fn_t type
typedef int (*init_fn_t)(void);Here a return value of
intis defined, a function pointer type with the function parametervoidand renamed toinit_fn_t. -
####belongs to the C language, and its role is to combine two language symbols into a single language symbol -
SECTION
#define SECTION(x) __attribute__((section(x)))__attribute__((section(name)))puts the functional functions or data into an input segment specified namedname
With the above preliminary backup, let's analyze the following INIT_EXPORT macro. Expand the macro to as below
RT_USED const init_fn_t __rt_init_fn SECTION(".rti_fn." level) = fnThe function of this macro is to assign the pointer of the function fn to the variable __rt_init_fn, this variable type is RT_USED const init_fn_t, and it is stored in the specified segment .rti_fn.level. So after the function is exported using an automatic initialization macro, pointers to each initialization function will be stored in these data segments. When we're dereferencing these pointers will be taking as we're executing the corresponding function.
Division of segments
The segments are divided in component.c, and the source code is as follows
static int rti_start(void)
{
  return 0;
}
INIT_EXPORT(rti_start, "0");
static int rti_board_start(void)
{
  return 0;
}
INIT_EXPORT(rti_board_start, "0.end");
static int rti_board_end(void)
{
  return 0;
}
INIT_EXPORT(rti_board_end, "1.end");
static int rti_end(void)
{
  return 0;
}
INIT_EXPORT(rti_end, "6.end");
The distribution of the segments exported above using the INIT_EXPORT macro is shown in the following table
| NO. | Segment Name | Function Pointer/Function Name |
|---|---|---|
| 1 | .rti_fn.0 | __rt_init_rti_start |
| 2 | .rti_fn.0.end | __rti_init_rti_board_start |
| 3 | .rti_fn.1.end | __rti_init_rti_board_end |
| 4 | .rti_fn.6.end | __rti_init_rti_end |
After adding the six segments that are exported after auto-initialization, the distribution of each segment is shown in the following table
| NO. | Segment Name | Function Pointer/Function Name |
|---|---|---|
| 1 | .rti_fn.0 | __rt_init_rti_start |
| 2 | .rti_fn.0.end | __rti_init_rti_board_start |
| 3 | .rti_fn.1 | INIT_BOARD_EXPORT(fn) |
| 4 | .rti_fn.1.end | __rti_init_rti_board_end |
| 5 | .rti_fn.2 | INIT_PREV_EXPORT(fn) |
| 6 | .rti_fn.3 | INIT_DEVICE_EXPORT(fn) |
| 7 | .rti_fn.4 | INIT_COMPONENT_EXPORT(fn) |
| 8 | .rti_fn.5 | INIT_ENV_EXPORT(fn) |
| 9 | .rti_fn.6 | INIT_APP_EXPORT(fn) |
| 10 | .rti_fn.6.end | __rti_init_rti_end |
rt_components_board_init function
Head to check about the implementation of the rt_components_board_init function
void rt_components_board_init(void)
{
#if RT_DEBUG_INIT
  int result;
  const struct rt_init_desc *desc;
  for (desc = &__rt_init_desc_rti_board_start; desc < &__rt_init_desc_rti_board_end; desc ++)
  {
    rt_kprintf("initialize %s", desc->fn_name);
    result = desc->fn();
    rt_kprintf(":%d done\n", result);
  }
#else
  volatile const init_fn_t *fn_ptr;
  for (fn_ptr = &__rt_init_rti_board_start; fn_ptr < &__rt_init_rti_board_end; fn_ptr++)
  {
    (*fn_ptr)();
  }
#endif
}
If not consider about the RT_DEBUG_INIT, it's clear to find that the rt_components_board_init is executing the following
volatile const init_fn_t *fn_ptr;
for (fn_ptr = &__rt_init_rti_board_start; fn_ptr < &__rt_init_rti_board_end; fn_ptr++)
{
  (*fn_ptr)();
}
The above code defines a fn_ptr pointer, which is dereferenced when the range of the pointer is within the range of __rt_init_rti_board_start and rt_init_rti_board_end, where the pointer is the function pointer put during automatic initialization, so it is quite the execution of the function. That is, the function exported by INIT_BOARD_EXPORT(fn) is executed
rt_components_init function
source code:
void rt_components_init(void)
{
#if RT_DEBUG_INIT
  int result;
  const struct rt_init_desc *desc;
  rt_kprintf("do components initialization.\n");
  for (desc = &__rt_init_desc_rti_board_end; desc < &__rt_init_desc_rti_end; desc ++)
  {
    rt_kprintf("initialize %s", desc->fn_name);
    result = desc->fn();
    rt_kprintf(":%d done\n", result);
  }
#else
  volatile const init_fn_t *fn_ptr;
  for (fn_ptr = &__rt_init_rti_board_end; fn_ptr < &__rt_init_rti_end; fn_ptr ++)
  {
    (*fn_ptr)();
  }
#endif
}
If not consider about the RT_DEBUG_INIT, it's clear to find that the rt_components_init is executing the following
volatile const init_fn_t *fn_ptr;
for (fn_ptr = &__rt_init_rti_board_end; fn_ptr < &__rt_init_rti_end; fn_ptr ++)
{
  (*fn_ptr)();
}
The code also defines a fn_ptr pointer, which is dereferenced when the range of the pointer is within the range of __rt_init_rti_board_end and __rt_init_rti_end, where the pointer is the function pointer put during automatic initialization, again, we're getting this function executed. That is, the function derived between the INIT_PREV_EXPORT(fn) to INIT_APP_EXPORT(fn) segments is executed
Execution of auto-initialized functions
The startup process of RT-Thread:
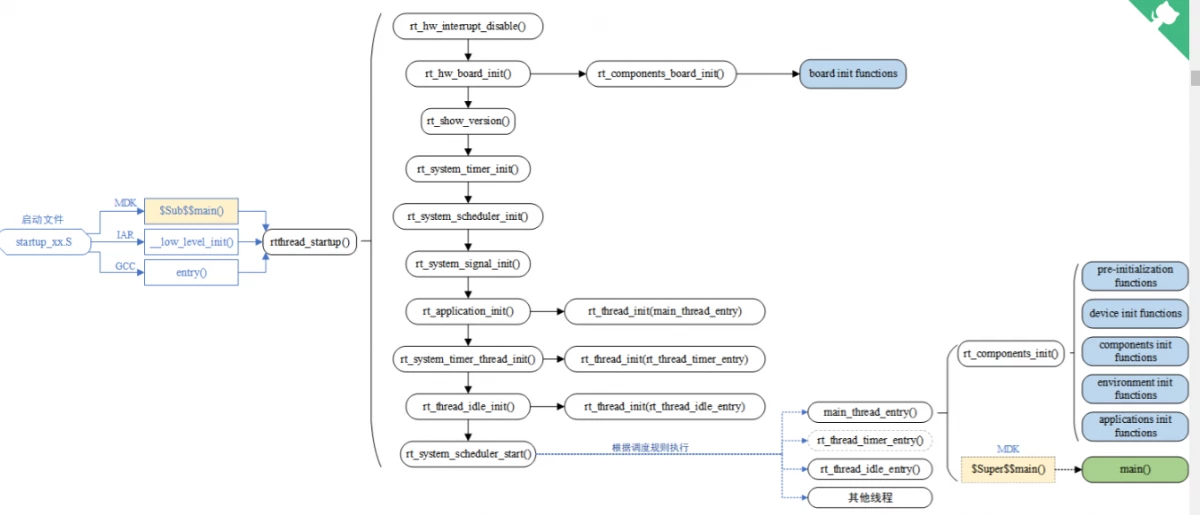
The rt_components_board_init() function and the rt_componenets_init() function are executed.
Sample
Add the following test code to the main.c function
int led_init(void)
{
  return 1;
}
INIT_APP_EXPORT(led_init);
The compiled .map file is shown as follows:
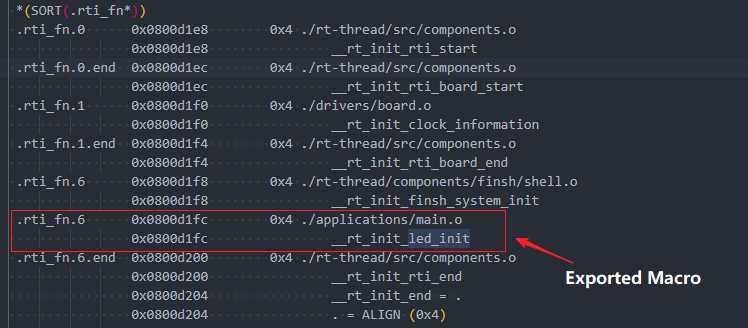
The function pointer __rt_init_led_init is located in the .rti_fn.6 segment, and the function rt_components_init() will dereference this pointer when it is executed, that is, execute the led_init function
Author: Mu Chen
ThingSpeak is an open-source software written in Ruby which allows users to communicate with internet enabled devices. This Paper takes you on a tour to connect Thingspeak to RT-Thread.
ThingSpeak is an open-source software written in Ruby which allows users to communicate with internet enabled devices. This Paper takes you on a tour to connect Thingspeak to RT-Thread.
1.Hardware Platform(The same method applies to different hardware platforms)
- D1s dev boards
- RW007 Module
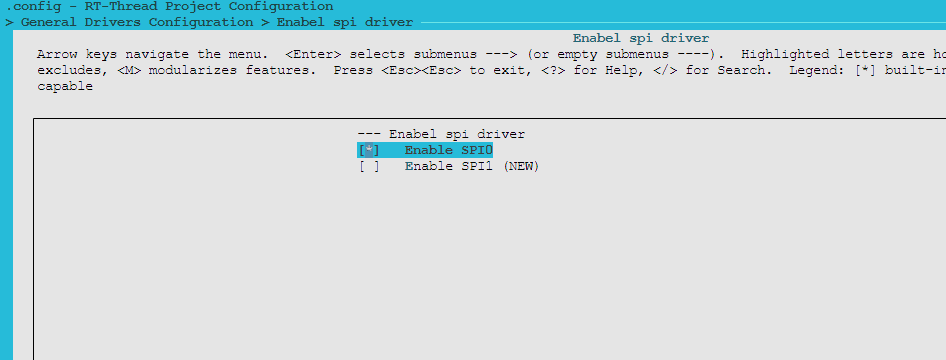
Configure RW007 Software Package
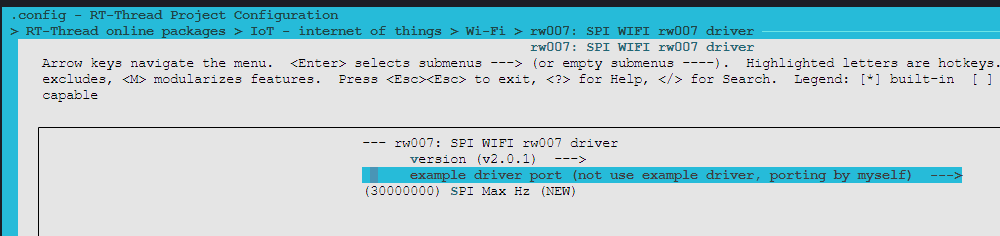
Connect D1s development board to the RW007 WIFI module via SPI0
Enter pkgs —update to update the package
After updating the package, change ALIGN in the struct rw007_spi struct definition in the rw007 package to rt_align
Enter the WIFI command to connect to the WIFI
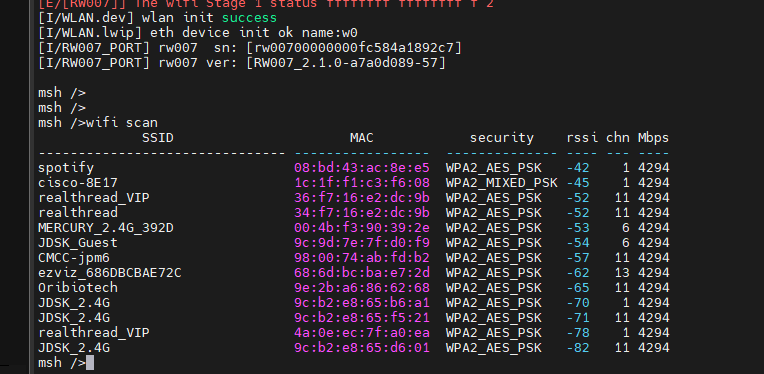
Note: There are some issues may happen when simultaneously enabling the D1s board and the RW007 module, the issues may include:
- If D1s is power-on and then plug in the RW007 module, the serial terminal will be cut off, and the serial terminal software will be reopened
- With the RW007 module plugged in, if enable or reset D1s will enter the FEL mode and need to exit via the xfel.exe reset command
Configure Thingspeak
1. Quick register to Thingspeak if you're a new user.
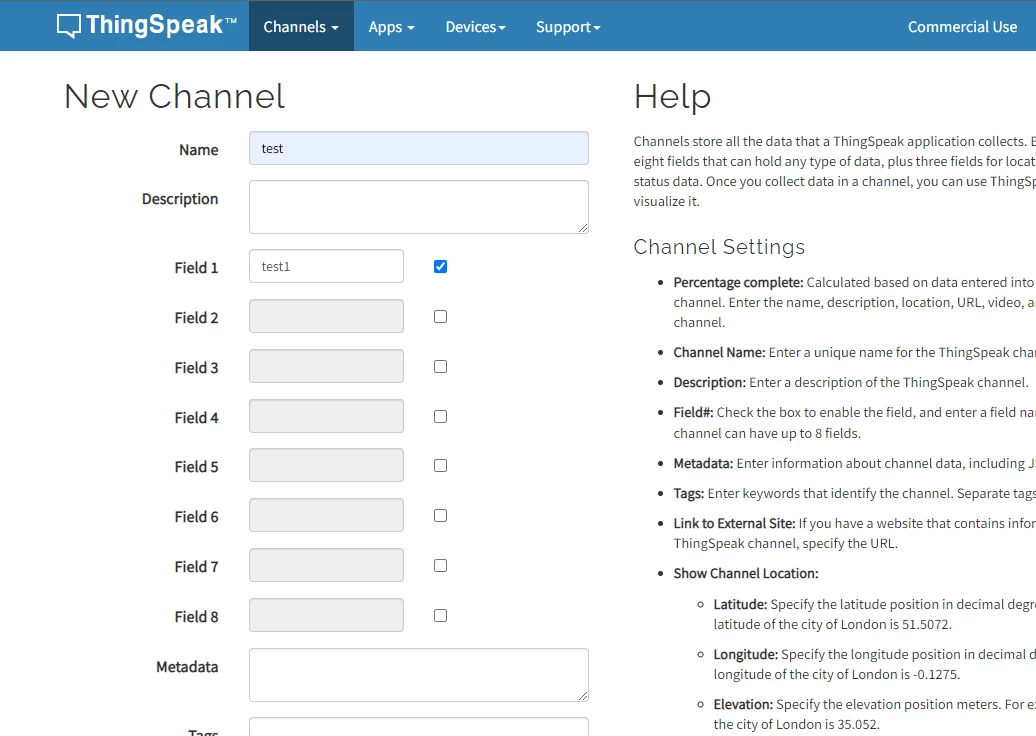
2. Create the channel
In this paper, we only created a data interface field1 to upload data.
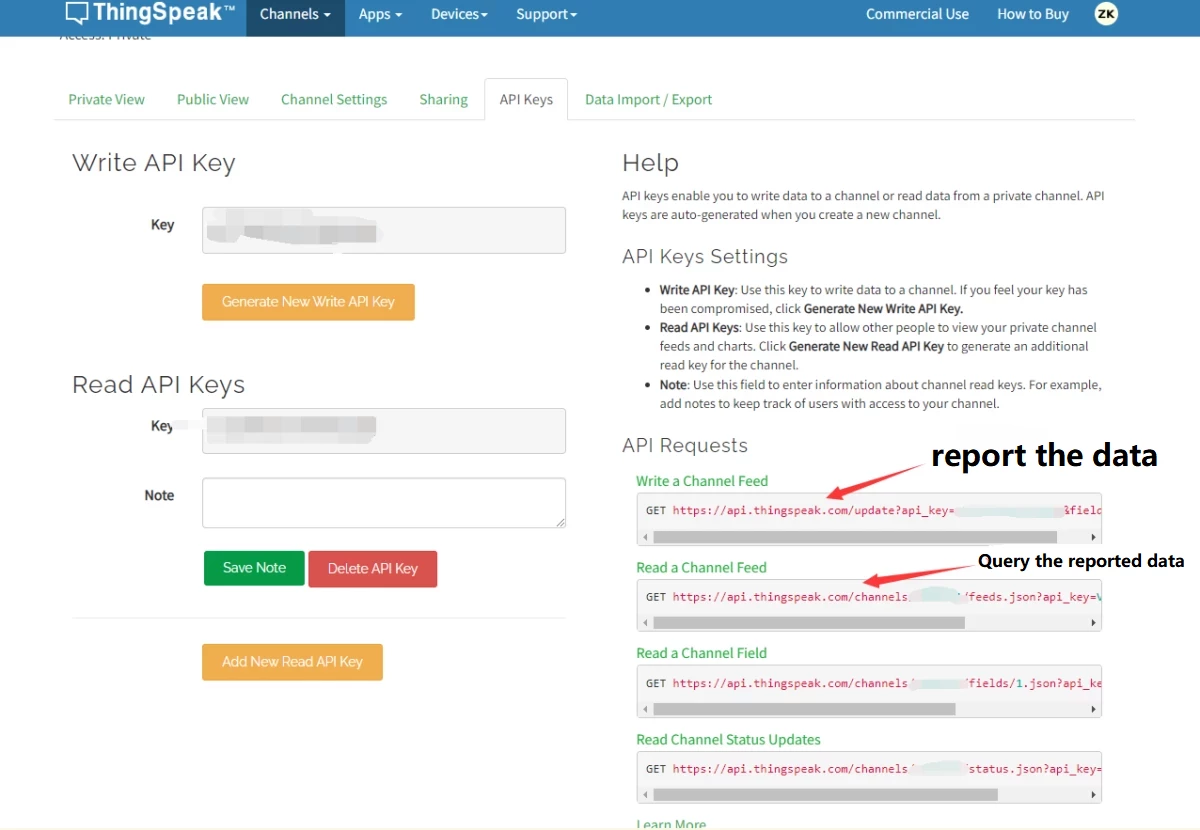
Check out the HTTP-related APIs in the channel.
Look at the figure below, the last field1=0 in the [Write a Channel Feed API is the uploaded data (where 0 is not limited to numbers, the string is also feasible)
Thingspeak uses the GET protocol, here we're bringing the webclient package to upload the data
Add the webclient package
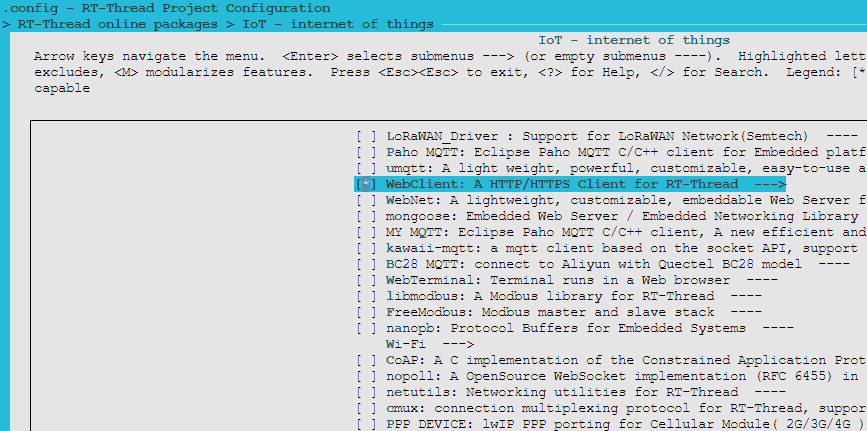
Add rt-thread/bsp/allwinner/d1s/applications/thingspeak.c file
Replace the value that defined by the 'GET_LOCAL_URI' to your own [Write a Channel Feed API]
#include
#include
#define GET_LOCAL_URI "http://api.thingspeak.com/update?api_key=XXXXXXXXXXXX&field1="
static int webclient_get_smpl(const char *uri)
{
char *response = RT_NULL;
size_t resp_len = 0;
int index;
if (webclient_request(uri, RT_NULL, RT_NULL, 0, (void **)&response, &resp_len) < 0)
{
rt_kprintf("webclient send get request failed.");
return -RT_ERROR;
}
rt_kprintf("webclient send get request by simplify request interface.\n");
rt_kprintf("webclient get response data: \n");
for (index = 0; index < rt_strlen(response); index++)
{
rt_kprintf("%c", response[index]);
}
rt_kprintf("\n");
if (response)
{
web_free(response);
}
return 0;
}
static int thingspeak(void)
{
char uri[80];
srand();
int number;
while(1)
{
number = rand() % 100;
sprintf(uri, "%s%d", GET_LOCAL_URI, number);
webclient_get_smpl(uri);
rt_kprintf("random number is %d\r\n",number);
rt_thread_mdelay(20000);
}
}
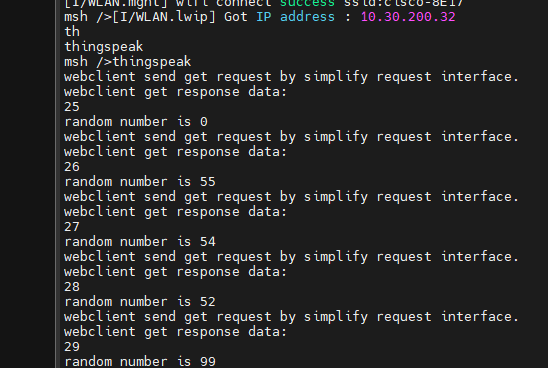
MSH_CMD_EXPORT(thingspeak, thingspeak); The program will upload the random 0~100 value of the development board to Thingspeak every 20 seconds.
After compiling, downloading, running, and connecting to WIFI, we can then use the thingspeak command to run the program.
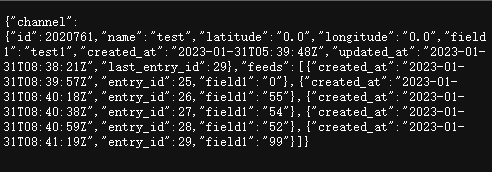
You can also query the data through other APIs in API Keys
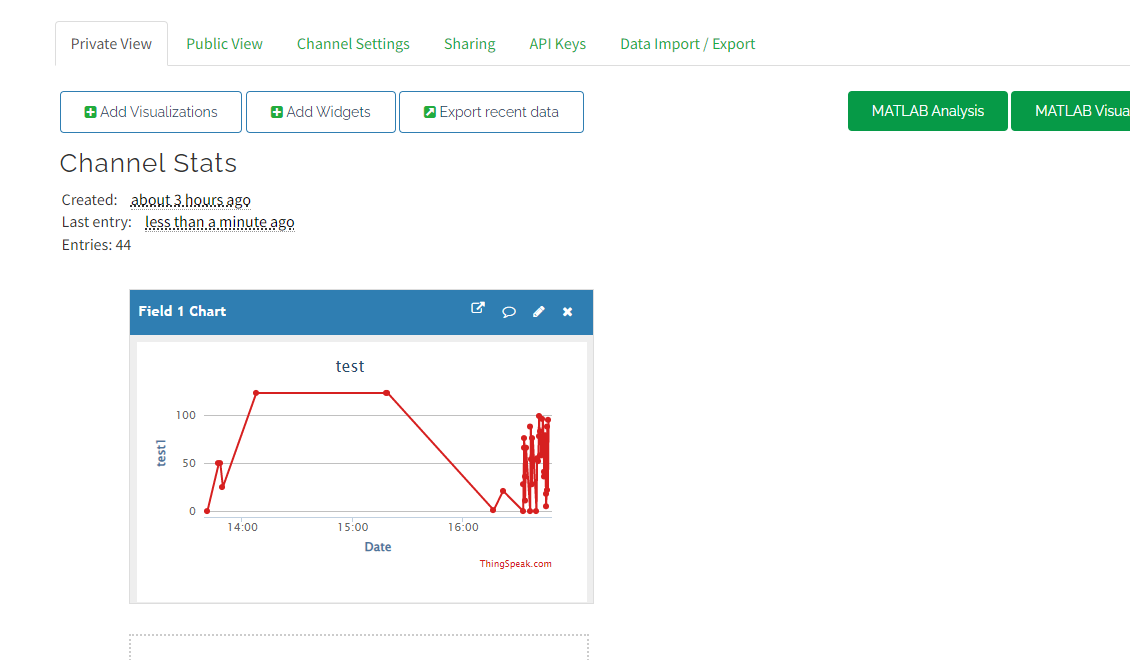
There are also provide the visual analysis data
Are there any ideas you'd like to share? Comment to chat with us.
Author: Rb
RT-Thread Smart is a professional, high-performance, microkernel operating system for real-time applications. It offers an open source foundation for embedded devices in any market, including security (e.g., internet protocol cameras), industrial control, onboard devices, consumer electronics, and anything else using embedded technology (which is increasingly coming to mean "everything").
Author: Rb
How to Start
1. Get to know about RT-Smart
RT-Thread Smart is a professional, high-performance, microkernel operating system for real-time applications. It offers an open source foundation for embedded devices in any market, including security (e.g., internet protocol cameras), industrial control, onboard devices, consumer electronics, and anything else using embedded technology (which is increasingly coming to mean "everything"). It's significant because, unlike traditional IoT operating systems, a microkernel operating system can fill the gap between a traditional real-time operating system (RTOS) and a comparatively large operating system like Linux to achieve the best balance between real-time performance, cost, security, startup speed, and more.
More details check out Hrer.
2. Built RT-Smart Environment
Download the RT-Smart user space application code:
git clone https://github.com/RT-Thread/userapps.git
Go to the userapps directory and clone the RT-Thread rt-smart branch
git clone -b rt-smart https://gitee.com/rtthread/rt-thread.git
More Details about environment built check out HERE.
3. Configure Toolchain
Running get_toolchain.py's script in the userapps/tools directory to download the corresponding toolchain and expand to the userapps/tools/gun_gcc directory. The toolchain name that follows can be an arm or riscv64.
Here we're taking the Allwinners D1s as an example, it is the RISCV-64 architecture.
Enter the following command:
python3 get_toolchain.py riscv64
Under the userapps directory, run the smart-env.sh to configure the toolchain path, the currently supported parameter can be arm or riscv64
source smart-env.sh riscv64
4. Get the LVGL Mainline Code
Go to the userapps directory, create a new media folder to store the LVGL-related code, and clone the LVGL mainline code to the local.
git clone https://github.com/lvgl/lvgl.git
5. Kernel Driver Implementation
Display Part
At this part, you could refer to the implementation approach came up with drv_clcd.c in qemu-vexpress-a9. In user space, if you want to get and operate the LCD, the driver needs to implement at least two OPS functions: drv_clcd_init + drv_clcd_control.
In drv_clcd_control, we need to handle the following types of cmd:
- RTGRAPHIC_CTRL_RECT_UPDATE: Notifies the graphics device to be updated
- RTGRAPHIC_CTRL_GET_INFO: Get the basic information of the LCD, including pixel format, resolution, etc
- FBIOGET_FSCREENINFO: Gets fixed parameter information for the FrameBuffer device. Fixed parameter information is using
struct fb_fix_screeninfo to describe structs - FBIOGET_VSCREENINFO: Get variable parameter information of LCD, including screen pixels, dimensions, and other information
Touch Part:
If the user space wants to obtain the coordinates of the touch chip, the underlying driver needs to implement at least touch_ops: probe + init + read_point, that is, the function of probing, initializing, and reading the touch device.
6. User Space Interface Docking
The directory structure of user space directory is as follows, you'll be needing to create new folders named lv_rtt_port, packages under the media/lvgl/ directory.
lvgl
├── lv_rtt_port
│   ├── SConscript
│   ├── lv_conf.h
│   ├── lv_port_disp.c
│   └── lv_port_indev.c
├── packages
│   ├── LVGL-latest
│   ├── lv_music_demo-latest
│   └── SConscript
├── SConscript
├── SConstruct
├── pkg_config.h
————————————————lv_rtt_portis a key point while doing the porting, it includes the display and touch interfaces, which mainly need to be written by ourselves.LVGL-latestgets the latest code fromhttps://github.com/lvgl/lvgland does not need to be modified.- lv_music_demo-latest is LVGL's music player demo, you could get the latest code from
https://github.com/RT-Thread-packages/lv_demo_music.git, no modification required. - The lv_conf.h file was modified from
lvgl_conf_template.hin thelvgldirectory. The configuration should be done as follows, and it depends on different screen parameters.
#define LV_COLOR_16_SWAP    1
#define LV_COLOR_DEPTH      32
#define LV_USE_PERF_MONITOR 1
/* music player demo */
#define LV_USE_DEMO_RTT_MUSIC       1
#define LV_DEMO_RTT_MUSIC_AUTO_PLAY 1
#define LV_FONT_MONTSERRAT_12       1
#define LV_FONT_MONTSERRAT_16       1
#define LV_COLOR_SCREEN_TRANSP      1
————————————————
6.1 Display Interface
The core is in the lv_rtt_port, and the file that needs to be paid attention to is thelv_port_disp.c file, it's not rushing to get the Touch added at this part, let's get the Display works first.
In RT-Thread, the LCD device is mainly operated through rt_device_xxx, first find the LCD device through the rt_device_find function, and operate the LCD device through the device handle after finding the device.
/* LCD Device Init */
device = rt_device_find("lcd");
RT_ASSERT(device != RT_NULL);
if (rt_device_open(device, RT_DEVICE_OFLAG_RDWR) != RT_EOK)
{
    rt_kprintf("open lcd devce fail\n");
    return;
}
rt_device_control(device, RTGRAPHIC_CTRL_GET_INFO, &info);
rt_device_control(device, FBIOGET_FSCREENINFO, &fb_info);
————————————————
As long as the user space start obtaining the framebuffer, we could operate the LCD. Note that in user space we cannot directly use the framebuffer variable returned by RTGRAPHIC_CTRL_GET_INFO, but need to use FBIOGET_FSCREENINFO to get the smem_start (that's the initial address of the address space), because the initial address and length of the allocated address space will be padded to the variables of smem_start and smem_len in the fb_fix_screeninfo structure.
Thus, we can make the LCD to display different colors by filling the smem_start address with the color data.
6.2 Touch Interface
Now we're getting to the Touch Interface. The file of the lv_port_indev.c should be highlighted here, we're mainly using the rt_device_find to find the touch device, and operate the touch device through the device handle after finding the device.
#define POINT_NUMBER 1
static rt_device_t ts;
static struct rt_touch_data *read_data;
ts = rt_device_find("touch");
rt_device_open(ts, RT_DEVICE_FLAG_INT_RX);
read_data = (struct rt_touch_data *)rt_calloc(POINT_NUMBER, sizeof(struct rt_touch_data) * POINT_NUMBER);
————————————————
Get coordinate function after calling the rt_device_read function, the coordinate information is saved in the parameter read_data, and then passed to the lv_indev_data_t structure of LVGL.
static bool touchpad_is_pressed(void)
{
    if (POINT_NUMBER == rt_device_read(ts, 0, read_data, POINT_NUMBER))
    {
        if (read_data->event == RT_TOUCH_EVENT_MOVE)
        {
            /* swap x and y */
            rt_uint16_t tmp_x = read_data->x_coordinate;
            rt_uint16_t tmp_y = read_data->y_coordinate;
            /* restore data */
            last_x = tmp_x;
            last_y = tmp_y;
            return true;
        }
    }
    return false;
}
static void touchpad_get_xy(rt_int16_t *x, rt_int16_t *y)
{
    *x = last_x;
    *y = last_y;
}
static void touchpad_read(lv_indev_drv_t *indev, lv_indev_data_t *data)
{
    if (touchpad_is_pressed())
    {
        data->state = LV_INDEV_STATE_PRESSED;
        touchpad_get_xy(&data->point.x, &data->point.y);
    }
    else
    {
        data->state = LV_INDEV_STATE_RELEASED;
    }
}
————————————————
7. Efforts
Here we're taking the RT-Thread Community Dev Boar Persimmon Pie M7 as an example, the compiled user space executable file is packaged and burned into the EMMC on the board using the xfel tool. Enter the executable file name in the serial terminal to start the user space program.
The final effect is as follows, with a screen resolution of 480*272 and RGB565 32-bit color depth, the frame rate of LVGL in user mode is maintained at 60fps as a whole, which meets the needs of use.
8. Docs
Author: windoufu
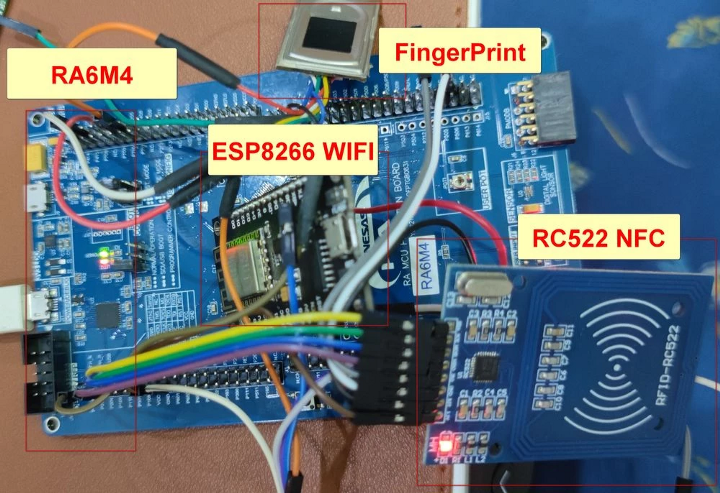
I developed an IoT fingerprint door lock based on the open-source RT-Thread IoT operating system and the RA6M4 development board; The hardware includes an ESP8266WIFI module, ATK-301 fingerprint module, RC522NFC module, RA6M4 main control board, etc. The software realizes Alibaba Cloud’s Smart WIFI to automatically finish the network configuration, APP remote to unlock the door, NFC to unlock the door, fingerprint registration, fingerprint unlocking, and many other functions.
Author: windoufu
I developed an IoT fingerprint door lock based on the open-source RT-Thread IoT operating system and the RA6M4 development board; The hardware includes an ESP8266WIFI module, ATK-301 fingerprint module, RC522NFC module, RA6M4 main control board, etc. The software realizes Alibaba Cloud’s Smart WIFI to automatically finish the network configuration, APP remote to unlock the door, NFC to unlock the door, fingerprint registration, fingerprint unlocking, and many other functions.
Hardware Architecture
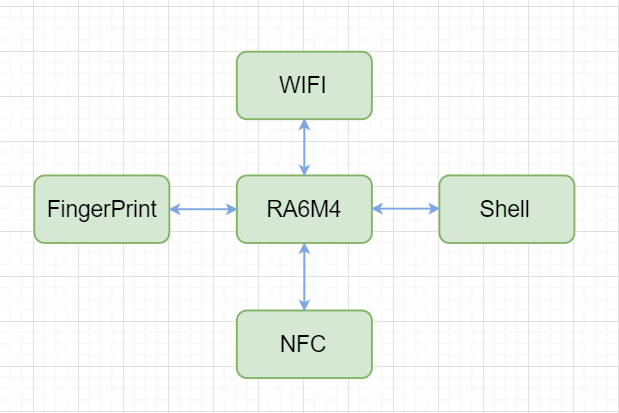
ESP8266WIFI module is responsible for completing Alibaba Cloud Intelligent APP communication, intelligent network distribution, remote unlocking, and other functions. ATK-301 fingerprint module, responsible for completing fingerprint registration and fingerprint matching functions, using serial port and master control for communication. RC522NFC module, responsible for completing NFC swipe to open the door, using the SPI interface and master control to communicate. RA6M4 main control board, responsible for implementing all peripheral module communication and functional logic. Among them, the LED light works to simulate the opening state, the green light means to open the door, and the red light to close the door.
Software Architecture
Software Module Description
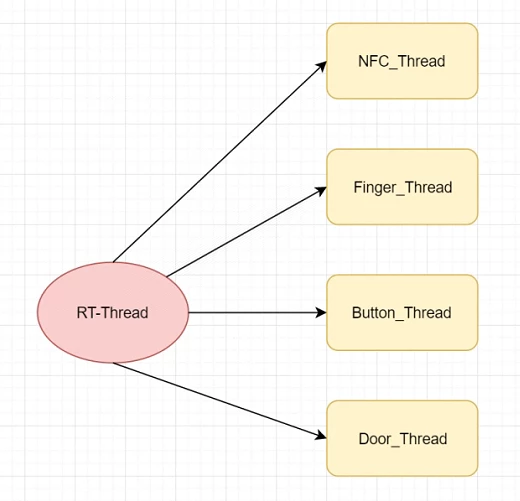
NFC thread: responsible for completing the detection of swipe card access, sending the door opening semaphore Fingerprint thread: responsible for completing fingerprint registration and fingerprint matching, after the fingerprint matching is successful, send the door opening signal Key thread: detects the key action, realizes fingerprint registration and door opening functions Open door thread: wait for the door opening signal to realize the door opening action
Demo Presentation
Source Code
The project is open source, download the code HERE.
By David528
Features
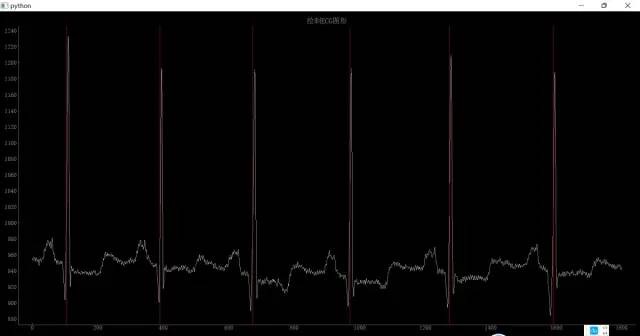
Generally, the traditional mathematical morphological method is the way that we’re taking as the main method of ECG signal waveform recognition. In the morphological method, the recognition of R-peak is the foundation of the other waveform recognition. In this project, we’re going to port the open source PanTompkins and do some transformation works, and an R-peak recognition technology implementation for producer and consumer models of RT-Thread systems will be added. Based on the collected ECG data, the ECG waveform is drawn in real-time and the R peak is identified, and the ECG waveform graph (white) and the marked position (red vertical line) of the R peak recognition are plotted in the example below.
By David528
Features
Generally, the traditional mathematical morphological method is the way that we’re taking as the main method of ECG signal waveform recognition. In the morphological method, the recognition of R-peak is the foundation of the other waveform recognition. In this project, we’re going to port the open source PanTompkins and do some transformation works, and an R-peak recognition technology implementation for producer and consumer models of RT-Thread systems will be added. Based on the collected ECG data, the ECG waveform is drawn in real-time and the R peak is identified, and the ECG waveform graph (white) and the marked position (red vertical line) of the R peak recognition are plotted in the example below.
Steps to follow
1. Create the project
Download/ Open RT-Studio IDE to create a new RT-Thread project based on the Renesas CPK-RA6M4 board.
2. Disable the system console and shell serial port input and output:
As I have only one serial port converter(USB to TTL), so I need to disable the system console and shell serial port input and output, I can then use this serial port independently for the input of ECG data and the output of the calculation result.
In the configuration header file rconfig.h, disable the following configuration:
1. Disable the console serial output
2. //#define RT_USING_CONSOLE
3. Disbale Shell:
4. //#define RT_USING_FINSH
3. Access the hardware
We’re focusing on the main card and the serial port converter( USB to TTL ), and it’s quite easy to access.
4. Add producer and consumer support to the open source PanTompkins algorithm
1. First, use RT-Thread’s rt_sem_init method to initialize the signals that are required for producer and consumer and serial port reception:
1. // Initialize the semaphore used by producers and consumers
2. rt_sem_init(&sem_lock, "lock",     1,      RT_IPC_FLAG_PRIO);
3. rt_sem_init(&sem_empty, "empty",   MAXSEM, RT_IPC_FLAG_PRIO);
4. rt_sem_init(&sem_full, "full",     0,      RT_IPC_FLAG_PRIO);
5.
6. // Initialize the serial port to receive the used signal
7. rt_sem_init(&rx_sem, "rx_sem", 0, RT_IPC_FLAG_FIFO);
2. Use RT-Thread’s rt_device_find and rt_device_open methods to open the serial port of device uart7
1. serial = rt_device_find(SAMPLE_UART_NAME);
2. if (!serial)
3. {
4.       rt_kprintf("find %s failed!\n", SAMPLE_UART_NAME);
5. }
6.
7. res = rt_device_open(serial, RT_DEVICE_FLAG_INT_RX);
8. if (res == RT_EOK)
9. {
10.    rt_device_set_rx_indicate(serial, uart_input);
11. }
3. Main source code fragment for the producer implementation
This part is based on serial port reception, making an infinite loop to receive serial port data, because the simulation sends each ECG data that contains n to the board, so use n as the end mark of each ECG data. After receiving ECG data, it is put into the consumer buffer.
1.  while (1)
2.    {
3.         dataType data = 0;
4.         char ch;
5.         char str[10];
6.         int i = 0;
7.
8.         while (1)
9.         {
10.            if (rt_device_read(serial, -1, &ch, 1) != 1) {
11.                rt_sem_take(&rx_sem, RT_WAITING_FOREVER);
12.        continue;
13.            }
14.            if (ch != '\n') {
15.                str[i] = ch;
16.                if ( i < (sizeof(str) - 1))
17.                     i ++;
18.            }
19.            else {
20.                data = atoi(str);
21.                break;
22.            }
23.         }
24.
25.         rt_sem_take(&sem_empty, RT_WAITING_FOREVER);
26.
27.         rt_sem_take(&sem_lock, RT_WAITING_FOREVER);
28.
29.         pc_buffer[pc_in] = data;
30.         pc_in = (pc_in + 1) % MAXSEM;
31.
32.         rt_sem_release(&sem_lock);
33.         rt_sem_release(&sem_full);    }
4. Main source code fragment for the customer implementation This part of the code is to implement the data input
1.     rt_sem_take(&sem_full, RT_WAITING_FOREVER);
2.
3.     rt_sem_take(&sem_lock, RT_WAITING_FOREVER);
4.
5.     num = pc_buffer[pc_out];
6.     pc_out = (pc_out + 1) % MAXSEM;
7.
8.     rt_sem_release(&sem_lock);
9.     rt_sem_release(&sem_empty);
5. At last, use the RT-Thread thread creation method rt_thread_create, rt_thread_startup to create and enable two threads, one for the producer and one for the consumer.
1.    tid = rt_thread_create("thread1",
2.                                 producer_thread_entry, (void*)0,
3.                                 THREAD_STACK_SIZE,
4.                                 THREAD_PRIORITY, THREAD_TIMESLICE);
5.    if (tid != RT_NULL)
6.    rt_thread_startup(tid);
7.
8.    tid = rt_thread_create("thread2",
9.                            consumer_thread_entry, (void*)0,
10.                           THREAD_STACK_SIZE,
11.                           THREAD_PRIORITY, THREAD_TIMESLICE);
12.   if (tid != RT_NULL)
13.   rt_thread_startup(tid);
5. Use Python to implement ECG data simulation input and ECG drawing.
Start from the main entry function, open a serial port COM3, and then create and enable two threads, one is to send the simulated ECG data, and the other is to receive ECG data and identify the results. In the source code for drawing ECG waveforms and R-peak (red vertical lines), we’re using QTimer and pygtgraph to draw the ECG graphics. Implemented Python source code:
1. import serial
2. import threading
3. import time
4. import pyqtgraph as pg
Visit RT-Thread main repository and give it a star⭐ if you haven’t already: https://github.com/RT-Thread/rt-thread
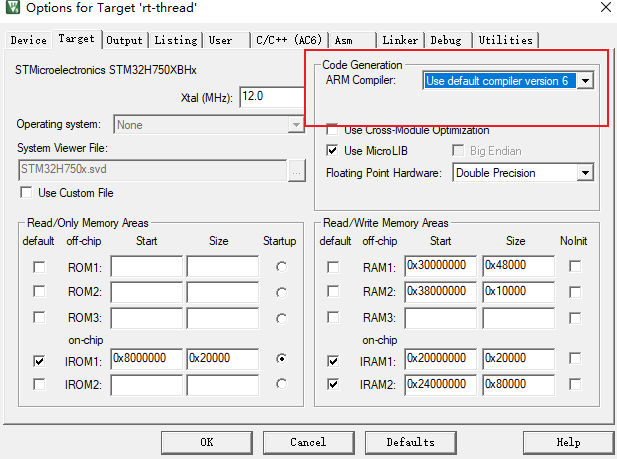
ArmClang Support
In the release of RT-Thread 4.1.0, Arm Compiler 6 was added, allowing users to modify the `rtconfig.py` to specify the compiler while building mdk5 projects.
- ArmClang supports more architectures compared to Armcc, Armcc supports armv7 architectures, armclang supports Armv6, Armv7, Armv8 and future Arm’s new processors.
- ArmClang compiles faster than Armcc under the same project.
User Guide
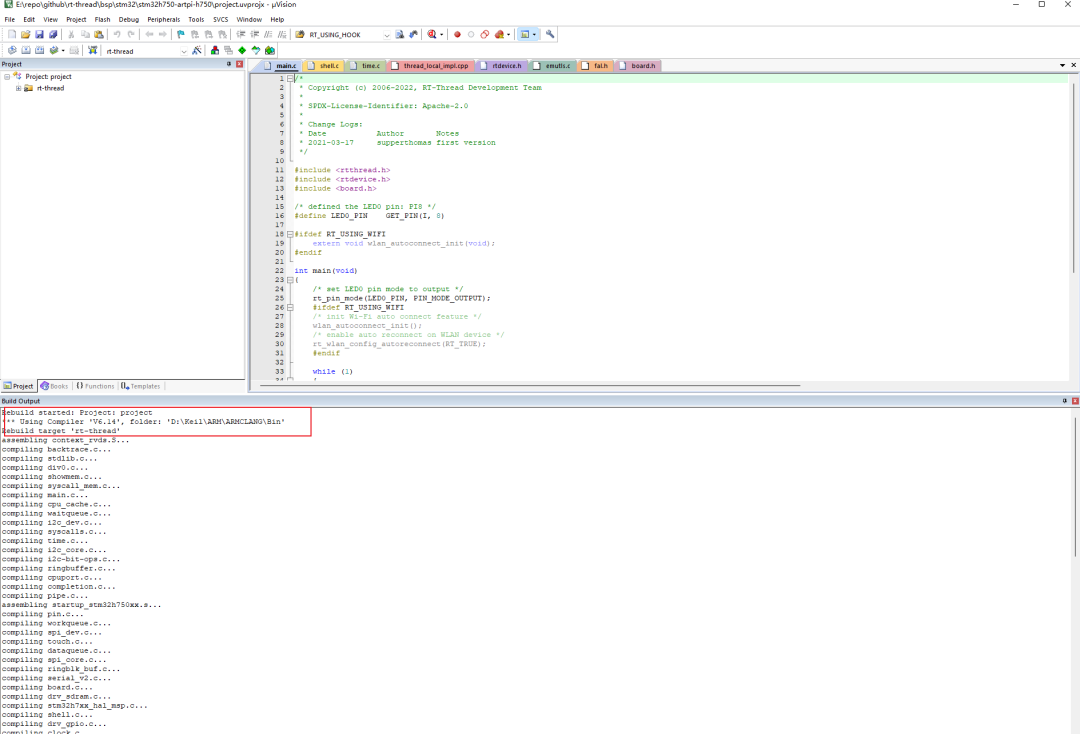
- Open any project in the rt-thread/bsp directory, we’re taking stm32h750-artpi-h750 as an example.
- Open the rtconfig.py file and modify the PLATFORM to armclang.
-

- Open the keil template project, modify the compiler to ArmClang, Ctrl+S save settings
-
- Under the RT-Thread Env environment, use the command
scons --target=mdk5'to generate the keil project. -
Reference
- Arm Compiler armclang Reference Guide Version 6.9
Intro:
This project was built with AB32VG1 microcontroller as the main controller, and the open-source RT-Thread IoT OS is adopted. This system design implements the data display via LCD screen OLED12864.
Code Open on: https://gitee.com/lk3/project/tree/master/
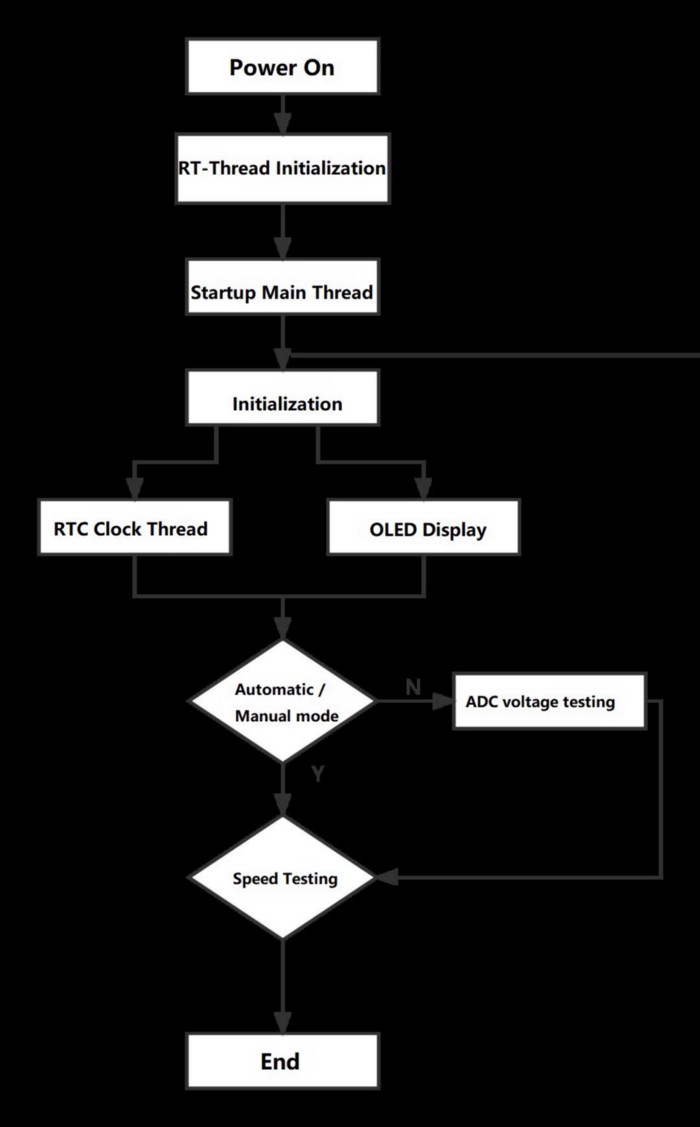
The project has been completed:
- Cruise control (speed limit is 25Km/h);
- OLED screen to display speed (0–36km/h);
- Support to display Year, Hour, Minute & Second, convenient for viewing the data;
- LED simulation alarm when the speed is too fast;
- Adjustable resistance as the electric vehicle throttle for speed control.
Hardware Specification
Kernel Part:
Multithreading, multitasking scheduling, semaphores, mutexes, etc.
Component Part:
Hardware ADC, analog IIC, RTC, etc.
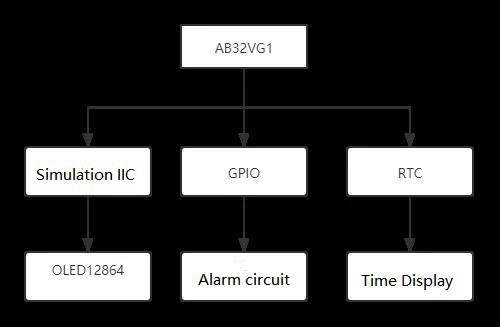
Pin Distribution
VCC 5V;
GND
SCL: PE6
SDA: PE7
Sliding Varistor:
100K: (ADC function) (Both sides of the Tap connects 3.3~5V)
IO: PE5(adc0)
Acquisition voltage 0–3.3V, (acquisition accuracy: 10 bits)
LED:
PA1: (Blue)
Button:
F1: (Mark: S2)
Software Specification
- The whole project was developed under RT-Thread Studio IDE
- C programming language
- The code adopts some part of semaphores and mutexes to ensure thread synchronization, and seamless switching is achieved through multithreading task scheduling.
- OLED display execution function in display.c
- OLED underlying driver function in oled.c
- Key execution function in button.c
- ADC function in adc_val.c
Presentation
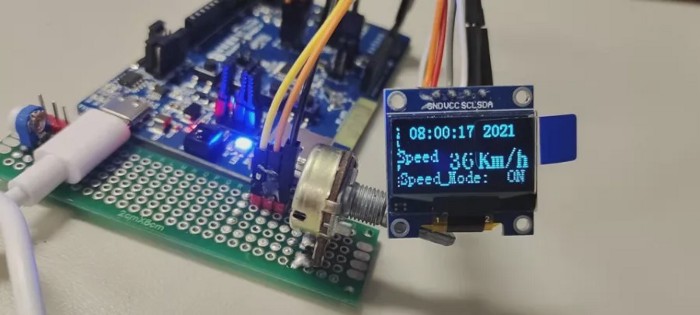
Video Presentation: https://youtu.be/H16ijhzXyPA
RT-Thread Contact Info:
Website: https://www.rt-thread.io
Github: https://github.com/RT-Thread
Twitter: https://twitter.com/rt_thread
Facebook: https://www.facebook.com/RT-Thread-IoT-OS-110395723808463
Youtube: https://www.youtube.com/channel/UCdDHtIfSYPq4002r27ffqPw
RT-AK is an AI Kit developed by the RT-Thread Team, committed to help
developers one-click deploy the AI models, allowing developers to develop
business code on top of a unified API and ultimately optimize performance on the target
platform, making it easier and simple to develop end-side AI applications.
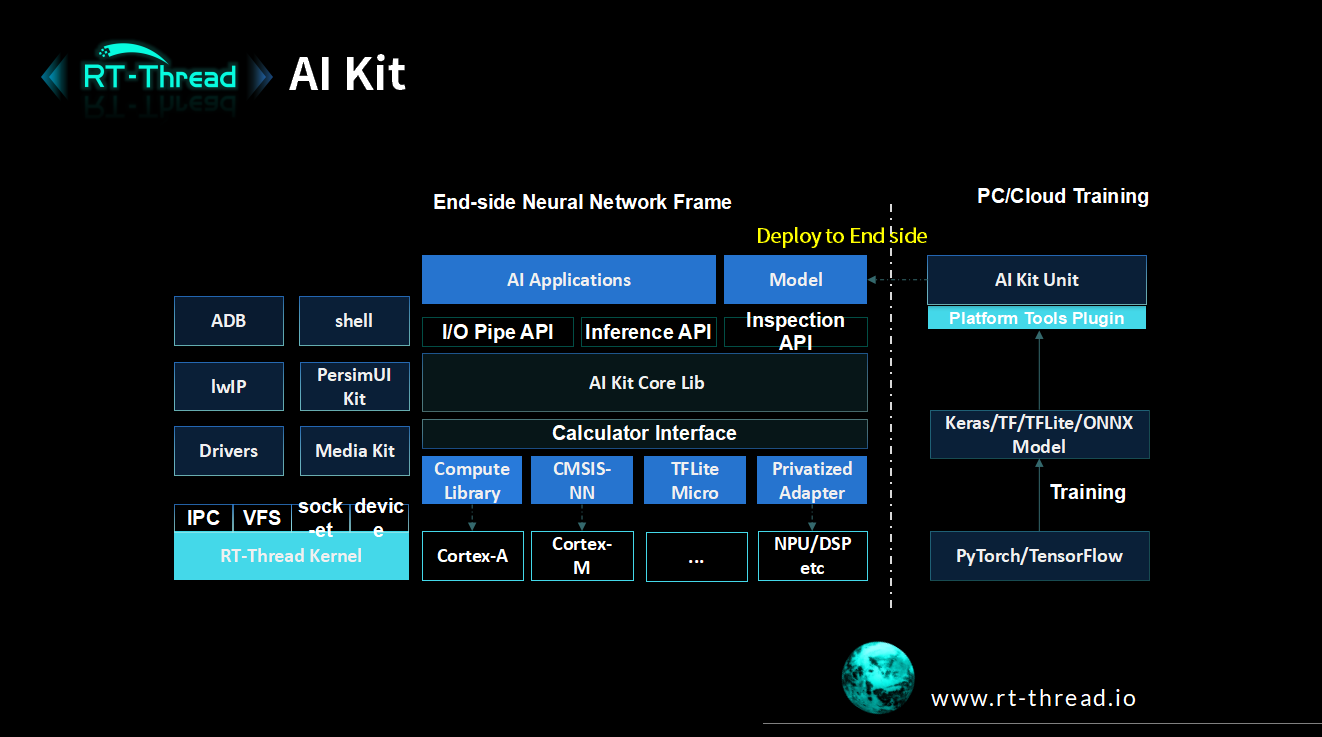
0. RT-AK Intro
RT-AK is an AI Kit developed by the RT-Thread Team, committed
to help developers one-click deploy the AI models, allowing developers to
develop
business code on top of a unified API and ultimately optimize performance on the target
platform, making it easier and simple to develop end-side AI applications.
With the RT-AK support, taking one line of command of
python aitools.py --model xxx... can deploy the AI model to
the embedded system:
Commands List: How to run aitools.py
GitHub Repository: https://github.com/RT-Thread/RT-AK
We are striving to minimize the difficulties and thresholds for embedded AI deployment!
1. Preparation
- Windows 10
- Python >= 3.7
Required Documents:
| Index | Documents | Example |
| 1 | Hardware & BSP |
ART-PI BSP |
| 2 | Neural network model | ./rt_ai_tools/Model/keras_mnist.h5 |
| 3 | STM32 AI Plug-in |
X-CUBE-AI download & decompress, will be described below |
| 4 | RT-AK |
RT-AK code is cloned locally |
1.1 X-CUBE-AI Intro
- Download Link: https://www.st.com/zh/embedded-software/x-cube-ai.html
- Version:5.2.0
TO DO LIST: The Latest comes to V6.0.0, RT-AK is now using V5.2.0 will soon be updated to the latest!
X-CUBE-AI is a part of STM32Cube Expansion Package in
STM32Cube.AI ecosystem and extending STM32CubeMX capabilities with
automatic conversion of pre-trained Neural Network and integration of generated
optimized library into the user's project.

X-CUBE-AI
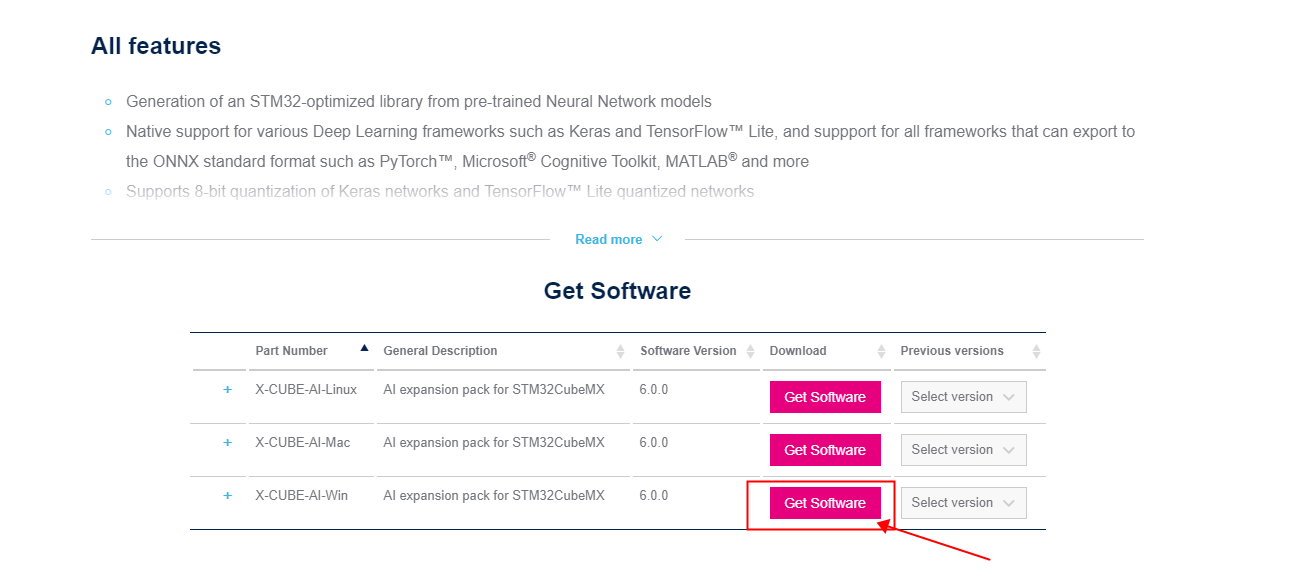
Download
1.2 X-CUBE-AI Decompress
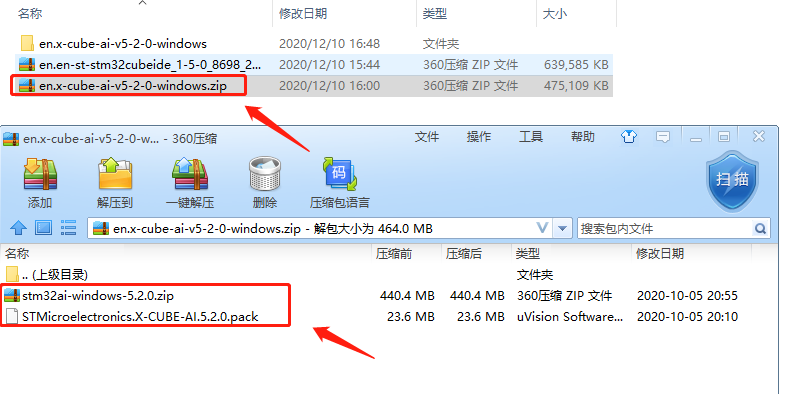
Downloaded File Folder
Includes:
stm32ai-windows-5.2.0.ziphas stored theX-CUBE-AImodel conversion software:stm32ai. This file is required.STMxxx.packis a static library file ofSTM32Cube.AI, it doesn't need to decompress, and located in./RT-AK/rt_ai_tools/platforms/stm32/X-CUBE-AI.5.2.0
Unzip
to D:\Program Files (x86)\stm32ai-windows-5.2.0 , so you can get a
windows folder under this path.
Keep in mind about this path. HIGH ATTENTION!

STM32: X-CUBE-AI unzip path
1.3 ART-PI BSP
- Open
RT-Thread Studio - Create
ART-PI BSP
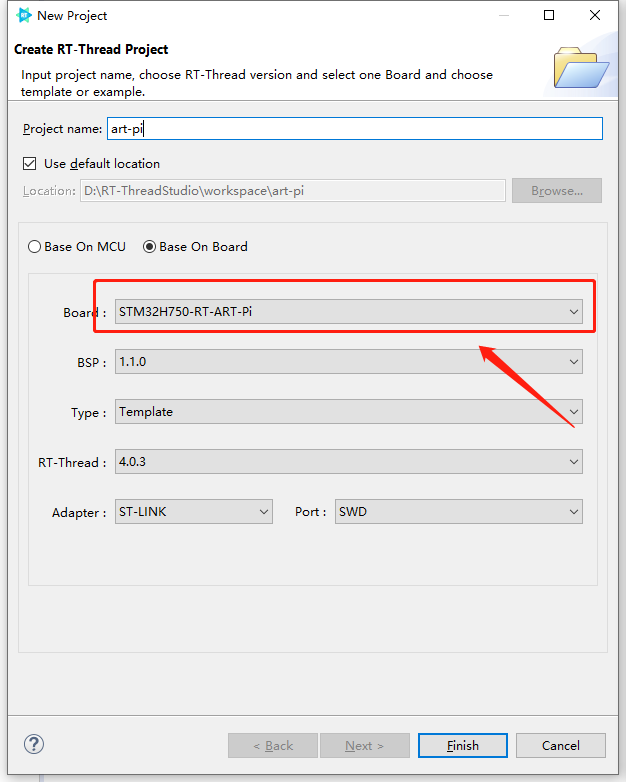
Create ART-PI Project in RT-Thread Studio
2. Execute
Step1 Run rt_ai_tools/aitools.py
Code will automatically use the STM32Cube.AI model conversion tool to obtain a BSP with AI integrated. YES. Aha Moment! Internal detailed processes please refer to the source code or the readme documentation under the plugin_stm32 warehouse.
Run Command
Enter edge-ai/RTAK/tools path, run aitools.py
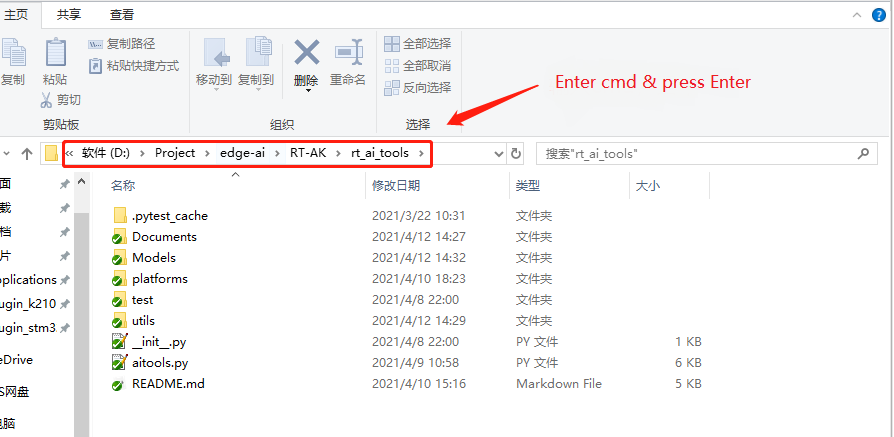
# Run Command
python aitools.py --project=<your_project_path> --model=<your_model_path> --platform=stm32 --ext_tools=<your_x-cube-ai_path> --clear
# Sample
python aitools.py --project="D:\RT-ThreadStudio\workspace\test" --model="./Models/keras_mnist.h5" --platform=stm32 --ext_tools="D:\Program Files (x86)\stm32ai-windows-5.2.0\windows" --clear
Works done so far, some more additional instructions to supplement are shown following
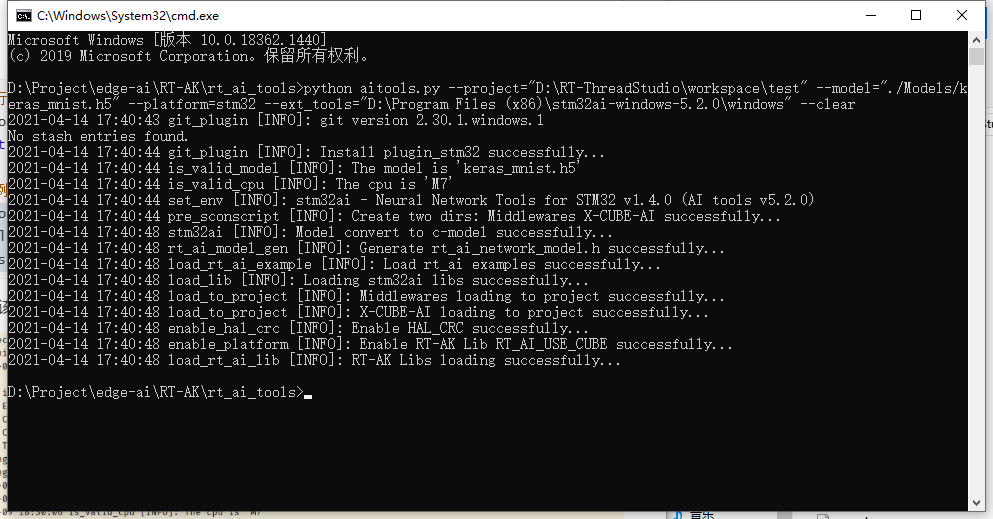
Other Parameters for Run Command
# Specify the name of the conversion model,--model_name defaults to network
python aitools.py --project=<your_project_path> --model= <your_model_path> --model_name= <model_name>  --platform=stm32 --ext_tools=  <your_x-cube-ai_path>
# Save files generated during running the stm32ai thread,-- clear defaults to empty
# If exited, the work folder generated during running 'stm32ai', i.e. '--stm_out, will be deleted
python aitools.py --project= <your_model_path> --model= <your_model_path> --platform=stm32 --ext_tools= <your_x-cube-ai_path>
# Specify to save the run log, --log defaults to empty
python aitools.py --project= <your_project_path> --model= <your_model_path> --log=./log.log --platform=stm32 --ext_tools= <your_x-cube-ai_path>
# Specify the name of the saved folder,--stm_out defaults to the time of day, such as './20210223'
python aitools.py --project= <your_project_path> --model= <your_model_path> --platform=stm32 --ext_tools= <your_x-cube-ai_path> --stm_out
# Specify the generated c-model name ,--c_model_name defaults to network
python aitools.py --project= <your_project_path> --model=<your_model_path> --platform=stm32 --ext_tools= <your_x-cube-ai_path> --c_model_name=<new_model_name>
Run Parameters Specs
- Main functions parameters
| Parameter | Description |
--log |
./log.log The log stores the path, which defaults to
empty, and if so, the log file is saved, e.g. ./log.log |
--project |
OS+BSP project engineering folder, empty, user-specified |
--model |
Neural network model file path, defaults to
./Models/keras_mnist.h5
|
--model_name |
New model name after neural network model conversion, defaults to
network
|
--rt_ai_lib |
RT-AK Lib provided by RT-Thread defaults to
../rt_ai_lib
|
--platform |
Specified hardware platform information, currently supported:
stm32, k210, defaults to example
|
- STM32 platform plug-in parameters
| Parameter | Description |
|---|---|
--ext_tools |
X-CUBE-AI storage path, model conversion tool,
stm32ai executable software inside, requiring user-specified
|
--cube_ai |
X-CUBE-AI runs the required static library, defaults
to./platforms/stm32/X-CUBE-AI.5.2.0 |
--rt_ai_example |
Storert_ai_<model_name>_model.c sample file, defaults
to./platforms/stm32/docs |
--stm_out |
The intermediate folder path that results from the stm32ai
thread processing is named by default for the timestamp of the day |
--workspace |
Temporary workspace generated during running stm32ai, defaults
to ./stm32ai_ws |
--val_data |
Defaults to empty, allows users to customize the test dataset even when using an internally self-generated random dataset. |
--compress |
Represents the global compressibility factor that will be applied, applied
only to the full connection layer, with the option of "1|4|8", defaults to
1
|
--batches |
Indicates how many random data samples have been generated, with the default
of 10 |
--mode |
"analyze|validate" mode (optional) plus "generate" mode (must have),
1 indicates selected, select one from
{'001', '011', '101', '111'}, defaults to 001
|
| --network | The model name of the template file in Documents, defaults to
mnist.
|
| --enable_rt_lib | Open macro definitions in project/rtconfgi.h and default to
RT_AI_USE_CUBE
|
| --clear | If need to delete the intermediate folder stm_out that
generated in stm32ai, defaults to False |
Step2 Compile and Burn
This tutorial shows only 'RT-Thread Studio' compilation method, but RT-AK also supports:
KeilSconsbased onRT-Thread EnvSconsnot based onRT-Thread Env
RT-Thread Studio Compile and Burn
In RT-Thread Studio, find the project engineering and right-click
Update packages and refresh project,
Then compile 
Finally, burn and display.
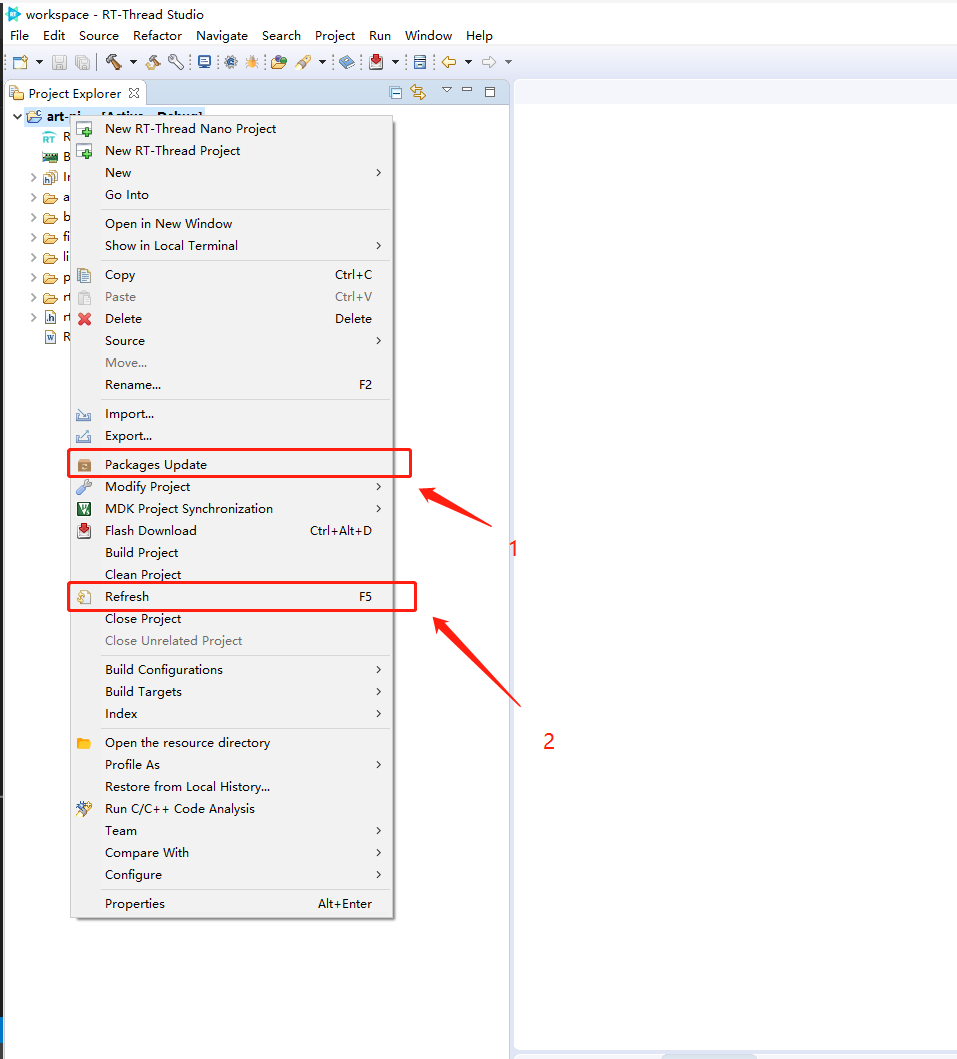
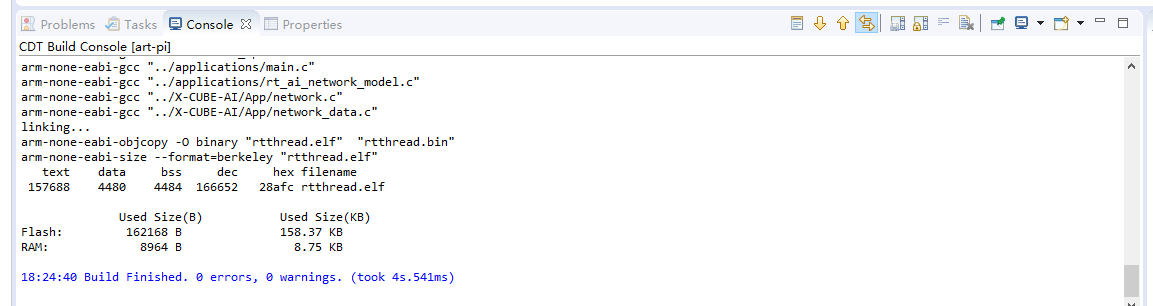

Now, you're successfully get a new ART-Pi BSP that integrates
AI and RT-Thread.
AI-related application development can be easily processed on RT-Thread.
Sample Application Code
You may reach to Here for the sample code to run model reasoning mnist_app.c:
- Download and decompress and place it under the
/applications path - Select project engineering in
RT-Thread Studioand right-click to refresh - Compile and burn.
- Enter the command:
mnsit_app
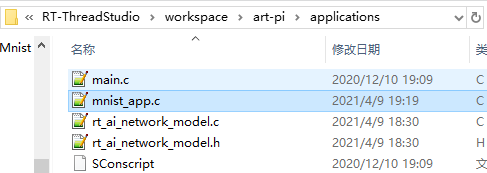
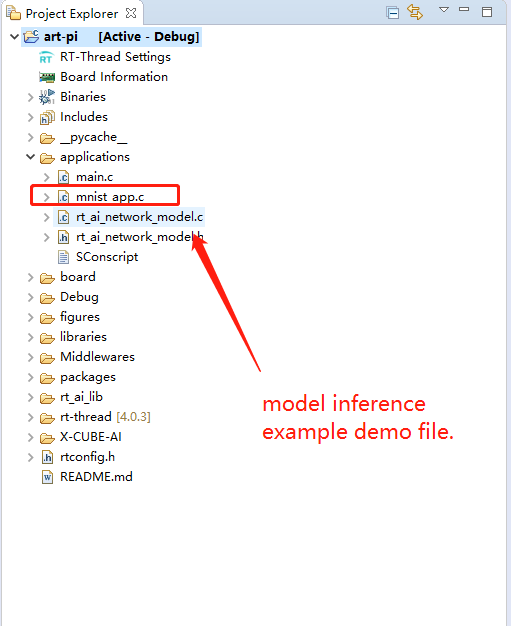

3. GitHub Address
https://github.com/EdgeAIWithRTT/Project3-Mnist_Cube_RTT/tree/master/Mnist_RTT
RT-Thread Contact Info:
Website: https://www.rt-thread.io
Github: https://github.com/RT-Thread
Twitter: https://twitter.com/rt_thread
Facebook: https://www.facebook.com/RT-Thread-IoT-OS-110395723808463
Youtube: https://www.youtube.com/channel/UCdDHtIfSYPq4002r27ffqPw
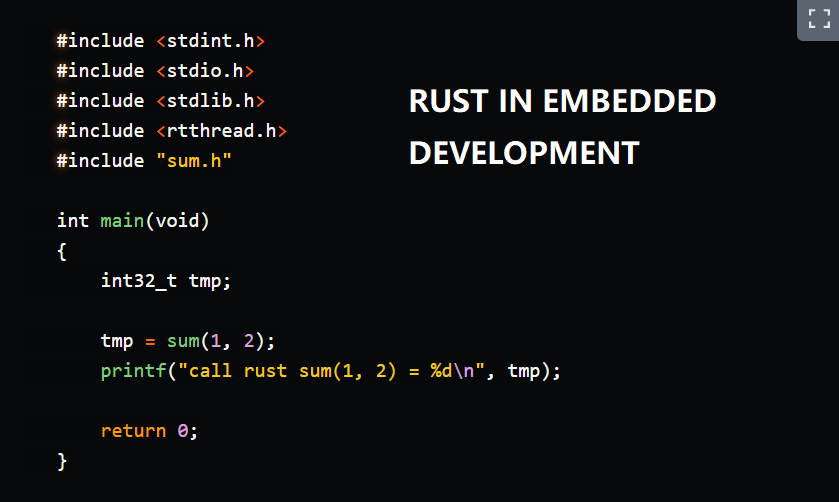
What is Rust?
Rust is a language that empowers everyone to build reliable and efficient software. It features
- High Performance: Amazing fast speed and high memory utilization
- Reliability: Memory errors are able to be eliminated during compilation
- Productivity: Great documentation, a friendly compiler with useful error messages, and top-notch tooling — an integrated package manager and build tool, smart multi-editor support with auto-completion and type inspections, an auto-formatter, and more.
Why use RUST on Embedded Development?
Rust is designed to guarantee both security and high performance. The design philosophy is right into what embedded development requires.
While embedded software has running problems that are mostly due to its memory. The Rust language can be regarded as a compiler-oriented language, so you can be sure that you are using memory safely while compiling. Here are some of the benefits of Rust developing on embedded devices:
- Powerful static analysis
- Flexible memory
- Fearless concurrency
- Interoperability
- Portability
- Community driven
Now, let’s get it on the Open Source RT-Thread operating system to demonstrate how rust can be used for embedded development.
Call Rust in C
When we’re calling the Rust code in C code, requires us to package the Rust source code as a static library file. When the C code compiles, link it in.
Create lib Library
1.Use cargo init --lib rust_to_c to build a lib library in Clion. Add the
following code to the lib.rs. The following function evaluates the sum of two values of
type i32 and returns the result :
#![no_std]
use core::panic::PanicInfo;
#[no_mangle]
pub extern "C" fn sum(a: i32, b: i32) -> i32 {
    a + b
}
#[panic_handler]
fn panic(_info:&PanicInfo) -> !{
    loop{}
}
2.Add the following code to the Cargo.toml file to tell Rustc what type of library to generate.
[lib]
name = "sum"
crate-type = ["staticlib"]
path = "src/lib.rs"
Cross-compilation
1.Install armv7 target:
rustup target add armv7a-none-eabi2.Generate static library file:
PS C:\Users\LiuKang\Desktop\RUST\rust_to_c> cargo build --target=armv7a-none-eabi --release --verbose
   Fresh rust_to_c v0.1.0 (C:\Users\LiuKang\Desktop\RUST\rust_to_c)
Finished release [optimized] target(s) in 0.01s
Generate Header File
1.Install cbindgen, cbindgen generates C/C++11 header file from the rust library:
cargo install --force cbindgen2.Create a new cbindgen.toml file under the project folder:
3.Generate header file:
cbindgen --config cbindgen.toml --crate rust_to_c --output sum.hCall Rust Library File
1.Put the generated sum.h and sum.a files into the
rt-thread\bsp\qemu-vexpress-a9\applications directory
2.Modify the SConscript file and add static library:
from building import *
cwd     = GetCurrentDir()
src     = Glob('*.c') + Glob('*.cpp')
CPPPATH = [cwd]
LIBS = ["libsum.a"]
LIBPATH = [GetCurrentDir()]
group = DefineGroup('Applications', src, depend = [''], CPPPATH = CPPPATH, LIBS = LIBS, LIBPATH = LIBPATH)
Return('group')
3.Call the sum function in the main function and get the return value and printf the value.
#include
 #include
 #include
 #include
 #include "sum.h"
 int main(void)
 {
     int32_t tmp;
     tmp = sum(1, 2);
     printf("call rust sum(1, 2) = %d\n", tmp);
     return 0;
 }
4.In RT-Thread Env environment, use scons to compile the project and run:
LiuKang@DESKTOP-538H6DE D:\repo\github\rt-thread\bsp\qemu-vexpress-a9
   $ scons -j6
   scons: Reading SConscript files ...
   scons: done reading SConscript files.
   scons: warning: you do not seem to have the pywin32 extensions installed;
   parallel (-j) builds may not work reliably with open Python files.
   File "D:\software\env_released_1.2.0\env\tools\Python27\Scripts\scons.py", line 204, in
   scons: Building targets ...
   scons: building associated VariantDir targets: build
   LINK rtthread.elf
   arm-none-eabi-objcopy -O binary rtthread.elf rtthread.bin
   arm-none-eabi-size rtthread.elf
  text    data     bss     dec     hex filename
628220    2148   86700  717068   af10c rtthread.elf
   scons: done building targets.
   LiuKang@DESKTOP-538H6DE D:\repo\github\rt-thread\bsp\qemu-vexpress-a9
   $ qemu.bat
   WARNING: Image format was not specified for 'sd.bin' and probing guessed raw.
Automatically detecting the format is dangerous for raw images, write operations on block 0 will be restricted.
Specify the 'raw' format explicitly to remove the restrictions.
\ | /
   - RT -     Thread Operating System
/ | \     4.0.4 build Jul 28 2021
2006 - 2021 Copyright by rt-thread team
   lwIP-2.1.2 initialized!
   [I/sal.skt] Socket Abstraction Layer initialize success.
   [I/SDIO] SD card capacity 65536 KB.
   [I/SDIO] switching card to high speed failed!
   call rust sum(1, 2) = 3
   msh />
Add, subtract, multiply and divide
1.We can implement some complicated math in rust. In the lib.rs file, use the rust language to implement add, subtract, multiply and divide:
#![no_std]
  use core::panic::PanicInfo;
  #[no_mangle]
  pub extern "C" fn add(a: i32, b: i32) -> i32 {
      a + b
  }
  #[no_mangle]
  pub extern "C" fn subtract(a: i32, b: i32) -> i32 {
      a - b
  }
  #[no_mangle]
  pub extern "C" fn multiply(a: i32, b: i32) -> i32 {
      a * b
  }
  #[no_mangle]
  pub extern "C" fn divide(a: i32, b: i32) -> i32 {
      a / b
  }
  #[panic_handler]
  fn panic(_info:&PanicInfo) -> !{
      loop{}
  }
2.Build library files and header files and place them in the application directory
3.Use scons to compile, if errors jumped on link up, find the solution on its official Github.
LINK rtthread.elf
 d:/software/env_released_1.2.0/env/tools/gnu_gcc/arm_gcc/mingw/bin/../lib/gcc/arm-none-eabi/5.4.1/armv7-ar/thumb\libgcc.a(_arm_addsubdf3.o): In function `__aeabi_ul2d':
 (.text+0x304): multiple definition of `__aeabi_ul2d'
 applications\libsum.a(compiler_builtins-9b744f6fddf5e719.compiler_builtins.20m0qzjq-cgu.117.rcgu.o):/cargo/registry/src/github.com-1ecc6299db9ec823/compiler_builtins-0.1.35/src/float/conv.rs:143: first defined here
 collect2.exe: error: ld returned 1 exit status
 scons: *** [rtthread.elf] Error 1
 scons: building terminated because of errors.
4.Modify rtconfig.py file, add the link parameter
--allow-multiple-definition:
DEVICE = ' -march=armv7-a -marm -msoft-float'
CFLAGS = DEVICE + ' -Wall'
AFLAGS = ' -c' + DEVICE + ' -x assembler-with-cpp -D__ASSEMBLY__ -I.'
LINK_SCRIPT = 'link.lds'
LFLAGS = DEVICE + ' -nostartfiles -Wl,--gc-sections,-Map=rtthread.map,-cref,-u,system_vectors,--allow-multiple-definition'+\
                  ' -T %s' % LINK_SCRIPT
CPATH = ''
LPATH = ''
5.Compile and run QEMU:
LiuKang@DESKTOP-538H6DE D:\repo\github\rt-thread\bsp\qemu-vexpress-a9
    $ scons -j6
    scons: Reading SConscript files ...
    scons: done reading SConscript files.
    scons: warning: you do not seem to have the pywin32 extensions installed;
    parallel (-j) builds may not work reliably with open Python files.
    File "D:\software\env_released_1.2.0\env\tools\Python27\Scripts\scons.py", line 204, in
    scons: Building targets ...
    scons: building associated VariantDir targets: build
    LINK rtthread.elf
    arm-none-eabi-objcopy -O binary rtthread.elf rtthread.bin
    arm-none-eabi-size rtthread.elf
   text    data     bss     dec     hex filename
 628756    2148   86700  717604   af324 rtthread.elf
    scons: done building targets.
    LiuKang@DESKTOP-538H6DE D:\repo\github\rt-thread\bsp\qemu-vexpress-a9
    $ qemu.bat
    WARNING: Image format was not specified for 'sd.bin' and probing guessed raw.
     Automatically detecting the format is dangerous for raw images, write operations on block 0 will be restricted.
     Specify the 'raw' format explicitly to remove the restrictions.
 \ | /
    - RT -     Thread Operating System
 / | \     4.0.4 build Jul 28 2021
 2006 - 2021 Copyright by rt-thread team
    lwIP-2.1.2 initialized!
    [I/sal.skt] Socket Abstraction Layer initialize success.
    [I/SDIO] SD card capacity 65536 KB.
    [I/SDIO] switching card to high speed failed!
    call rust sum(1, 2) = 3
    call rust subtract(2, 1) = 1
    call rust multiply(2, 2) = 4
    call rust divide(4, 2) = 2
Modify the lib.rs file
// The imported rt-thread functions list
 extern "C" {
     pub fn rt_kprintf(format: *const u8, ...);
 }
 #[no_mangle]
 pub extern "C" fn add(a: i32, b: i32) -> i32 {
     unsafe {
         rt_kprintf(b"this is from rust\n" as *const u8);
     }
     a + b
 }
Generate Library File
cargo build --target=armv7a-none-eabi --release --verbose
   Compiling rust_to_c v0.1.0 (C:\Users\LiuKang\Desktop\RUST\rust_to_c)
     Running `rustc --crate-name sum --edition=2018 src/lib.rs --error-format=json --json=diagnostic-rendered-ansi --crate-type staticlib --emit=dep-info,link -C opt-level=3 -C embed-bitcode=no -C metadata=a
0723fa112c78339 -C extra-filename=-a0723fa112c78339 --out-dir C:\Users\LiuKang\Desktop\RUST\rust_to_c\target\armv7a-none-eabi\release\deps --target armv7a-none-eabi -L dependency=C:\Users\LiuKang\Desktop\RUS
T\rust_to_c\target\armv7a-none-eabi\release\deps -L dependency=C:\Users\LiuKang\Desktop\RUST\rust_to_c\target\release\deps`
    Finished release [optimized] target(s) in 0.11s
Run
Copy the library files generated by rust into the application directory.
LiuKang@DESKTOP-538H6DE D:\repo\github\rt-thread\bsp\qemu-vexpress-a9
 $ scons -j6
 scons: Reading SConscript files ...
 scons: done reading SConscript files.
 scons: warning: you do not seem to have the pywin32 extensions installed;
         parallel (-j) builds may not work reliably with open Python files.
 File "D:\software\env_released_1.2.0\env\tools\Python27\Scripts\scons.py", line 204, in
 scons: Building targets ...
 scons: building associated VariantDir targets: build
 LINK rtthread.elf
 arm-none-eabi-objcopy -O binary rtthread.elf rtthread.bin
 arm-none-eabi-size rtthread.elf
    text    data     bss     dec     hex filename
  628812    2148   90796  721756   b035c rtthread.elf
 scons: done building targets.
 LiuKang@DESKTOP-538H6DE D:\repo\github\rt-thread\bsp\qemu-vexpress-a9
 $ qemu.bat
 WARNING: Image format was not specified for 'sd.bin' and probing guessed raw.
          Automatically detecting the format is dangerous for raw images, write operations on block 0 will be restricted.
          Specify the 'raw' format explicitly to remove the restrictions.
  \ | /
 - RT -     Thread Operating System
  / | \     4.0.4 build Jul 28 2021
  2006 - 2021 Copyright by rt-thread team
 lwIP-2.1.2 initialized!
 [I/sal.skt] Socket Abstraction Layer initialize success.
 [I/SDIO] SD card capacity 65536 KB.
 [I/SDIO] switching card to high speed failed!
 this is from rust
 call rust sum(1, 2) = 3
 call rust subtract(2, 1) = 1
 call rust multiply(2, 2) = 4
 call rust divide(4, 2) = 2
 msh />
RT-Thread IoT OS Global Tech Conference is open for registration! We welcome developers from different countries to come together to exchange ideas, showcase projects, identify solutions, discuss future strategies, and provide mutual learning opportunities on a wide variety of topics exploring embedded technologies.
Free Register:
https://forms.gle/8W1j2ZhCSLKFfyFQ8

RT-Thread Contact Info:
Website: https://www.rt-thread.io
Github: https://github.com/RT-Thread
Twitter: https://twitter.com/rt_thread
Facebook: https://www.facebook.com/RT-Thread-IoT-OS-110395723808463
Youtube: https://www.youtube.com/channel/UCdDHtIfSYPq4002r27ffqPw
RT-Thread Smart Open Source Micro-Kernel Operating System was released last September by RT-Thread Open Source Team. RT-Thread Smart(Aka RT-Smart) is aimed primarily at mid-to-high-end processors with MMU(Memory Management Unit), providing a more competitive operating system-based software platform to benefit the industries in Security( such as IPC Camera), Gateway, Industrial Control, On-board Device, Consumer Electronics and so on.
We’re making the introduction of RT-Thread Smart into several articles intend to give a detailed explanation of RT-Thread Smart from a different perspective, so follow us to make sure you’re in the loop to be updated about new knowledge. Today, let’s get started with RT-Thread Smart Application Programming on Raspberry Pi.
Why Choose Raspberry Pi to Port?
Raspberry Pi is the first hardware platform officially supported by RT-Smart, many reasons for choosing the Raspberry Pi to best fit MicroKernel System. First of all, well-known fact that Raspberry Pi is the most popular ARM Cortex-A hardware dev board, extensively used in innovative applications, playing a significant role in college education and many other industries. Second, since the release of the Raspberry Pi 4B, the kernel has also become more standardized (Raspberry Pi 4B carrying the standard GIC interrupt controller, wired Ethernet port (vs Raspberry Pi3 needs USB switch to wired Ethernet), from which porting rt-smart to other A-Series processors will also be a good reference.
Comparison with Raspberry PI 3 B:
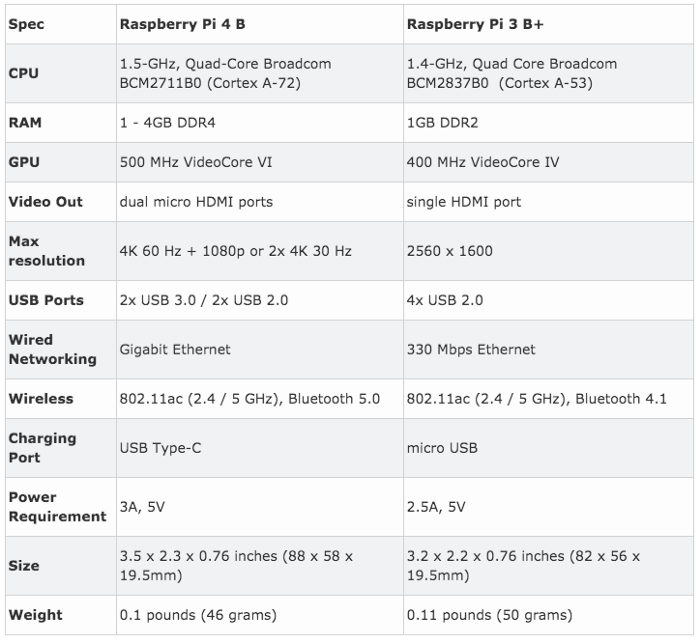
Write an application
It’s easy to run RT-Smart on Raspberry Pi. First of all, download the RT-Smart code, it carries Raspberry Pi 4B corresponding porting code and some user-space applications.
There are several ways to write a program on RT-Smart: the traditional RT-Thread scons build method, the Linux-like approach, this article will lead you with Makefile and CMake approach. Get you to a❀ Fancy Hello World program.
Built with scons
Because RT-Thread is natively built with scons, so we’re going to write an application built with scons, it will call RT-Thread’s APIs to create a thread and output “hello world!”
examples/scons/main.c File Checklist
 1 #include
 2
 3void thread_entry(void* parameter)
 4{
 5    rt_kprintf("hello world\n");
 6}
 7
 8int main(int argc, char** argv)
 9{
10    rt_thread_t tid;
11    tid = rt_thread_create("hello", thread_entry, RT_NULL,
12        1024, 20, 20);
13    if (tid)
14    {
15        rt_thread_startup(tid);
16    }
17    rt_thread_mdelay(100);
18
19    return 0;
20}
The corresponding compilation script consists of two, one is a Scanscript and the other is a SContruct.
SConstruct File Checklist:
 1import os
 2import sys
 3
 4# UROOT_DIR points to the userapps folder in rt-smart sdk
 5UROOT_DIR = os.path.join('..', '..')
 6
 7# Add the directory of the building.py to the system search path
 8sys.path = sys.path + [os.path.join(UROOT_DIR, '..', 'tools')]
 9from building import *
10
11# Compile an application
12BuildApplication('scons', 'SConscript', usr_root = UROOT_DIR)
The SConscript file checklist, which is similar to the original RT-Thread component SConscript file:
  1from building import *
  2
  3cwd = GetCurrentDir()
  4src = Glob('*.c') + Glob('*.cpp')
  5CPPPATH = [cwd]
  6
  7CPPDEFINES = ['HAVE_CCONFIG_H']
  8group = DefineGroup('scons', src, depend = [''], CPPPATH = CPPPATH, CPPDEFINES = CPPDEFINES)
  9
 10Return('group')
According to the RT-Thread traditional building method, the scons will be executed directly and generating the corresponding executable scons.elf file. **
 1~/workspace/rtthread-smart/userapps/examples/scons$ scons
2scons: Reading SConscript files ...
3scons: done reading SConscript files.
4scons: Building targets ...
5scons: building associated VariantDir targets: build/scons
6CC build/scons/main.o
7LINK scons.elf
8scons: done building targets.
Built with Makefile
We also give an example of C++ version by using the Makefile method.
main.cpp File Checklist:
 1#include
 2#include
 3
 4extern "C" {
 5
 6int main(int argc, char** argv)
 7{
 8    int index = 0;
 9    std::vector a;
10    for (index = 0; index < 5; index ++)
11    {
12        a.push_back(index);
13    }
14
15    for (std::vector::iterator it=a.begin(); it != a.end(); it++)
16        std::cout << "hello world, index = " << *it << std::endl;
17    return 0;
18}
19
20}
Makefile can be written in such a way:
 1# Set up a cross tool chain
 2CROSS_COMPILE= arm-linux-musleabi-
 3CC= $(CROSS_COMPILE)gcc
 4CXX= $(CROSS_COMPILE)g++
 5
 6# Get the current directory
 7PWD := $(shell pwd)
 8
 9#  UROOT_DIR points to the userapps folder in rt-smart sdk
10UROOT_DIR := $(PWD)/../..
11RT_DIR=$(UROOT_DIR)/sdk/rt-thread
12INC_DIR=$(UROOT_DIR)/sdk/include
13LIB_DIR=${UROOT_DIR}/sdk/lib
14
15# Compilation and link parameters
16CFLAGS= -march=armv7-a -marm -msoft-float -D__RTTHREAD__  -Wall -O0 -g -gdwarf-2 -n --static
17CFLAGS+= -I. -I$(RT_DIR)/include -I$(RT_DIR)/components/dfs -I$(RT_DIR)/components/drivers -I$(RT_DIR)/components/finsh -I$(RT_DIR)/components/net -I${INC_DIR}
18
19LDFLAGS= -march=armv7-a -marm -msoft-float -T ${UROOT_DIR}/linker_scripts/arm/cortex-a/link.lds
20LDFLAGS+= -L$(RT_DIR)/lib -L$(LIB_DIR) -Wl,--whole-archive -lrtthread -Wl,--no-whole-archive -n --static -Wl,--start-group -lrtthread -Wl,--end-group
21
22default:
23    $(CXX) $(CFLAGS) -c main.cpp -o main.o
24    $(CXX) $(LDFLAGS) main.o -o main.elf
25
26clean:
27    @rm *.o *.elf
28
29.PHONY: default clean
Generate an executable makefile.elf file by executing a make in the directory. **
Built with CMake
We’ll write the pthread multithreaded version of hello world in the form of pthreads: output “hello world” in a POSIX thread.
POSIX thread version of the main .c code list
 1#include
 2#include
 3
 4void *pthread_entry(void* parameter)
 5{
 6    printf("hello world\n");
 7    return NULL;
 8}
 9
10int main(int argc, char** argv)
11{
12    int ret;
13    void *value;
14    pthread_t pth;
15
16    /* Create a pthread thread to execute hello output*/
17    ret = pthread_create(&pth, NULL, pthread_entry, NULL);
18    printf("ret = %d\n", ret);
19
20    /* Waitting to end */
21    pthread_join(pth, &value);
22
23    return 0;
24}
The corresponding CMakeLists .txt file checklist
  1cmake_minimum_required(VERSION 3.5)
  2
  3project(cmake)
  4
  5## system configuration
  6enable_language(C ASM)
  7
  8set(CMAKE_SYSTEM_NAME Generic)
  9set(CMAKE_SYSTEM_PROCESSOR arm)
 10
 11if(NOT DEFINED ENV{RTT_EXEC_PATH})
 12    message(FATAL_ERROR "not defined environment variable: RTT_EXEC_PATH")
 13    message(FATAL_ERROR "Please execute the command: $ source smart_env.sh")
 14endif()
 15
 16set(CONFIG_PREFIX "$ENV{RTT_EXEC_PATH}/arm-linux-musleabi-")
 17#  UROOT_DIR points to the userapps folder in rt-smart sdk
 18set(UROOT_DIR "${PROJECT_SOURCE_DIR}/../..")
 19
 20set(CMAKE_C_COMPILER "${CONFIG_PREFIX}gcc")
 21set(CMAKE_CXX_COMPILER "${CONFIG_PREFIX}g++")
 22set(CMAKE_ASM_COMPILER "${CONFIG_PREFIX}gcc")
 23set(CMAKE_OBJCOPY "${CONFIG_PREFIX}objcopy")
 24set(CMAKE_C_AR "${CONFIG_PREFIX}ar")
 25set(CMAKE_SIZE "${CONFIG_PREFIX}size")
 26
 27set(SDK_DIR "${UROOT_DIR}/sdk")
 28set(LINK_SCRIPTS_DIR "${UROOT_DIR}/linker_scripts/arm/cortex-a")
 29
 30set(CMAKE_C_FLAGS "${CMAKE_C_FLAGS} -march=armv7-a -marm -msoft-float -Werror -Wall -O0 -g -gdwarf-2 -n --static")
 31set(CMAKE_ASM_FLAGS "${CMAKE_ASM_FLAGS} -march=armv7-a -marm -msoft-float -x assembler-with-cpp -O0 -g")
 32set(CMAKE_CXX_FLAGS "${CMAKE_CXX_FLAGS} -march=armv7-a -marm -msoft-float -Werror -Wall -Woverloaded-virtual -fno-exceptions -fno-rtti -O0 -g -gdwarf-2 -n --static")
 33
 34set(SDK_INC
 35    "${UROOT_DIR}/include"
 36    "${UROOT_DIR}/rt-thread/include"
 37    "${UROOT_DIR}/rt-thread/components/dfs"
 38    "${UROOT_DIR}/rt-thread/components/drivers"
 39    "${UROOT_DIR}/rt-thread/components/finsh"
 40    "${UROOT_DIR}/rt-thread/components/net"
 41)
 42
 43# Set the location of the link script
 44set(CMAKE_EXE_LINKER_FLAGS  "-T ${LINK_SCRIPTS_DIR}/link.lds -static")
 45
 46## user configuration
 47set(APPS_INC
 48    "${PROJECT_SOURCE_DIR}"
 49    "${SDK_INC}"
 50)
 51
 52set(APPS_SRC
 53    "${PROJECT_SOURCE_DIR}/main.c"
 54)
 55
 56set(CMAKE_EXECUTABLE_SUFFIX ".elf")
 57
 58add_executable(${PROJECT_NAME} ${SDK_SRC}  ${APPS_SRC})
 59target_include_directories(${PROJECT_NAME} PRIVATE ${APPS_INC})
Create a build folder in this directory
  1~/workspace/rtthread-smart/userapps/examples/cmake/build$ cmake ..
 2-- The C compiler identification is GNU 7.5.0
 3-- The CXX compiler identification is GNU 7.5.0
 4-- Check for working C compiler: /usr/bin/cc
 5-- Check for working C compiler: /usr/bin/cc -- works
 6-- Detecting C compiler ABI info
 7-- Detecting C compiler ABI info - done
 8-- Detecting C compile features
 9-- Detecting C compile features - done
10-- Check for working CXX compiler: /usr/bin/c++
11-- Check for working CXX compiler: /usr/bin/c++ -- works
12-- Detecting CXX compiler ABI info
13-- Detecting CXX compiler ABI info - done
14-- Detecting CXX compile features
15-- Detecting CXX compile features - done
16-- The ASM compiler identification is GNU
17-- Found assembler: /usr/bin/cc
18-- Configuring done
19-- Generating done
20-- Build files have been written to: ~/workspace/rtthread-smart/userapps/examples/cmake/build
Generate the Makefile file and compile it via make.
 1~/workspace/rtthread-smart/userapps/examples/cmake/build$ make
 2[ 50%] Building C object CMakeFiles/cmake.dir/main.c.o
 3[100%] Linking C executable cmake.elf
 4[100%] Built target cmake
Run the Application
Place the above three compiled applications on the Raspberry Pi’s SD card. We can use the card reader to copy the application to the SD card on the PC. Then plug it back into the Raspberry Pi and power it back on. Show Time:
 1 \ | /
 2- RT -     Thread Smart Operating System
 3 / | \     5.0.0 build May  4 2021
 4 2006 - 2020 Copyright by rt-thread team
 5lwIP-2.1.2 initialized!
 6[I/sal.skt] Socket Abstraction Layer initialize success.
 7file system initialization done!
 8msh /> cd bin
 9msh /bin> scons.elf
10msh /bin> hello world!
The program is executed and can output hello world!
From the above three examples, we can find out some new trending in RT-Smart:
1. In the user-space is running the RT-Thread traditional API: RT-Thread multi-thread, all the schedule that based with Priority Preemption can be used;
2. Support the C++ to write the application, as well as stdc++ library;
3. Support the pthreads in the form of POSIX thread mode to execute, which will be mapped and executed in RT-Thread multithread.
Get Example Codes
https://gitee.com/rtthread/rt-smart-notes/tree/master/examples
Get RT-Smart Source Code
https://github.com/RT-Thread/rt-thread/tree/rt-smart
What’s Next?
- wget & curl Porting
- busybox Porting
- sdl Graphic Application
- dropbear & ssh server Application
Any questions while using RT-Smart, feel free to share on RT-Thread Club!
RT-Thread Contact Info:
Website: https://www.rt-thread.io
Github: https://github.com/RT-Thread
Twitter: https://twitter.com/rt_thread
Facebook: https://www.facebook.com/RT-Thread-IoT-OS-110395723808463
Youtube: https://www.youtube.com/channel/UCdDHtIfSYPq4002r27ffqPw

Image by : Opensource.com
I was once asked why computers are called "computers" when they do so much more than compute numbers. A modern PC browses the internet, plays audio and video, generates beautiful graphics for video games and movies, simulates and predicts complex weather patterns and epidemiological risks, brings architectural and engineering blueprints to life, and much more.
The reason computers can do all of this because all these problems can be expressed as numerical equations, and the computer's CPU—its central processing unit—is actually little more than a simple calculator.
To get a CPU to send signals to a hard drive to write data or to a monitor to show an image, it must receive instructions. These instructions come in the form of "code," which is a terse way of saying someone must write a program that "speaks" the same language as the CPU. A CPU understands machine language, a mostly incomprehensible array of bits that most humans don't bother writing out manually. Instead, we use programming languages like C, C++, Java, Python, and so on. These languages are parsed and compiled into machine language, which is delivered to the CPU.
If you try to instruct a CPU in a language it doesn't understand, the CPU won't know what to do. You can experience the rather unspectacular results of such an attempt at miscommunication by trying to boot a Raspberry Pi from an x86_64 RHEL image. It would be nice if it could work, but it doesn't.
Porting an OS to a new architecture
The RT-Thread project offers an open source operating system (OS) for embedded-systems programmers. The embedded space is extremely diverse, with lots of Internet of Things (IoT), custom industrial, and hobbyist devices. RT-Thread's goal is to make embedded programming easy for everyone, regardless of what device you're using. Sometimes, that means porting an OS to a new architecture, whether for a chip of the same architecture but with slightly different instruction sets or new architectures altogether.
Approaching this problem can be a little intimidating at first—you may not know where or how to start. This article collects the lessons RT-Thread maintainers learned as we ported RTOS to new chip architectures.
What you need to know before beginning
Here's a high-level view of a seemingly insurmountable process. This could differ for your project, but conceptually this is relatively universal, even if some of the specifics are different:
- Prepare a C-language execution environment
- Confirm that characters can be sent and received over a serial port
- Confirm that the context switch code works
- Get the hardware timers supported
- Confirm that the interrupt routine can receive and parse data over the serial port
The execution model
For most advanced architectures, the OS and user applications run at different privilege levels. This prevents malfunctioning code from affecting the OS's integration and safety. For example, in the ARMv7-A architecture, the OS usually runs in the System mode, while in ARMv8-A, an OS can run at the EL2 or EL3 privilege level.
Usually, a chip executes bootup code at the highest privilege level when it's powered on. After that, though, the OS switches the privilege level to its target mode.
1. Execute C code
The key action in this step is to set the block starting symbol (.bss) section to zero and set up the stack pointers.
In C-language implementations, the uninitialized global variables and static variables are usually stored in the .bss section, which doesn't occupy any space in the storage device. When the program is loaded, the corresponding space is allocated in memory and initialized to zero. When the OS boots up, it has to do this work by itself.
On the other hand, the OS has to initialize the stack space and set up the stack pointer. Since C-language programs save and restore local variables on the stack when entering and exiting a function, the stack pointer must be set before invoking any C functions. RT-Thread has to do this step for each newly created thread.
2. Use at least one serial drive
RT-Thread outputs information and logs through the serial port, which also helps debug the code during the transplantation process. At this stage, receiving data over serial ports is not required. We knew we were on the right track when we first saw our friendly, familiar RT-Thread logo over the serial port!
3. Confirm context switching logic
The context of a task is its whole execution environment, which contains generic registers, the program counter, the location of the stack frame, and so on. When a new thread is created, RT-Thread has to allocate and set up its context manually so that the scheduler can switch to the new thread, as it does with others.
There are three things to pay attention to:
- First, when RT-Thread starts up, interrupts are disabled by default. They are enabled when the task scheduler is enabled for the first time; this process is implemented in assembly language during the context-switch period.
- Second, the next scheduling will start when a thread exits, which is when the resources owned are reclaimed by the idle thread.
- Third, the order that data is pushed into the stack must be consistent with the order of popping data out of the stack.
Generally, you want to enter the main function and the msh console normally. However, input control can't be achieved at this stage because serial input interrupts are not implemented. When serial interrupts are implemented, msh inputs can be made.
4. Set the timer
RT-Thread requires a timer to generate interrupts periodically; this is used to count the ticks that elapse since the system startup. The tick number is used to provide software interrupt functions and instruct the kernel when to start scheduling a task.
Setting the value of a time slice can be a tricky business. It's usually 10ms to 1ms. If you choose a small time slice on a slow CPU, most of the time is spent on task switching—to the detriment of getting anything else done.
5. Confirm serial port works correctly
In this step, we interacted with RT-Thread msh over the serial port. We sent commands, pressed Enter, and watched as msh executed the command and displayed the results.
This process is usually not difficult to implement. A word of warning, though: Don't forget to clear the interrupt flag on some platforms after the serial port interrupt is handled.
Once the serial port works correctly, the porting process is essentially done!
Get Busy
To port your project to different chip architectures, you need to be very clear about the architecture of the chip you're targeting. Get familiar with the underlying code in the most critical points of your project. By cross-referencing the chip's manual combined with a lot of practical working experience, you'll learn the chip privilege mode, register, and compilation method.
If you don't have a project you need to port to a new chip, please join us; the RT-Thread project can always use help porting RTOS to new chips! As an open source project, RT-Thread is changing the landscape of open source embedded programming. Please introduce yourself and ask for help at RT-Thread Club!
Source: Alan Smithee
RT-Thread Contact Info:
Website: https://www.rt-thread.io
Github: https://github.com/RT-Thread
Twitter: https://twitter.com/rt_thread
Facebook: https://www.facebook.com/RT-Thread-IoT-OS-110395723808463
Youtube: https://www.youtube.com/channel/UCdDHtIfSYPq4002r27ffqPw
It's generally known that the hands writing Robots can not catch up with the printer in the actual production line because it lacks efficiency so it hasn't applied in many different industry scenarios. However, for beginners who want to learn Robots and may look to create one by themselves, hands writing robots is a good start as it has a simple structure and in line with human handwriting habits. The design of this writing robot includes path planning, line interpolation, acceleration and deceleration control, and other common-used motor motion control algorithms. Software part, DXF file resolution, openCV image processing, and other G code generation tools are taken in this project. Build a good foundation for a further in-depth study of laser cutters, engraving machines, 3D printers, and other large-scale equipment. My tutorial will share my experience of creating this project. I hope this helps you in some way.
Development Environment
Hardware:ART-PI、arduino、TM4C123GXL
RT-Thread Inside:v3.14
Development Tool:MDK-ARM5.31、VSCode
RT-Thread in this project
Kernel: Thread Scheduling、Resource Allocation、Synchronous Communication、Device-driven Frameworks.
Components: DFS File System、UART Serial Asynchronous Communication、CAN Communication.
Others: UDP Communication、cJSON Codec
Hardware Architecture
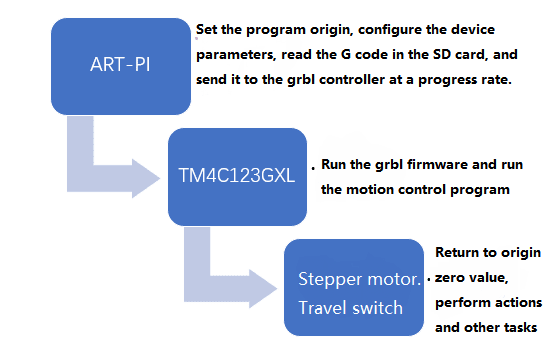
Software Architecture
- Image processing module
- Motion control module
- G code generation module
The image processing module is responsible for pre-processing image files such as text images and photographs, removing clutter, and then decoding the image with appropriate algorithms, de-emerging the main information, and then extracting the outline skeleton to fit the machine writing.
The motion control module is one of the most complex modules in a writing robot, responsible for the precise and fast movement of each motion body. After receiving the G-code instruction, it is required to combine all the instruction information received for generating an appropriate initial speed and the maximum running speed of the current instruction, proceed with the linear interpolation according to the motion trajectory, and finally send pulses to the motor according to the SPTA trapezoidal acceleration and deceleration algorithm.
The G-code generation module serializes the image outline and then plans the path, selects a suitable machining precision, and then generates the NC processing file according to the G code specification that commonly used in CNC machining. In addition, for standard DXF files, G code is generated by file resolution.
Software Module Introduction
grbl is a high-performance, low-cost open-source CNC controller that delivers high-speed, precise motor control pulses based on the ATmega 328 chip. It accepts standards-compliant g-code, and includes full acceleration management with look ahead, to deliver smooth acceleration and jerk-free turning action.
As grbl includes full acceleration management with look ahead. That means the grbl controller needs to maintain 16-20 G code instructions. This requires ART-PI to send G-code instructions in a timely manner by reading the grbl controller buffer state to avoid buffer overflows and buffer emptying.
Therefore, RT-Thread real-time operating system is indeed for this project. By reading the NC file on the SD card, and communicate with the grbl controller, to control the devices running smoothly. In addition, RT-Thread has a wealth of human-computer interaction features so you may real-time display the device work path, progress and status on the screen, and may also add the features of resume breakpoint and many others.
Source Code
https://gitee.com/qiao_cg/grbl
Presentation
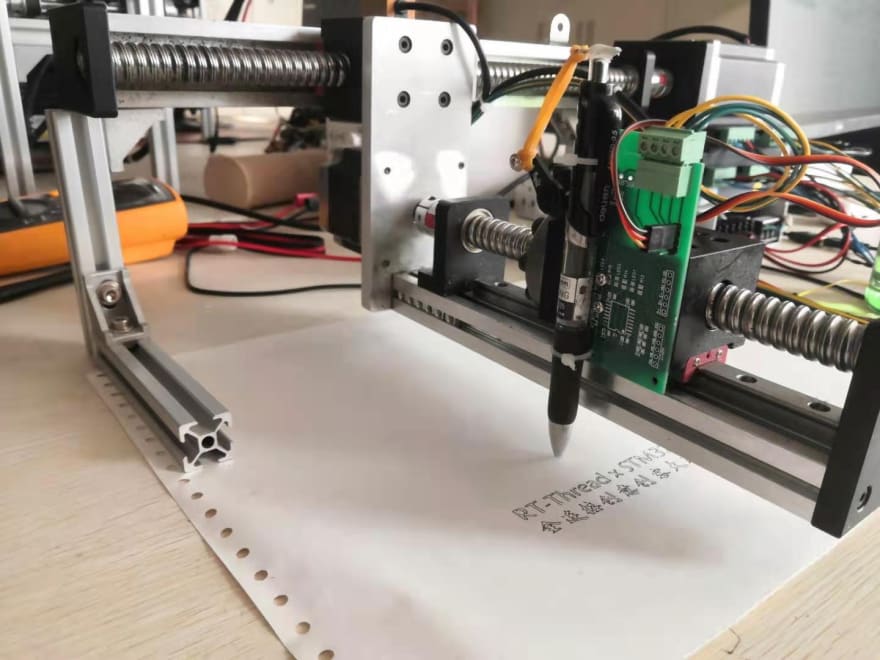
Check out Video.
RT-Thread Contact Info:
Website: https://www.rt-thread.io
Github: https://github.com/RT-Thread
Twitter: https://twitter.com/rt_thread
Facebook: https://www.facebook.com/RT-Thread-IoT-OS-110395723808463
Youtube: https://www.youtube.com/channel/UCdDHtIfSYPq4002r27ffqPw

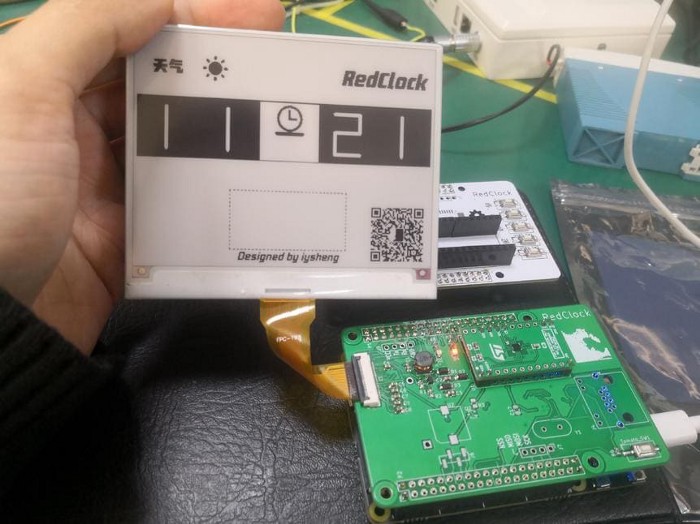
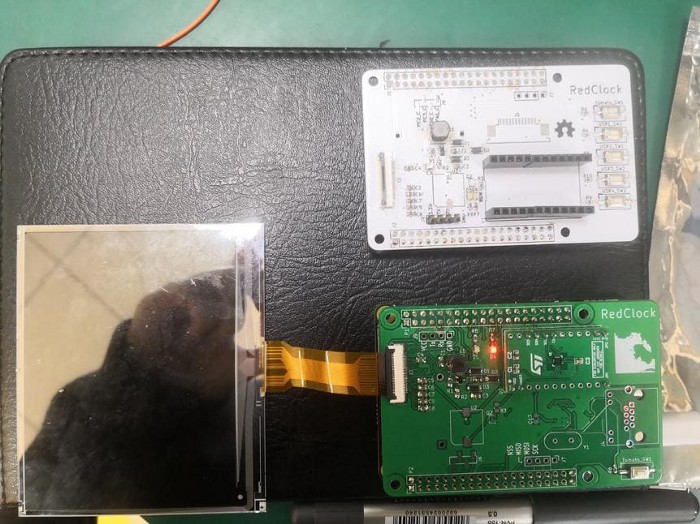
Description:
RedClock simultaneously displays time and weather icons on ink screen (time information is obtained through ntp, weather information is obtained from the Weather Report via js language, wired and wireless wifi network connection is supported). One button can switch into Pomodoro Technique, the Pomodoro Technique defaults 25 minutes as a period, when it comes to 25 minutes, the screen will be triggered to prompt a message (Pomodoro turns red color). Meanwhile, the RedClock reserves the patch buzzer device pad and supports beep alarm (can be associated with multiple alarm events, for example, temperature, air pressure, and many other events that exceed threshold). It can also obtain temperature and air pressure information via external air pressure sensor LPS22HH (ST barometer) and periodically display it through ink screen. Time, weather, temperature, and air pressure information also supports simultaneous display on the device IP when there is network access to ART-Pi.
Details:
For the first time to create an ink screen, I’m thinking of adding the Pomodoro Technique to the traditional WIFI clock, making it more powerful instead of providing time and weather information only, and looking for a way to help people increase productivity and become your best, most productive self at work. when using the RedClock.
My RedClock is now supported to implement:
- Display time and weather info through ink screen.
- One button can switch into Pomodoro Technique
- Obtain temperature and air pressure info via the external air pressure sensor lps22hh and passes to ink screen
- Time, weather, temperature, and air pressure information also supports simultaneous display on the device IP when there is network access to ART-Pi.
Development Environment:
Hardware: ART-Pi 、LPS22HH、SSD1619
RT-Thread inside: V4.0.3
Development Tool:
- Compiling Tool: arm-none-eabi-gcc、 arm-none-eabi-binutils
- Editing Tool: vim
- Burning & Debugging Tool: openocd 0.10+ dirty、kermit、telnet、gdb
Hardware Development Tool:Kicad(RedClock Expansion Board Development Tool)
Software Details:
The open-source RT-Thread real-time operating system is taken into this project.
Kernel Part:
Mutex、Semaphore、mempool、device
Component Part:
cJSON、EasyFlash、webnet
Software Part:
lps22hb(sensor)
Others:
Bus Interface: I2C(Sensor)、SPI(Ink Screen)
Hardware Architecture:
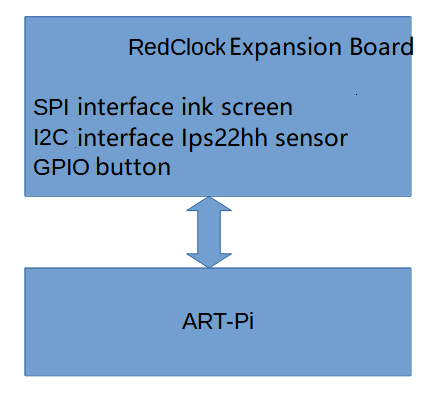
Software Architecture:
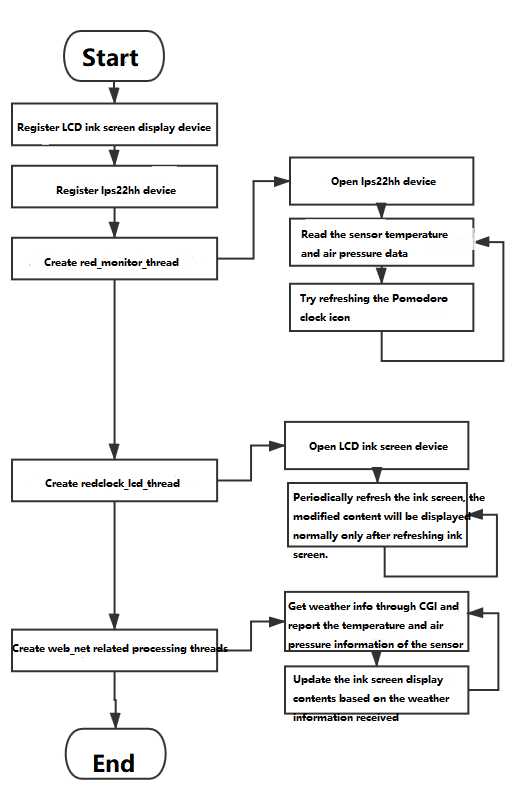
If you’re looking for a step by step tutorials and code, please message Opensource RT-Thread IoT OS.
I recorded all the stuff into documents and would like to share it with you all.
1: Create the burning environment of Linux+openocd+gdb
2: RedClock Expansion Board Design
3: RedClock Web Interface Development
4: RedClock air pressure sensor development
5: RedClock ink screen display design
RT-Thread Contact Info:
Website: https://www.rt-thread.io
Github: https://github.com/RT-Thread
Twitter: https://twitter.com/rt_thread
Facebook: https://www.facebook.com/RT-Thread-IoT-OS-110395723808463
Youtube: https://www.youtube.com/channel/UCdDHtIfSYPq4002r27ffqPw

Step 1: Description
Smart irrigation systems are a combination of sensors and controllers which monitor the watering, moisture related content temperature and climate and there by watering the crops as per requirement. In this project I am using a soil moisture sensor to detect the moisture of the soil. There are two types of soil moisture sensor.
Resistive soil moisture sensor Capacitive soil moisture sensor Both the soil moisture sensor works on the principle of electrical conductivity. Resistive soil moisture sensor works with change in resistance between the two leads of the sensor where as capacitive soil moisture sensor has only one lead which works with respect to the change in dielectric property of the soil.
Step 2: Working
In this project I am using a resistive soil moisture sensor. When the soil moisture sensor detects the change in electrical conductivity it sends data to the controller then with respect to the sensor data the controller switches ON the water pump or switches OFF the water pump. When the water pump is ON led green light is ON, When the water pump is switched OFF the red led is OFF. Thereby the green and red led show the status of the water pump is whether ON or OFF respectively.
Step 3: Technical Description
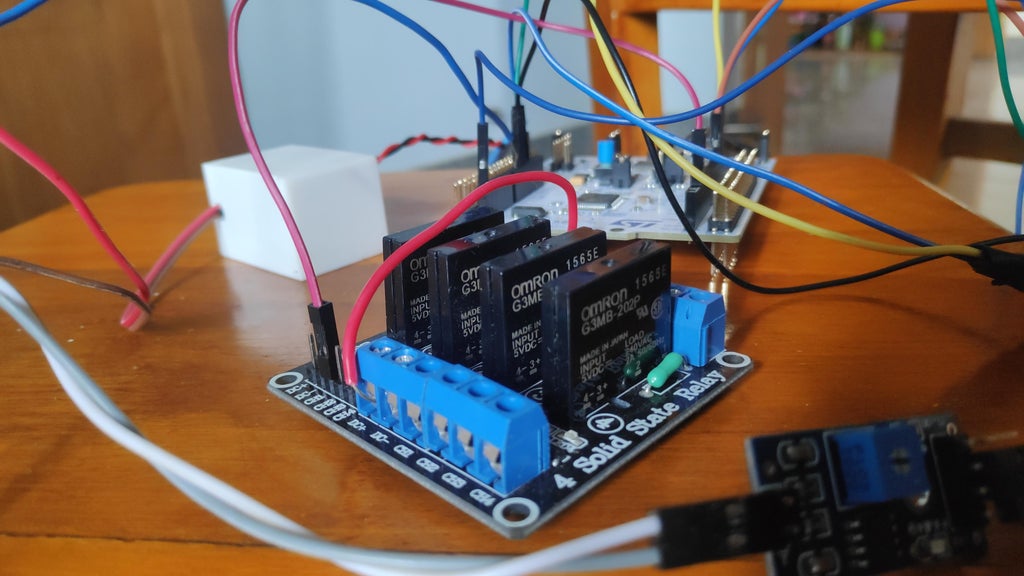
Threads are used to run tasks concurrently; I have used 3 threads for this project one to monitor the sensor data simultaneously and thread two to turn ON the water pump and green led if the sensor didn’t find any moisture and the thread 3 turns OFF the water pump and turns ON the red led.
Step 4: Product Features
The sensor collects data all the time.
All the process happens concurrently so no delay occurs unless manual delay which were made on intention Multiple sensors can be added in future. My Experience in RT-Thread I am using RT-thread for this project. I am new to RT-thread this is my 1st project in RT-Thread I used RT-Thread studio for this project it is user friendly and free tool so I will be using it for my future projects. I also used the thread function which helped me achieve concurrency. I got help from RT-Thread Club and some direct help from the people from RT-Thread. They were so friendly that they helped me at various stages of the project. My special thanks to the members from RT-Thread for helping me to complete this project.
Have a look at their website to get started.
Step 5: Hardware Framework
The Controller used in this project is STM32 F411-RE which has ARM CORTEX – M4 as the CPU with 512kb of flash memory and 32 kHz internal clock
Step 6: Software Framework
The OS used for this project is RT-Thread RTOS
The program is written in c the only work of the main function is to activate the three threads.
Step 7: Wiring
1. GREEN LED P(A, 5)
2. RED LED P(A, 6)
3. Soil Moisture Sensor P(C, 0)
4. Water Pump P(A, 10)
Step 8: Check Out My Video in Youtube to Get More Clear About the Project
You can find the git-hub link to the source code in the description of the youtube video.
Source: Varun Pandithurai
RT-Thread Contact Info:
Website: https://www.rt-thread.io
Github: https://github.com/RT-Thread
Twitter: https://twitter.com/rt_thread
Facebook: https://www.facebook.com/RT-Thread-IoT-OS-110395723808463
Youtube: https://www.youtube.com/channel/UCdDHtIfSYPq4002r27ffqPw
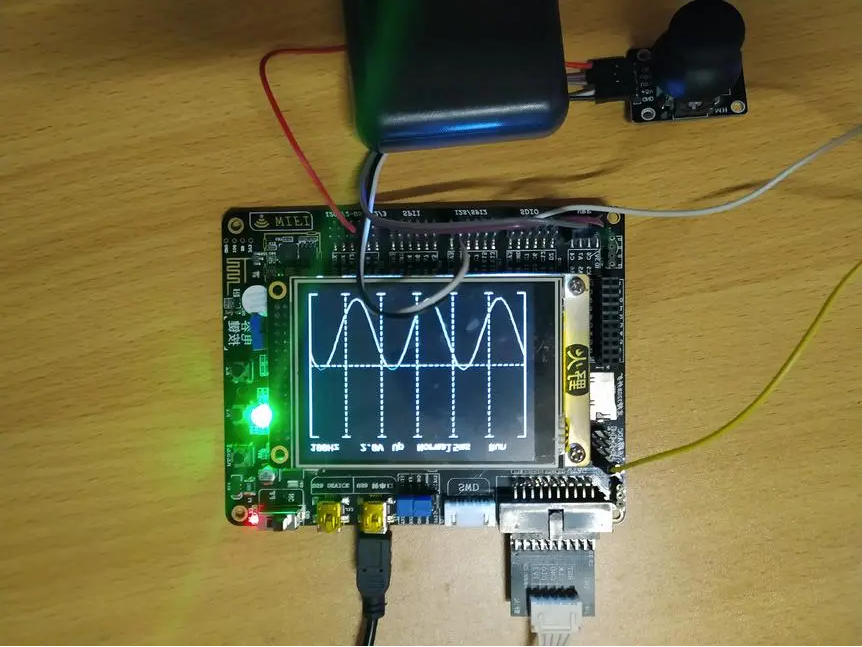
01
Introduction
This tutorial documented the steps of creating an Oscilloscope.
Voltage: 0-3.3V,
Frequency: 1Hz-10kHz
3 Sampling Modes: auto, normal and single time
2 Trigger Modes: rising edge and falling edge
02
Development Environment
Hardware:stm32f103, 3.2 inch ILI9341 LCD display
RT-Thread:v3.0.3
IDE:MDK v5.26
03
RT-Thread Inside Part
Kernel: Scheduler, Semaphore, Message Queue.
Scheduler: Create multiple threads for different purposes.
Semaphore: Used to synchronize threads.
Message Queue: Used to transfer the data between threads.
04
Hardware Architecture
The signal of the waveform generator acquired by the ADC processed on the stm32f103 chip and being displayed on the 3.2-inch ILI9341 LCD screen.
05
Software Architecture
06
Software Module Introduction
Thread:
GetWave_thread:
Wave sampling thread, determine the sampling frequency based on the time represented by each grid of the settings screen, and determine the sampling start point according to the trigger threshold and trigger mode, then sampling the waveform and save it.
PlotWave_thread:
Waveform display thread; Waveforms are displayed according to the area of the screen.
KeyScan_thread:
Key scan thread; Read the key values for conversion and send them to the setting thread.
Setting_thread:
Set the action to execute the thread, perform the settings item modification operation, and refresh the display information.
Message Queue
setting_data_queue:
Read the key scan thread and convert the settings information to the settings thread to change the settings and display the refreshed information.
getwave_status_queue:
Used to communicate between the waveform sampling thread and the waveform display thread to ensure that the sampling waveform is displayed in a timely manner.
key_scan_queue:
Used to communicate between setting threads and key scan threads to ensure that key signals are read in a timely manner while avoiding excessive resource consumption by key scan threads.
07
Presentation
08
Catch the Code
https://gitee.com/zhan-min/oscilloscope.git
RT-Thread Contact Info:
Website: https://www.rt-thread.io
Github: https://github.com/RT-Thread
Twitter: https://twitter.com/rt_thread
Facebook: https://www.facebook.com/RT-Thread-IoT-OS-110395723808463
Youtube: https://www.youtube.com/channel/UCdDHtIfSYPq4002r27ffqPw
Hi RT-Thread Community. Here we are in 2021. Take a review of what’s happening in the first month of 2021 in the RT-Thread community.
Same as usual, let’s start with the code contribution.
1. Code Contribution:
The statistics are fetched from merged PR on the Github master code branch.
We want to acknowledge and thank the following community members for their contributions to RT-Thread in January. They are:
Michael0066、hyhkjiy、xys20071111、mysterywolf、Forest-Rain、greedyhao、PYGC、fmkong、redocCheng 、Trisuborn、tmmdh、CraztTnspt、Jedcheen、xiaofengvskuye、xinyigao、DavidLin1577、iysheng、liuanlin-mx、Hxinrong 、shuobatian 、chengy4、Rice_Chen, Bluetrum Tech、Nuvoton Tech、NXP、HuaDa Semiconductor.
Thanks to all contributors who share their time, energy, and talent to help RT-Thread. Thank you very much!
Code updating:
- bsp:ls2k:make set console device more flexible #4282
- Feature/nrf5x nrf52832 and nrf52840 compatible with gcc compilation #4285
- Update bsp/allwinner_tina/rtconfig.py #4274
- [stm32] [bluepill] add the function of MDK simulator & update MDK5 project template #4266
- [bsp] [raspberry-pico]add gpio drivers #4276
- add support stm32wl and bsp/stm32wl55jc-st-nucleo #4277
- [fix] Fix an error-reporting problem when using lwip 2.1.2 as the protocol stack and enabling the dhcp server option
- [PWM] Fix the pwm clock frequency doubling problem #4263
- add raspberry-pico bsp #4275
- [bsp] [bluetrum] add i2c, wdt and hwtimer support #4268
- Feature/update rt studio py #4271
- Feature/use studio project file template #4269
- Append RT_WEAK for overriding various ECC layout #4267
- fixbug:keep makefile.targets while it has existed #4264
- [utilities] [ulog] fix ulog backend color log length calculation error #4258
- [bsp] [bluetrum] add sdio support #4255
- [bsp] fix mm32 iar icf bugs #3950
- irq_disable [drivers/sensor]disable irq only when the sensor and module sensors are all closed. #3271
- Fix compile error when adding RT_USING_MTD_NOR #4226
- [update] stm32mp1 uart dma sample #4253
- Add support of the PWM driver for STM32H7 for in stm32, add the complementary of PWM, such as , pwm_get commands, and more #4250
- fix priority inversion bug of mutex. #3647
- [ulog]Add backend filtering interface, add async log output control interface, ulog mutex change to semaphore #4251
- [bsp] [stm32] Add HAL_TIM_Base_Init #4249
- [.gitignore] Filter out the dist folder #4241
- add dist to rt-thread studio support for all bsp #4245
- fix imxrt uart2 wrong configure #4236
- [stm32] [bsp] [bluepill] update readme and update cubemx project #4238
- Fix an NRF52840 compilation error when enabled SPI drivers #4233
- [stm32] [stm32f103-blue-pill] add USB device support #4235
- [readme] update #4237
- [libcpu/arm/arm926/start_gcc.S] Remove platform-specific code in common #4234
- SAI module-i.mxrt1050evk #3989
- [kernel] add rt_mb_urgent() #4218
- Update net_test.c #4225
- [bsp] [gd32103c-eval] Add gd32103c-eval bsp [src/kservice.c] Update the print time notification information #4223
- scons: Add CodeLite target #3967
- add error checks of rt_mutex_take() #4165
- [kernel] [script] remove module.c #4220
- [kernel] update sconscript #4219
- Rearrange the format of the .c and pipe .c #4216
2. Software Packages Updating (RT-Thread has a total of 299 packages now)
- Add multi-channel remark for can_ymodem package #828
- add as7341 sensor package: AS7341 visible light sensor that can sense 11 wavelengths of visible light. #829
- add an independent watchdog driver package for sgm706 #830
- [littlefs] release v2.3.0 #831
- [ulog_file] add ulog_file package index #832
- Add kdb software index #834
- rs485 release v1.02 #836
- Add state_machine, a Finite-state machine(FSM)with rich but simple implementation in C language #840
- add MICROPYTHON_USING_FLOAT_IMPL_FLOAT in kconfig #841
- Add logmgr package: support log management system features #842 #847 #849
- Perfect the support on ASR6500S, Update Kconfig #846
- [ulog_file] update ulog_file index #848
- [add]add gt911 touch drive #850
- Add rt_memcpy_cm software package: the Cortex-M kernel assembly acceleration version of the rt_memcpy function #851
- add tag for Cortex-M #852
- add Qfplib_M0_tiny software package: Cortex-M0 floating-point computing assembly acceleration library (tiny version) #853
- add Qfplib-M0-full software package: Cortex-M0 floating-point computing assembly acceleration library (full version) #854
- add Qfplib-M3 software package: Cortex-M3 floating-point computing assembly acceleration library #855
- [system/littlefs]fixed version index #857
Thanks to redocCheng 、Prry、geniusgogo、 Bruceyzha 、qiyongzhong0 、mysterywolf、zyk6271 、RiceChen for contributing software packages!
RT-Thread Contact Info:
Website: https://www.rt-thread.io
Github: https://github.com/RT-Thread
Twitter: https://twitter.com/rt_thread
Facebook: https://www.facebook.com/RT-Thread-IoT-OS-110395723808463
Youtube: https://www.youtube.com/channel/UCdDHtIfSYPq4002r27ffqPw
RT-Thread is an open-source embedded real-time operating system (RTOS) that provides a wide range of components and 290+ software packages for the Internet of Things (IoT). RT-Thread MicroPython IDE is built by the RT-Thread team to provide a powerful development environment for MicroPython developers.
What makes RT-Thread MicroPython special?
- A convenient connection mode of development board (serial port, network, USB)
- Support MicroPython-based code intelligent completion and syntax check
- Support MicroPython REPL interactive environment
- Provides many code samples and demo program
- Support full project synchronization function
- Support to download files or folders to the development board
- Supports fast running code files in memory
- Supports code snippets to run functions
- Supports several major MicroPython development boards
- Support Windows and Ubuntu operating systems
Take a quick look at the introduction of RT-Thread MicroPython IDE
Create Raspberry Pi PICO project in RT-Thread MicroPython IDE
-
Download and install RT-Thread Micropython IDE:

-
Create a MicroPython project:
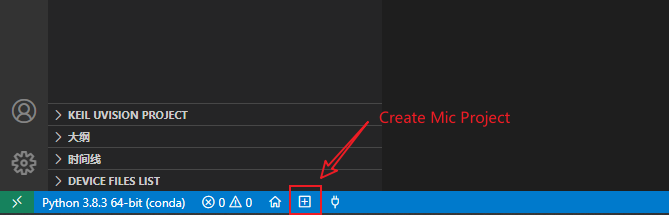
-
Create a New MicroPython project:

-
Create a blank MicroPython Project:
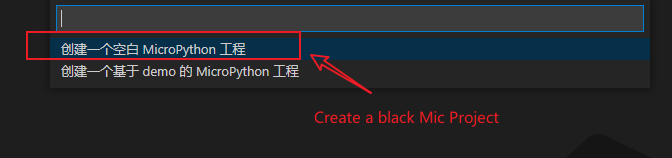
-
Enter the project name:
-
Select the path to save the project:
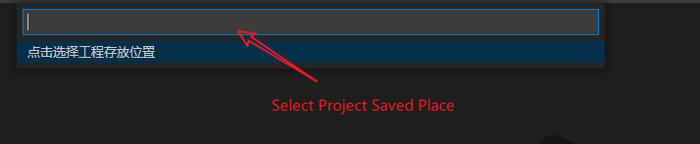
-
Project successfully created.
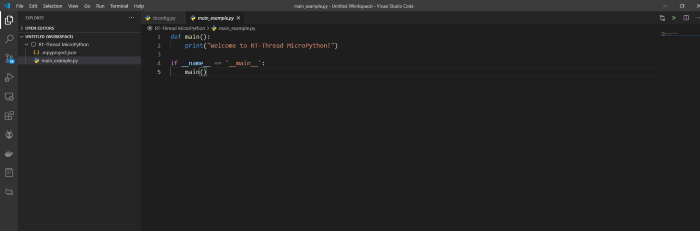
-
Connect to the device:

-
Choose Pico Com Port:
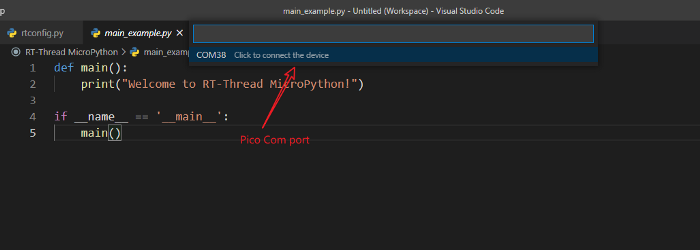
-
Run the python file on PICO board:
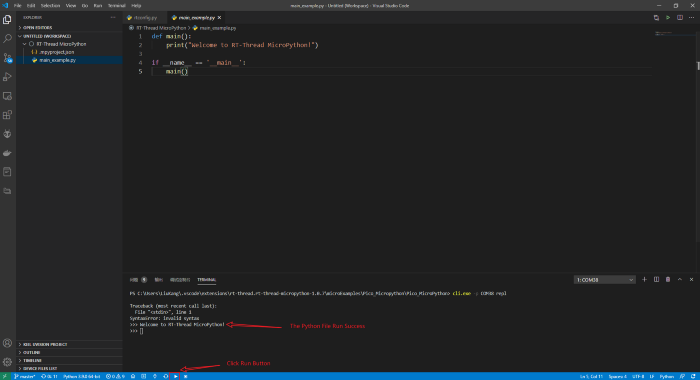
-
You can also right-click to get it run:
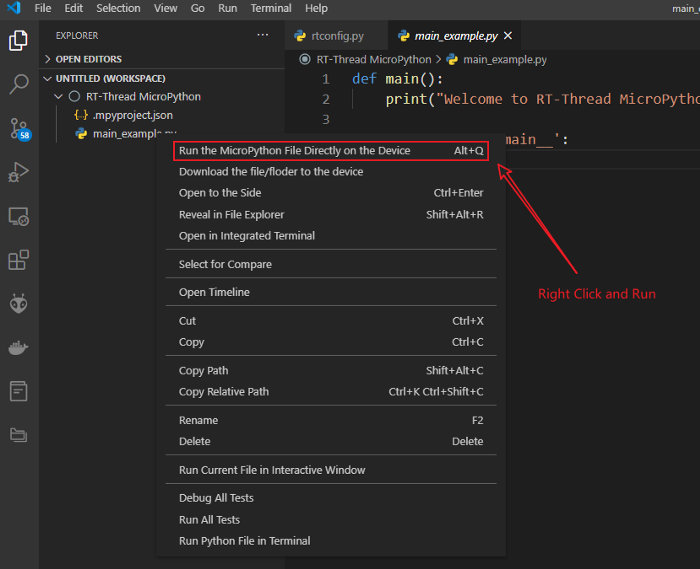
-
Here you can obtain more MicroPython samples:
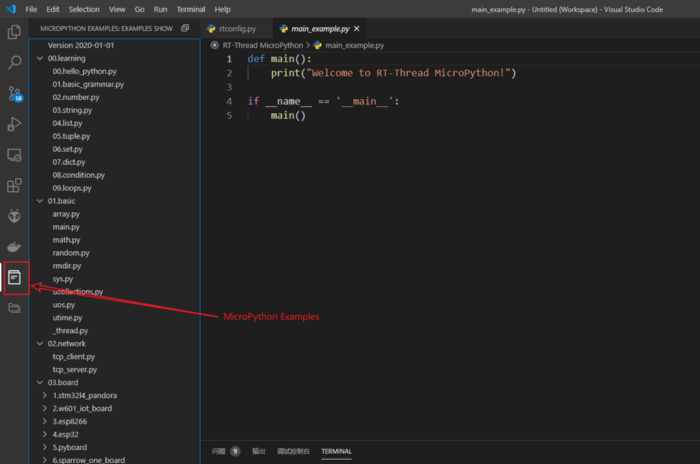
Check out the Tutorial Video
In The End
Any questions during the development, feel free to reach us at RT-Thread Club.
You are also very welcome to contribute any of your knowledge to the RT-Thread OpenSource Community. Let opensource project benefits more people!
RT-Thread Contact Info:
Website: https://www.rt-thread.io
Github: https://github.com/RT-Thread
Twitter: https://twitter.com/rt_thread
Facebook: https://www.facebook.com/RT-Thread-IoT-OS-110395723808463
Youtube: https://www.youtube.com/channel/UCdDHtIfSYPq4002r27ffqPw
Raspberry Pi PICO is now available in RT-Thread Studio IDE! Looking to make Raspberry Pico development simple and all in one-stop.
RT-Thread is an open-source embedded real-time operating system (RTOS) that provides a wide range of components and 290+ software packages for the Internet of Things (IoT). RT-Thread Studio IDE is built by the RT-Thread team and it takes full advantage of RT-Thread software packages and a wide range of components resources. All of this offers a way for developers to simplify the complexity of software development.
Walk through this tutorial get started with Raspberry Pi PICO in RT-Thread IDE.
RT-Thread Studio
- Download RT-Thread Studio
- Getting Started with RT-Thread Video Tutorial
- RT-Thread Studio Support Forum
Download PICO SDK
-
Click SDK Manager:
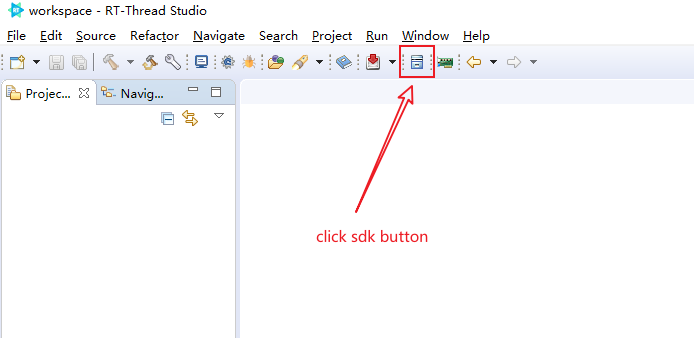
-
Download PICO BSP(Board Supported Package). Select v1.0.3.
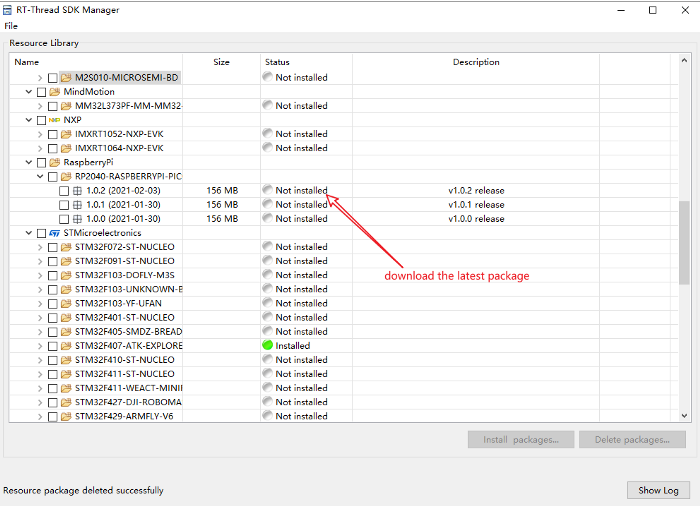
Create PICO Project
-
Create RT-Thread project:
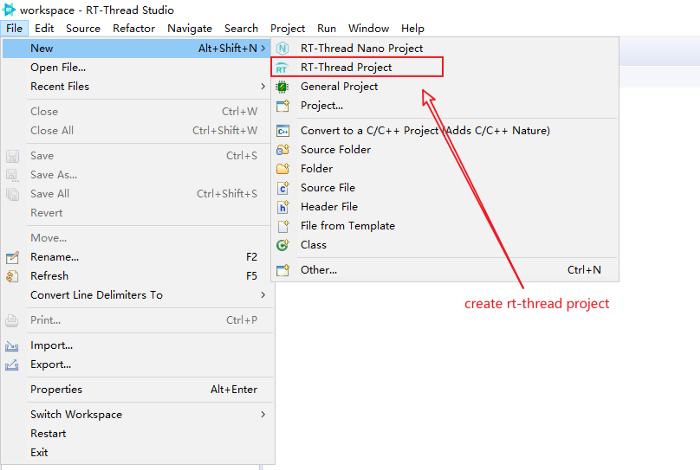
-
Select PICO
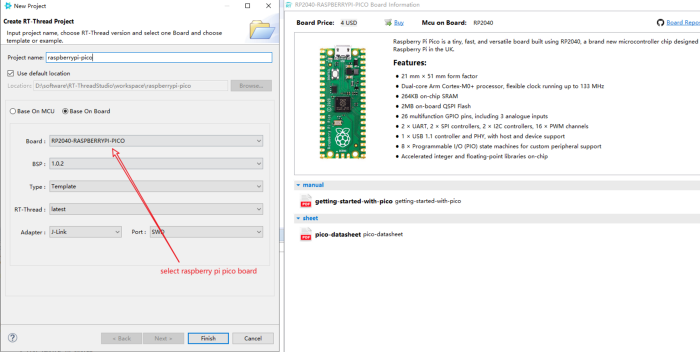
-
Click Finish, successfully created project.
Compile and Download
-
Click build to compile the project:
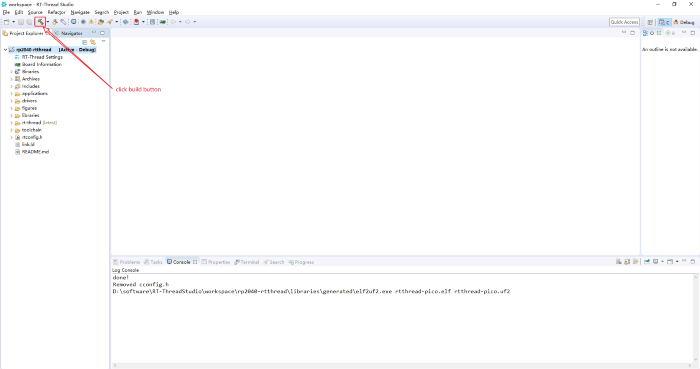
-
Press the BOOTSEL in the board, plug in the USB cable and serial cable:
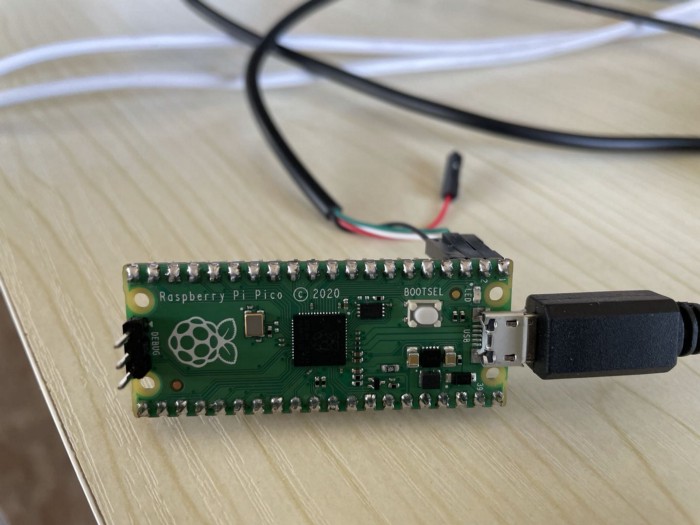
-
Open Serial Terminal Assistant in Studio:
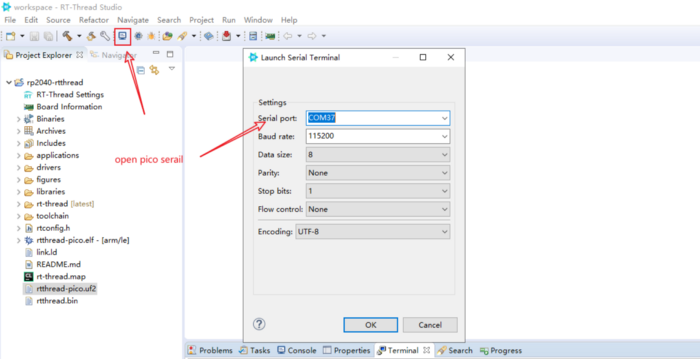
-
Open the rtthread-pico.uf2 belonging category:
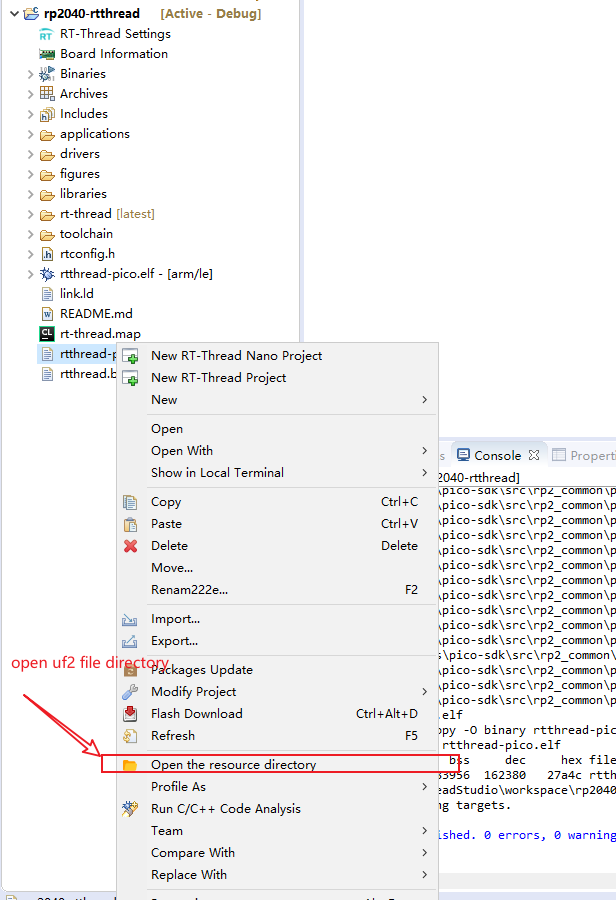
-
Download uf2 to PICO board:
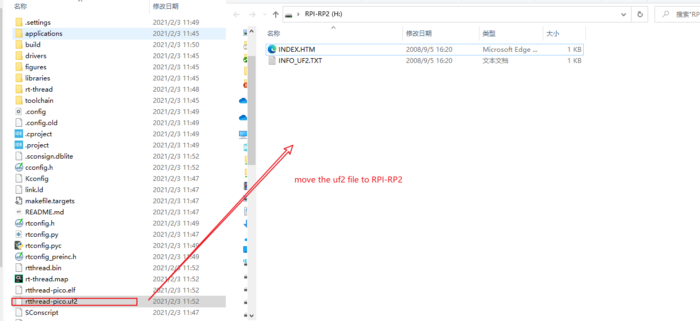
-
Successfully downloaded, we’ll see the LED is flashing.
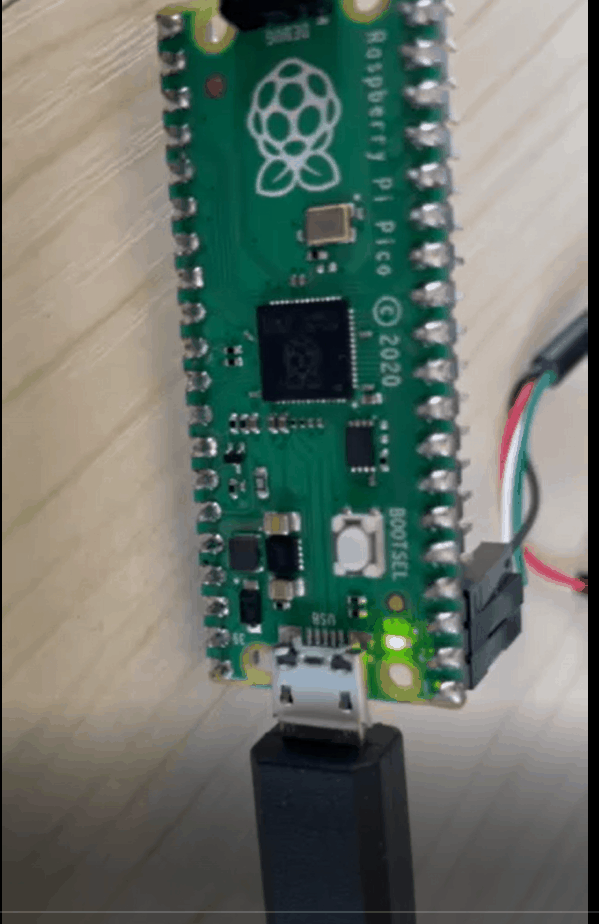
-
Communicate with PICO by Studio Serial Tool.
RT-Thread Contact Info:
Website: https://www.rt-thread.io
Github: https://github.com/RT-Thread
Twitter: https://twitter.com/rt_thread
Facebook: https://www.facebook.com/RT-Thread-IoT-OS-110395723808463
Youtube: https://www.youtube.com/channel/UCdDHtIfSYPq4002r27ffqPw
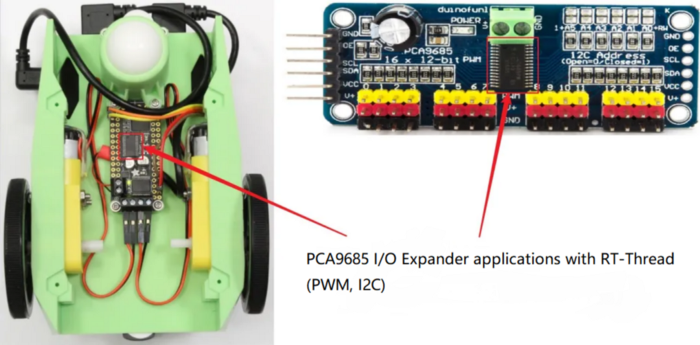
Hardware features.
- Each PWM has a 12-bit resolution (4096 level);
- Up to 16 PWM output, all PWM frequencies are unity, each space ratio can be independently controlled;
- I2C methods;
- Support 2.3V to 5.5V voltage, logic level 3.3V;
- Reset mode: Power-on reset, software reset.
PWM For Rudder Control
First, control signal.
- PWM frequency for rudder control is 50Hz (20000us a cycle)
-
For 12-bit resolution, time control accuracy (i.e., time resolution) is:
- The PWM of the rudder is around0.5ms ~ 2.5ms, the time stretching range is 2000us.
-
The stretching range with 4.88us time resolution that can be divided into nearly 410 parts.
-
Time stretching range 2000us corresponds to the steering range of 0 to 180 degrees, so the angle resolution of the rudder is about 0.439 degrees.


Second, check the chip usage in the PCA9685 manual.
-
What does the chip look like?
-
Pin functionality.
-
I2C address.
Address pins consist of A0 to A5, up to 64 addresses. There are 62 addresses available because the chip itself retains the All Call 7-bit address 0xE0 and the Software Reset 7-bit address 0x06.
By default (i.e., A0 to A5 all grounded), its 7-bit address is 0x40.
-
The target register.
MODE1 register, address 0x00, it is readable and writeable.
MODE2 register, address 0x01, it is readable and writeable.
Each PWM has four 8-bit control registers, the addresses please check the datasheet, the register is readable and writeable.
These four 8-bit registers are stated in the manual as two 12-bit registers. The two 12-bit registers separately control the high and low hours of the output, with a maximum value of 4095.
Let’s take a further look at what these two 12-bit registers mean according to the following Example 1, If starting to set the bits to 1 from the Xth bit each cycle, X should be written into the LEDx_ON register. if starting to clear the bits to 0 from the Xth bit each cycle, X should be written into the LEDx_OFF register.
-
The four examples in the following image represent the relationship between the settings and the output of these two 12-bit registers in general.
The four examples in the figure below represent the output in the case of ON register value < OFF register value.
The four examples in the figure below represent the output in the case of ON register value > OFF register value.
-
PWM frequency sets register as PRE_SCALE, address 0xFE, it is readable and writeable.
The chip has a built-in 25MHz oscillator, the frequency value of update_rate is in Hz. Therefore, for PWM at 50Hz, this register should be set to 121.
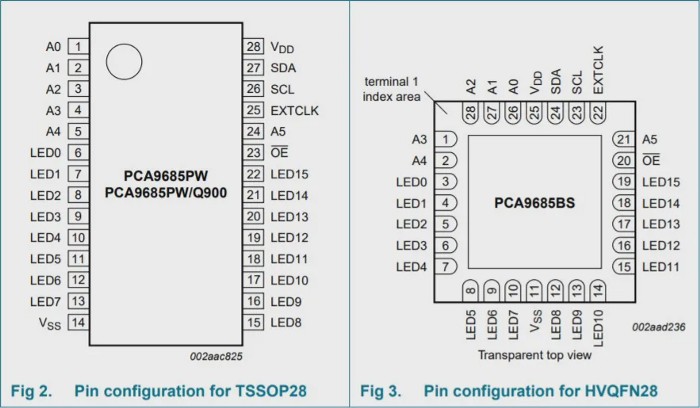
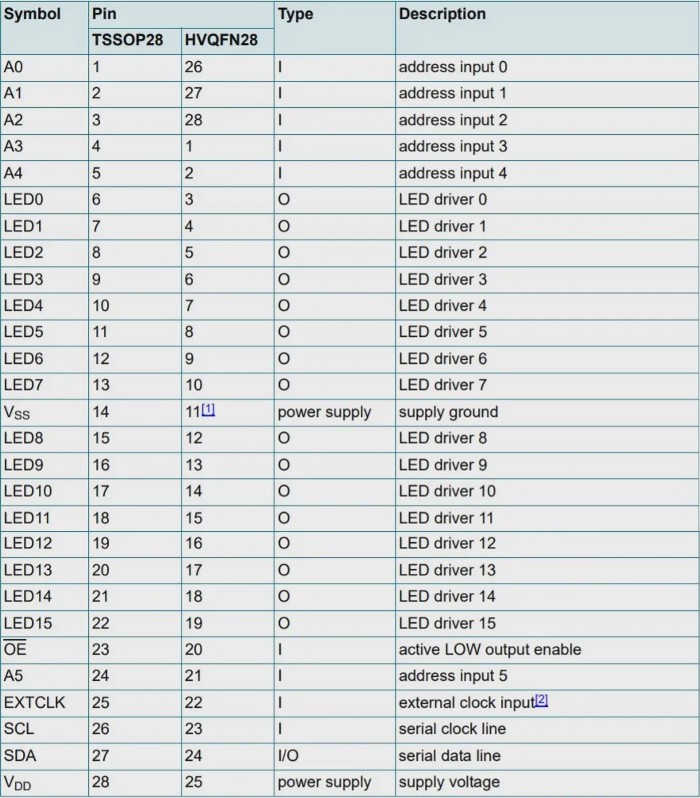
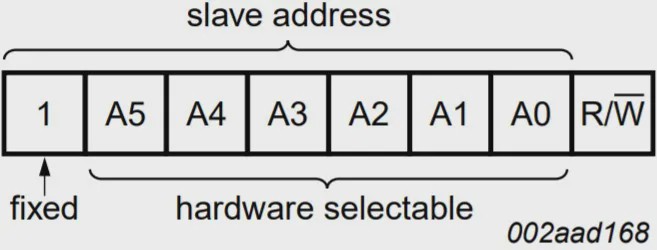
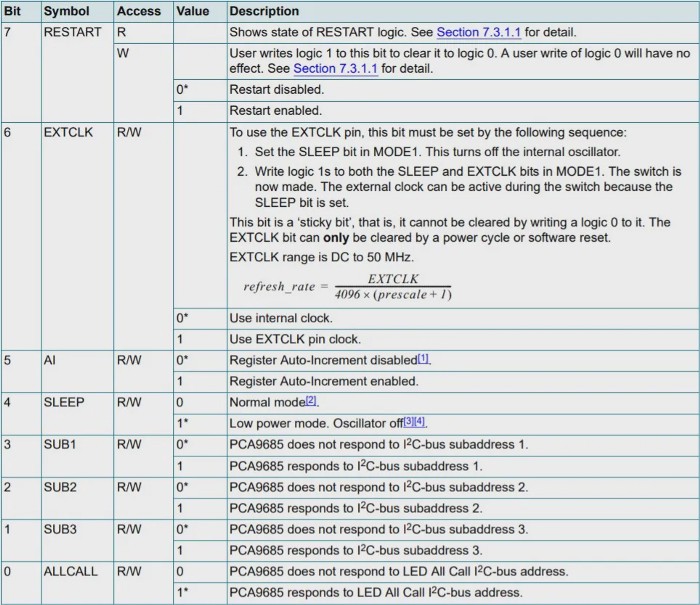
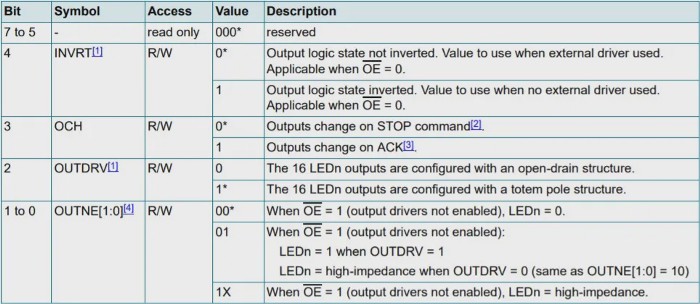
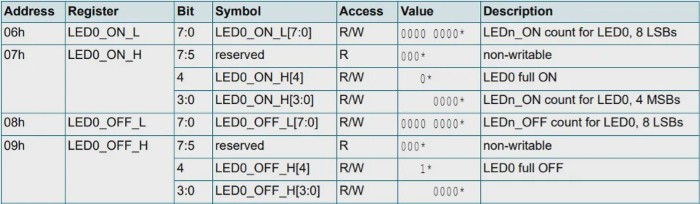
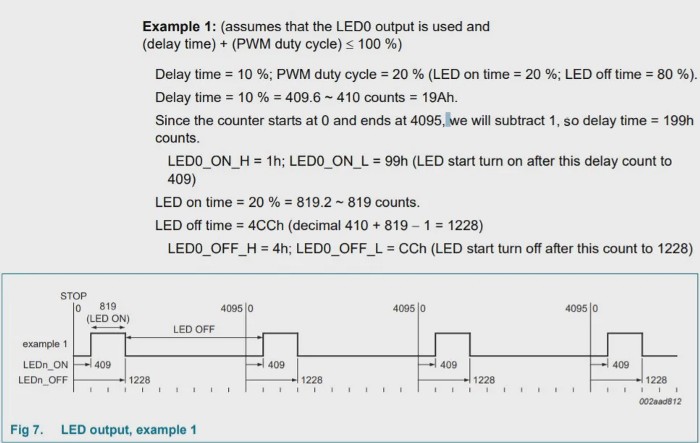
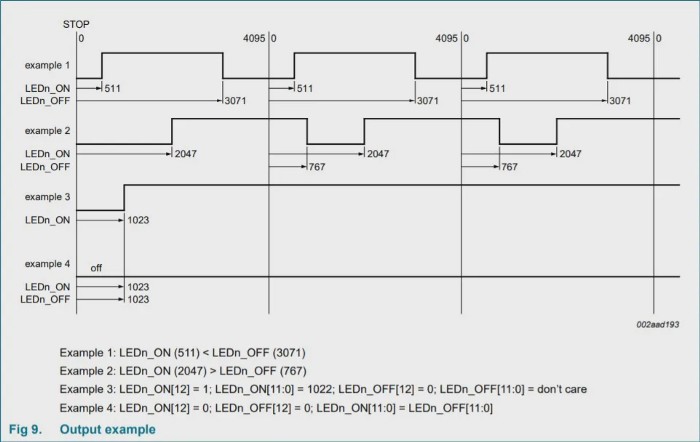
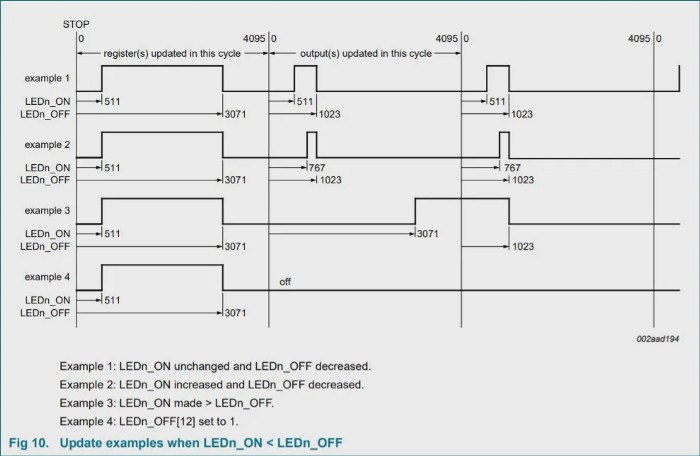
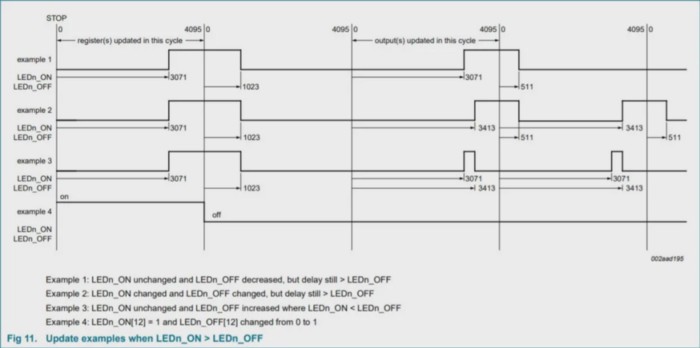

PAC9685 Driver Component of RT-Thread
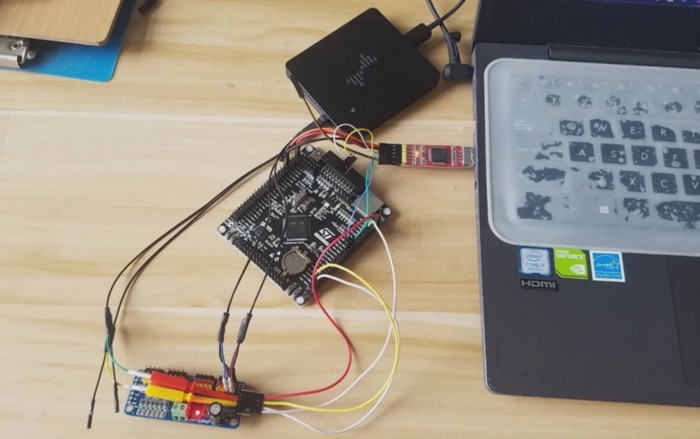
The hardware connection is shown as above, where we use the most common PCA9658 rudder control module, connected to a logic analyzer for viewing the data.
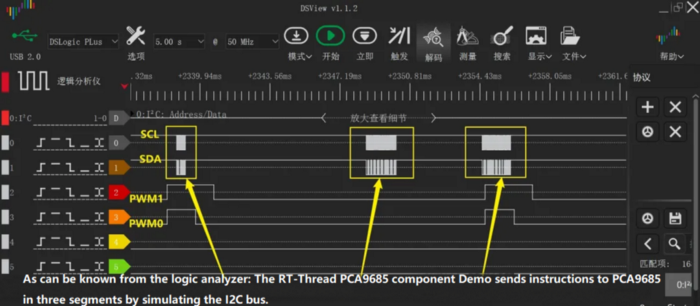
First Part
The first communication contents are shown below:
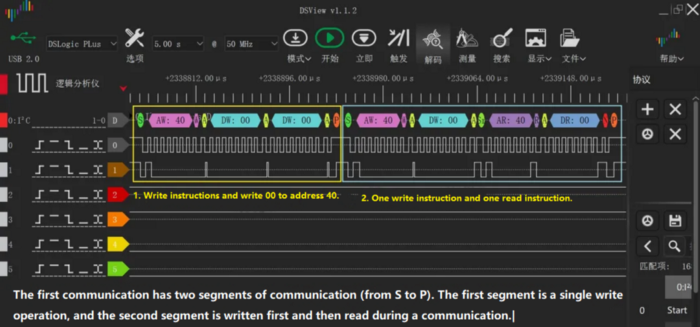
Look at the marked yellow box above, “Write 00 to address 40” means to write data 0 to the address of the register with the device address of 0 and the address of 40.
Correspondingly, the marked blue box could be interpreted as read the register value for the device address of 40 and the address of 0, the data value in the device sends back 0 to the target register.
Check out the code below to find out about its communication, as shown follows:
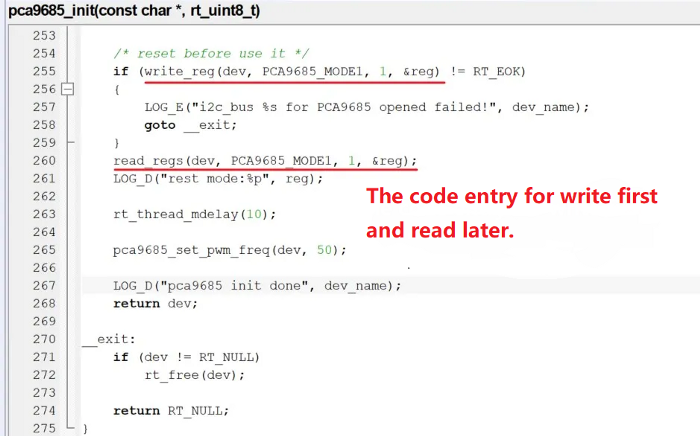
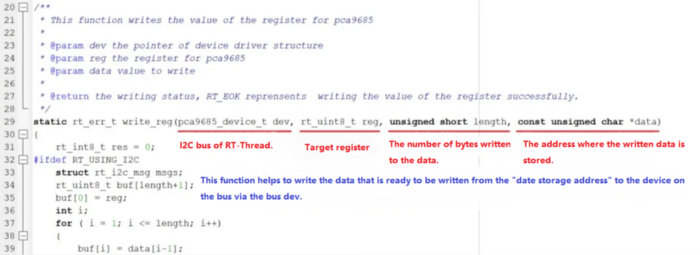
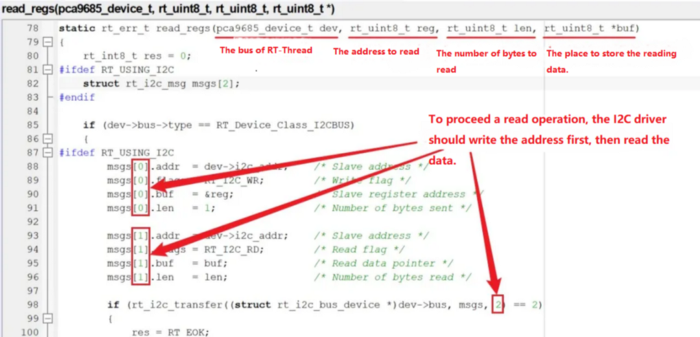
Second Part
According to the datasheet of PCA9685, we get to know that SLEEP mode should be enabled first when setting the PWM output frequency. The process to restart from SLEEP mode is specified in datasheet.
In RT-Thread’s PCA9685 component package, the set frequency-related operation is encapsulated in the function pca9685_set_pwm_freq().
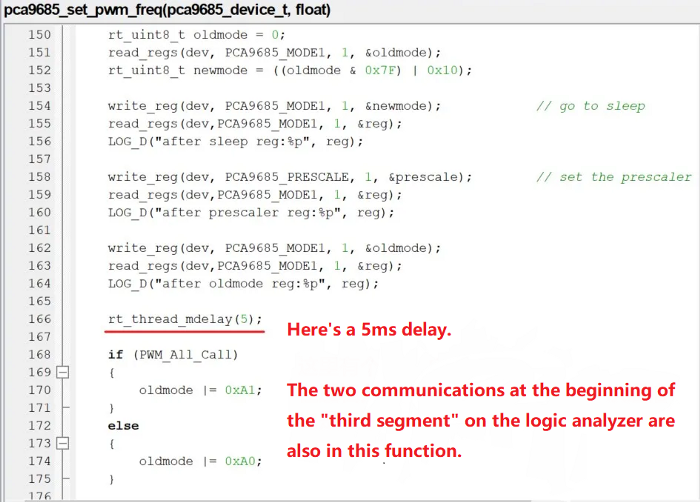
Third Part
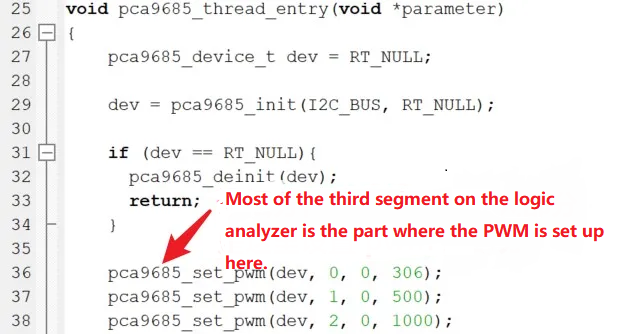
By analyzing the code, we could found that the RT-Thread driver component package for the PCA9685, inherits the spirit of RT-Thread opensource operating system tiny and elegant features and encapsulates the functions according to the datasheet of the PCA9685, making it much easier for developers to quickly master the knowledge of the PCA9685.
Get your first-hand experience with RT-Thread PCA9685 component.
RT-Thread Contact Info:
Website: https://www.rt-thread.io
Github: https://github.com/RT-Thread
Twitter: https://twitter.com/rt_thread
Facebook: https://www.facebook.com/RT-Thread-IoT-OS-110395723808463
Youtube: https://www.youtube.com/channel/UCdDHtIfSYPq4002r27ffqPw

Definition: RT-Thread software packages run on the RT-Thread IoT operating system. Different categories of packages were created for different application areas, each of which consists of the description information, source code or library files.
Before making a software package, its functionality requires to be defined accurately, to ensure that it does not couple closely with the code that related to the product business logic, in order to improve the versatility of the package.
The package should contain:
- Source code and documentation.
- Package index.
For example, the hello software package contains:
Organize Package code and Documentation.
Before making a package, you’ll need to read the sample package documentation and check the folder structure of the sample package.
The software package and its documents should contain:
- The source files to implement the required function.
- The file ‘SConscript’ in the root directory, which guides the compiler to build the software package.
- The sub-directory ‘example’, which contains code to demonstrate how to use the software package.
- The optional sub-module directories, controlled by ‘git’.
- The file ‘README.md’ to describe the software package shortly.
- The sub-directory ‘docs’, which describes the details about the implementation.
- The optional sub-directory ‘port’, which contains the code required by the software package to run on various platforms.
Create package index.
Package index: the package description files that are stored under the env\packages folder. Take the 'env\packages\packages\iot\pahomqtt folder as an example, it contains:
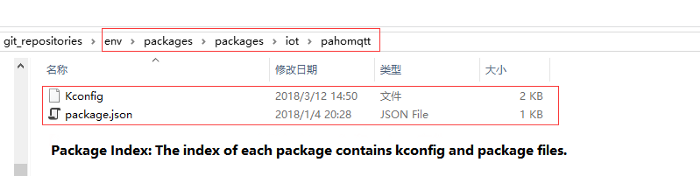
- Kconfig: storing the configuration items, such as package versions, feature options, etc.
- package.json: storing information such as the name of the package, package introduction, download links for each version, etc.
Use Index to Generate Wizard
We can make package index files by using Env’s package index generation wizard feature. Type the command pkgs --wizard, shown as follows:
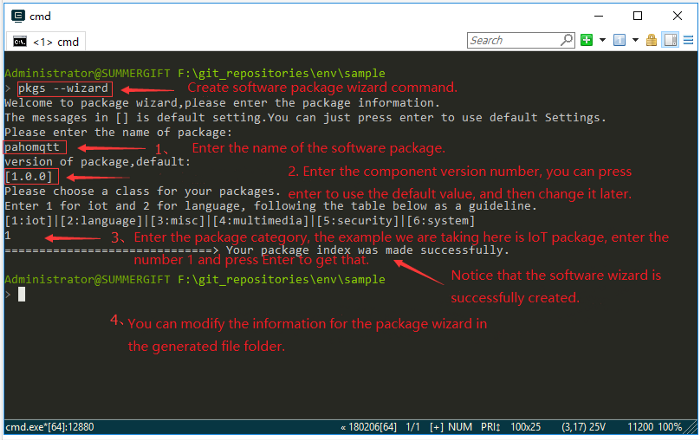
The generated contents are shown as follows:
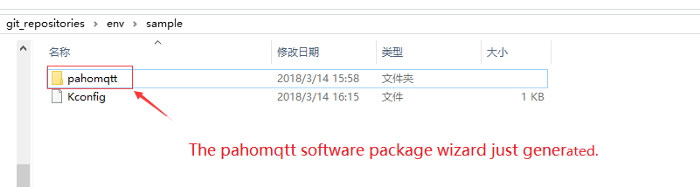
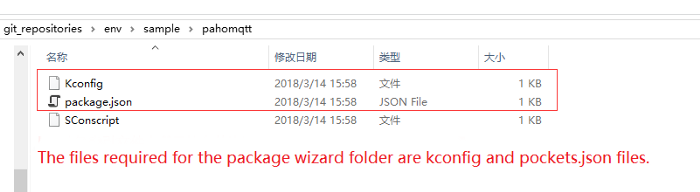
Note that the ‘SConscript’ file is only used when packing the source code by moving it to the package source folder. It doesn’t have to exist in the index folder after the packing process.
Revise package.json File
- package.json file Introduction:
{
    "name" : "pahomqtt",
    "description" : "a pahomqtt package for rt-thread",   # Package Description Info
    "keywords" : [
        "pahomqtt"
    ],
    "site" : [
    {
       "version" : "v1.0.0",
       "URL" : "https://pahomqtt-1.0.0.zip",              # Modify the download address of the compressed package based on its version number.
       "filename" : "pahomqtt-1.0.0.zip",
       "VER_SHA" : "fill in the git version SHA value"    # The compressed package form does not need to be filled in.
    },
    {
       "version" : "latest",                              # latest verison
       "URL" : "https://xxxxx.git",                       # Fill in the Git address
       "filename" : "Null for git package",
       "VER_SHA" : "fill in latest version branch name,such as mater" # Fill in SHA or the branch name.
    }
    ]
}
There are two types of ‘URL’ values in a file that can be filled in for each version:
- Git: the Git repository address and the corresponding version of SHA. Generally, the SHA is set to master for RT-Thread latest version.
- Compressed package: the download address of the specific package and SHA doesn’t have to be filled at this time.
Package.json is a description file for the software package, which contains the package name, package description, author, and the required download link for source code. Note, a description of the applied license must be included, such as GPLv2, LGPLv 2.1, MIT, Apache license v2.0, BSD, etc.
The modified package.json is as follows:
{
    "name" : "pahomqtt",
    "description" : "Eclipse Paho MQTT C/C++ client for Embedded platforms", # Update the description info.
    "keywords" : [
        "pahomqtt"
    ],
    "site" : [
    {
       "version" : "v1.0.0",                                             # v1.0.0
       "URL" : "https://github.com/RT-Thread-packages/paho-mqtt.git",    # update git address
       "filename" : "paho-mqtt-1.0.0.zip",
       "VER_SHA" : "cff7e82e3a7b33e100106d34d1d6c82e7862e6ab"            # Enter the specified SHA value.
    },
    {
       "version" : "latest",                                             # latest version
       "URL" : "https://github.com/RT-Thread-packages/paho-mqtt.git",
       "filename" : "paho-mqtt.zip",
       "VER_SHA" : "master"                                              # Enter master
    }
    ]
}
Modify Kconfig File:
The content of Kconfig is as follows:
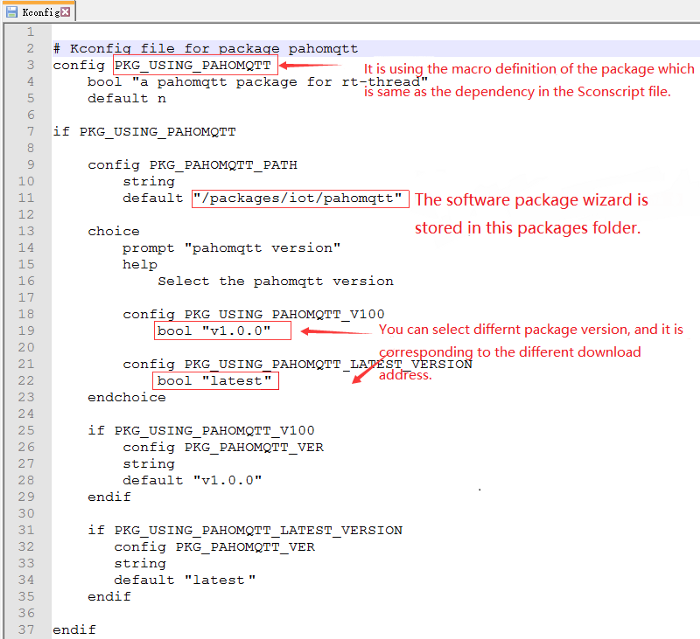
The Kconfig files in the package index are primarily used by the menuconfig command, and some of the options for the package must be defined, here are notes that you need to pay attention to:
- Most Kconfig contents automatically generated are necessary. The value of the options could be modified, but must not be deleted.
- The package must contain a configuration item beginning with the prefix PKG_USING_, so that RT-Thread's package manager can correctly identify it. Assuming that the name of the package is SOFTA, the corresponding package option should be PKG_USING_SOFTA ;
- The other options related to this SOTA package need to be defined with a configuration item beginning with SOFTA_, which can be SOFTA_USING_A or SOFTA_ENABLE_A.
- Packages that support the RT-Thread latest version require at least one fixed version, to prevent the appropriate version from being missed at some point.
- If the package needs more configuration items, you can refer to the Kconfig files from other existing packages for suggestions.
Upload Software Package
Packages could be uploaded to git or other downloadable sites. It’s recommended to save them as git repositories, which is convenient to update software packages.
Reference: RT-Thread Package Repository
Test Software Package
- Download the package: Copy the package index to env\packages\packages, and then download the package online in RT-Thread Env, test if it is successfully downloaded.
- Test the package functions: After downloading, execute the command scons to recompile the project, run it in the appropriate environment, and check if the package function works correctly.
- Switch the package version: Try to switch the version of the package under menuconfig, to check if the version switching feature is working.
Submit Software Package Index
Finally, the package index files need to be pushed through the PR process to the RT-Thread package repository: https://github.com/RT-Thread/packages.
Click HERE to learn how to submit a PR.
Manage Software Package Index Source
Env can download packages from multiple package sources, and the list of packages for each source is stored in env\packages folder. For example, the RT-Thread official package list is stored under the env\packages\packages folder.
Add Software Package Source
- Duplicate the official RT-Thread package folder, change the folder name and delete the unnecessary package index files within the folder, then add the necessary ones.
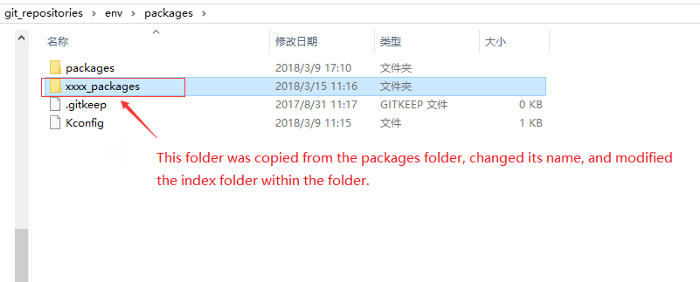
- Update the Kconfig files under the env\packages folder and add package source information to the Kconfig file.
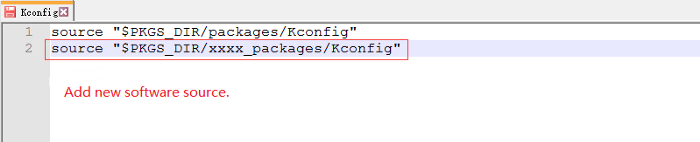
Delete Software Package Source
- Delete the software source folder;
- Delete the corresponding source folder information in the Kconfig file.
New Release Process
The following procedures are required before the release of a new version of the package:
- Check the package to make sure that the package function works properly.
-
Use the Github Release feature to publish a new version, if you don’t have the
permission to notify the administrator to release a new version for you. Refer to
the paho-mqtt
package repository for how to release a new version.
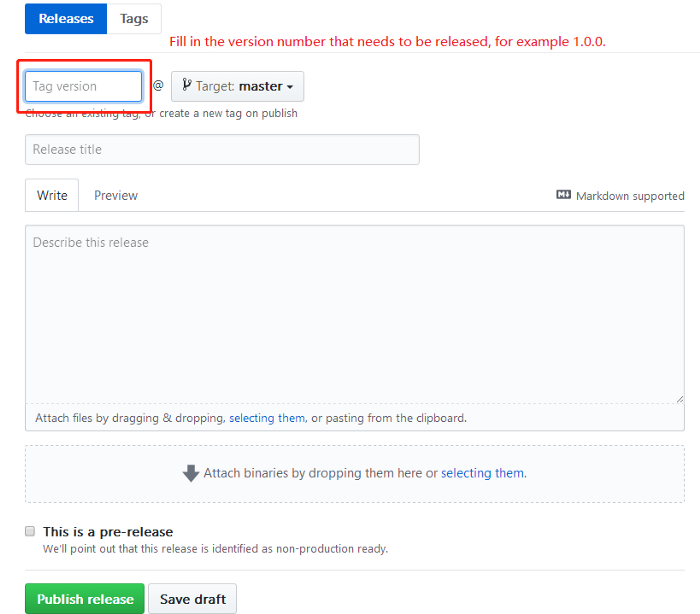
- Modify the local package index files, add information of the new information in the Kconfig file and package.json.
- Test the download and deletion features for this new version locally, as well as the installation to ensure that the package can be added to the project successfully.
- Submit a PR for the Package Index (https://github.com/RT-Thread/packages) and notify the administrator to merge it.
RT-Thread Contact Info:
Website: https://www.rt-thread.io
Github: https://github.com/RT-Thread
Twitter: https://twitter.com/rt_thread
Facebook: https://www.facebook.com/RT-Thread-IoT-OS-110395723808463
Youtube: https://www.youtube.com/channel/UCdDHtIfSYPq4002r27ffqPw
The existing and newly built five-star power supply station has installed a lot of smart devices, such as photovoltaic energy storage, central air conditioning, smart lighting, smart curtains, access control systems, and so on. Each sub-system interface is different, and there is no unified interface or platform, this project is going to solve this problem, and also settle some specific problems, such as carrier communication, and leakage monitoring, and so on.
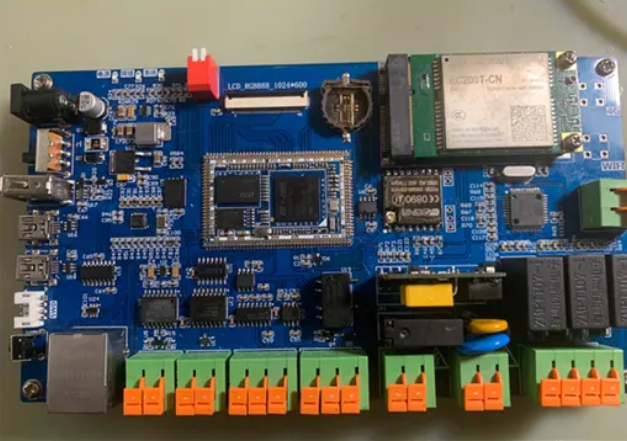
01
Hardware
Main Control: STM32F767IGT6. External extension of 32-bit SDRAM. External interfaces include:
- 1 10/100M gateway.
- 1 RS485 interface.
- 1 CAN interface.
- 1 RS232 interface.
- 1 carrier communication interface.
- 1 relay switch volume interface.
- 3 AC voltage measurement interfaces.
- 1 leakage monitoring interface.
- 1 TYPEA-USB connector.
- 1 Micro-USB interface.
- 1 temperature and humidity measurement interface.
- WIFI.
- 4G.
02
Implementation features:
- Modbus-TCP docking photovoltaic energy storage system.
- Modbus-RTU docking the central air conditioning system.
- Measure the ambient temperature and humidity of the installation.
- Measure the three-phase voltage value.
- Measure the leakage value of the switch.
- QPSI device analog U-stick.
- LCD displays sub-system data and acquisition data.
- Timely upload of ucloud leakage value and remote control the power.
03
Kernel
- Inter-thread synchronization: semaphore, mutex.
- Inter-thread communication: mailbox, message queue.
- Memory management: memheap management algorithm.
- I/O Device Management: PIN Device、SPI Device、UART Device、RTC Device、LCD Device、WATCH DOG Device、SENSOR Device.
- FinSH Console
- Virtual File System
- NETDEV NIC(Network Interface Controller)
- AT Command
- SAL (Socket Abstraction Layer)
- UCLOUD Software Package: ucloud_iot_sdk-latest
- AT Device Software Package: at_device-latest
- LIBMODBUS Software Package: libmodbus-latest
- OTA Software Package: ota_downloader-latest
- Network Package: netutils-latest
- DHTxx Software Package: dhtxx-latest
- EASYFLASH Software Package: EasyFlash-latest
- FAL Software Package: fal-latest
Hardware Architecture
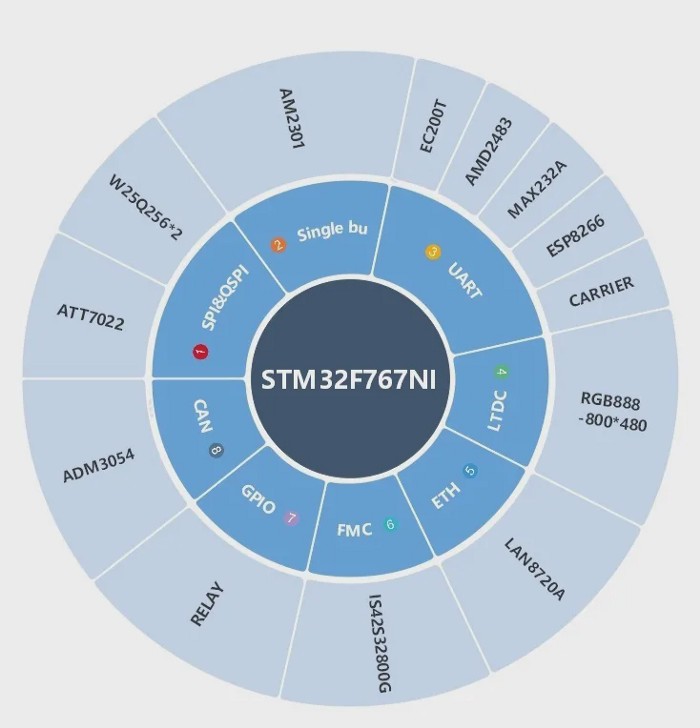
- ATT7022EU: Measuring three-phase voltage and leakage.
- W25Q256: One piece for storing word libraries and pictures and another piece for firmware download, factory firmware, EASYFLASH use, etc.
- AM2301: Temperature and humidity measurement.
- EC200T: 4G communication.
- ADM2483: RS485 communication.
- MAX232A:RS232 Communication.
- ESP8266: WIFI.
- LCD: RGB888, screen resolution 800 x 480.
- IS42S32800G: 32-bit SDRAM, 32M.
Software Architecture
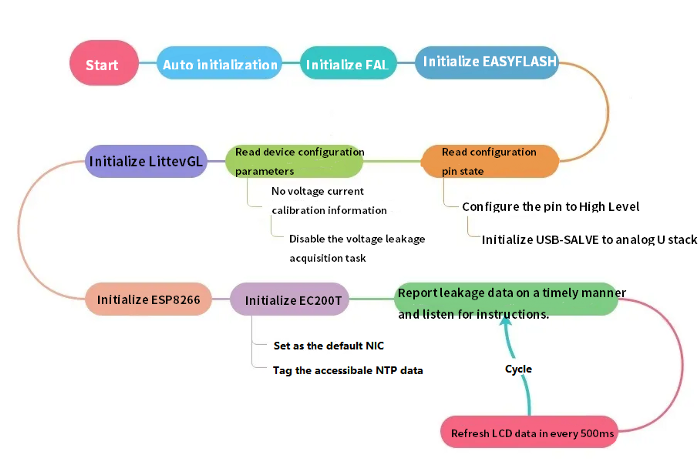
Software Module
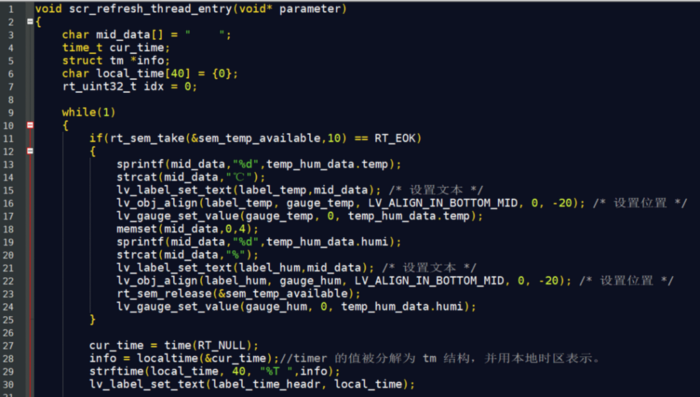
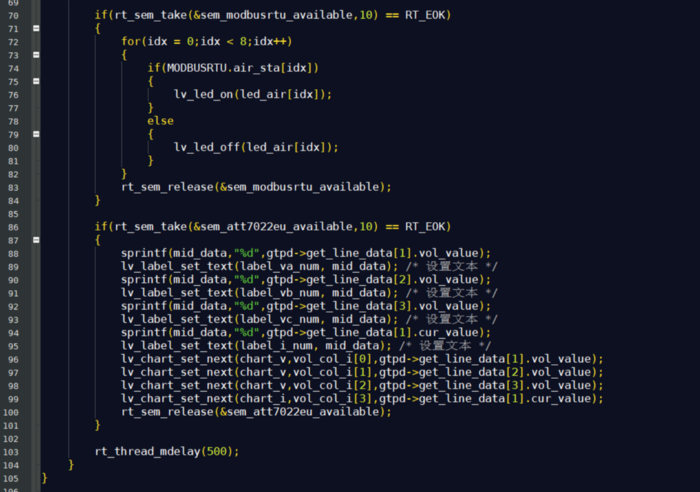

The above photo shows the most important task that responsible for refreshing the data displays on the screen, other acquisition tasks and data interaction tasks have their own semaphore, refresh task to get the semaphore waiting for 10MS, and then refresh the corresponding area.
Presentation
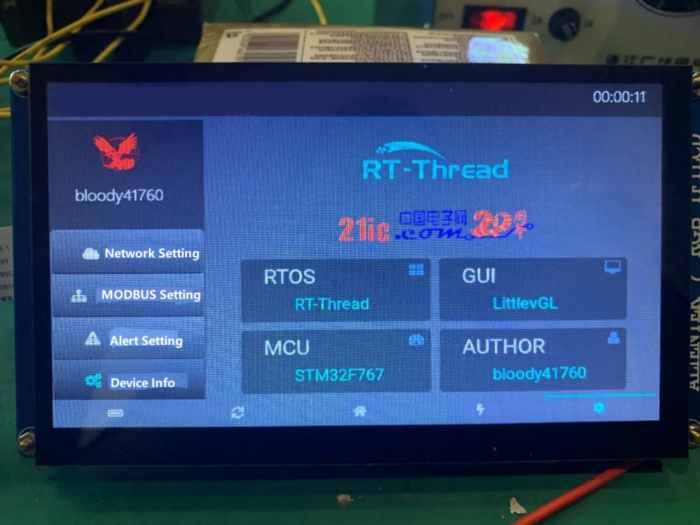
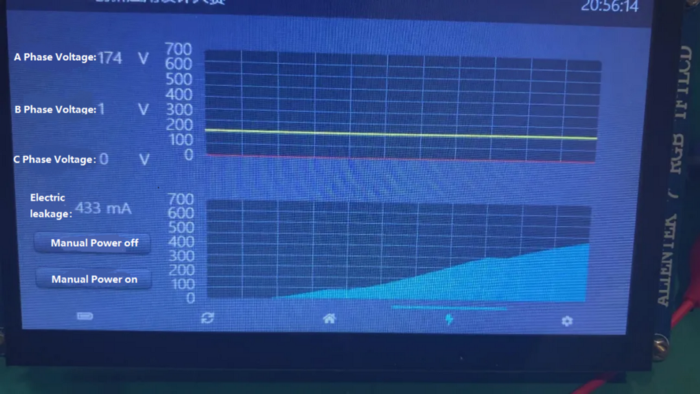

RT-Thread Contact Info:
Website: https://www.rt-thread.io
Github: https://github.com/RT-Thread
Twitter: https://twitter.com/rt_thread
Facebook: https://www.facebook.com/RT-Thread-IoT-OS-110395723808463
Youtube: https://www.youtube.com/channel/UCdDHtIfSYPq4002r27ffqPw

1. Code Contribution:
The statistics are fetched from merged PR on the Github master code branch.
We want to acknowledge and thank the following community members for their contributions to RT-Thread in August. They are:
qiyongzhong0、Michael0066 、ynkan、ylz0923、guohp1128、geniusgogo 、 liuduanfei、luhuadong、mysterywolf、xfwangqiang、supperthomas、NU-LL and Nuvoton Technology Corporation.
Thanks to all contributors who share their time, energy, and talent to help RT-Thread. Thank you very much!
Code updating:
- Fix stm32f769-st-disco bsp dist features, perfect the f7 series bsp template and test it. #3856
- Fix dataqueue, limit queue size to usable values (2,4,8,16…) to avoid errors when put_index exceed 0xffff. #3862
- utest:fixed compile err. #3861
- [update] drv_hwtimers.c file error struct member variables. #3857
- Remove legacy BSPs. #3849
- MIPS:remove redundant. #ifdef ARCH_MIPS64
- Fix the clock configuration issue for the hardware timer of STM32. #3846
- [skip travis] [Doc] Update file header copyright information for license. #3848
- [bsp/nrf5x/libraries/drivers] add wdt driver. #3840
- Add nrf5x adc driver. #3835
- [update] stm32mp157a-st-ev1 add ci and format code. #3832
- Fix the iterator failure for softtimer list timeout check. #3822
- Update error SFUD support manufacturer (Micronix -> Macronix). #3821
- Change I2C configuration hierarchy. #3802
- [update] add stm32mp1-st-ev1 bsp. #3814
- [BSP] [stm32f429-st-disco] Add SDRAM, LCD port files. #3808
- [stm32] perform an automatic ADC calibration using HAL_ADCEx_Calibration_Start(). #3811
- Add macros definition for struct rt_device_ops. #3810
- Fix gcc assembly option in rtconfig.py for imxrt1064-nxp-evk. #3792
- [bsp/ nrfx5] fix the board of nrf52832(pca10040). #3807
- [DFS] clean the unnecessary checking. #3806
- Fix startup files. #3804
- Add condition compilation to prevent the _sys_flen has compilation warning when RT_USING_DFS is not defined: the stat variable is defined but not called. #3803
- [code style] spelling mistake: PROERTY -> PROPERTY. #3801
- [modify] if … else if constructs to be terminated with an else clause, which other option is invalid and delete surplus space. #3773
- [add] a macro to be isolated while using signals in rt_mutex_take function. #3775
- [add] switch default clause. #3774
- [format] enumeration define two styles: define first or all. #3776
- Fix bugs on SConscript. #3788
- [nuvoton] Sync drivers of Nuvoton-M480 platform. #3799
- [ bsp/ nrf5x ] add the driver of pwm. #3796
- [modify] internal function ‘isdigit’ name to ‘_isdigit’. #3764
- [bsp] [ stm32 ] update stm32h743-st-nucleo bsp scripts. #3791
2. Software Packages Updating (RT-Thread has a total of 245 packages now)
- qboot release v1.01. #690
- lora-radio v1.1 update. #688
- Add new nnom new release 0.4.1. #686
- Add agile_jsmn package: jsmn is an ultra-lightweight, easy-to-carry, single file, suitable for environments with limited storage space in microcontroller, and can simply be used as an ANSI-C standard JSON parser. #685
- Add the peripheral driver for wk2124. #683
- Add uMCN package: uMCN is a light-weight and powerful IPC library based on the publisher/subscriber model. #682
- Add speech recognition package for chip LD3320. #679
- Add uCOSIII_Wrapper uCOSIII compatible layer package. #678
- Add nmealib package :Add a porting of the nmealib library on RT-Thread, which is used to parse GPS data for the NMEA protocol. #677
- Add agile_console software. #675
Thanks to qiyongzhong0、Forest-Rain、majianjia、loogg、 MrMichael、JcZou、xqyjlj 、majianjia、mysterywolf 、ShineRoyal for contributing the software packages.
One More Thing:
RT-Thread Micro-Kernel Operating System RT-Thread Smart will be announced next week, please stay tuned.
Introduction
RT-Thread provides a package management platform where RT-Thread official or community developer-provided packages are stored. The platform offers developers a wide selection of reusable packages, which is an important part of the RT-Thread ecosystem. RT-Thread now has 241 software packages that are out-of-box.
Click here to view the officially available packages from RT-Thread, most of which have detailed documentation and usage examples.
How to Enable RT-Thread Software Packages?
Package tools, as part of Env, provide developers with management functions such as download, update, delete, and more.
Entering pkgs on the Env command line can see the introduction to the command:
> pkgs
usage: env.py package [-h] [--update] [--list] [--wizard] [--upgrade] [--printenv]

optional arguments:
-h, --help  show this help message and exit
--update    update packages, install or remove the packages as you set in menuconfig
--list      list target packages
--wizard    create a package with wizard
--upgrade   update local packages list from git repo
--printenv  print environmental variables to check
Download, update, delete packages
Before you can download and update a package, you need to open the package you want to operate in menuconfig.
These packages are located under the RT-Thread online packages menu, which you can see the package categories as below:
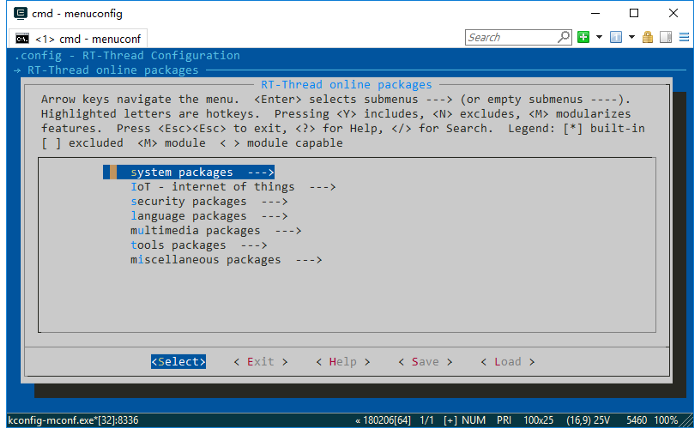
Select the package you need, save, and exit menuconfig. At this point, the package has been marked but has not been downloaded to the local, so it is not available.
-
Download: If the package has been selected locally, but not downloaded, enter: pkgs --update the package will be downloaded automatically;
-
Update: If the selected package has an update on the server-side and the version number selects the latest. Enter: pkgs --update, the package will be updated locally;
-
Delete: If you don’t need to use a package again, uncheck it in menuconfig before you execute: pkgs --update. Packages that have been downloaded locally but are not selected will be deleted.
RT-Thread Contact Info:
Website: https://www.rt-thread.io
Github: https://github.com/RT-Thread
Twitter: https://twitter.com/rt_thread
Facebook: https://www.facebook.com/RT-Thread-IoT-OS-110395723808463
Youtube: https://www.youtube.com/channel/UCdDHtIfSYPq4002r27ffqPw

01
Why do we need to tailor the system?
When designing an embedded RTOS system, we are looking for a simple and controllable system, so that we can have a clear mind when making a plan.
The essential characteristics of the embedded system are as follows:
- Application-centric
- Low power, small size, and low cost
- Software or hardware is tailorable
These issues should be considered fully in the process of designing embedded products, so when implementing them, we should focus not only on the system-level but also on the demands of business logic.
- Application field
- Research and development cycle
- System complexity
- Chip Resource (ROM and RAM)
- Firmware size requirements
- Start-up speed requirements
From the perspective of embedded system architecture, it is necessary to conform to the principle of high cohesion and low coupling as developers often need to adapt the different peripherals and components during the embedded system development process. Different needs require different changes so that software architecture is needed for adapting different changes, an embedded system architecture designed by high cohesion and low coupling principle is more scalable and more stable.
For bare-metal development, system tailor means reducing or optimizing business logic in a poll operation.
For Linux, system tailoring is to remove unnecessary components or peripherals, as well as tools, to reduce unused system functions, even in the bootloader.
For RTOS, system tailoring can reduce unnecessary component initialization or IPC initialization by removing the functionality. For example, if the project only needs critical IPCs such as signals, mailboxes, then message queues and events do not have to be initialized. In this way, you can shrink the code size and remove unnecessary initialization processes. Besides, by reducing the size of firmware, the start-up time of the system is also shortened, which improves the efficiency of the whole system.
02
RT-Thread is highly tailorable:
RT-Thread was born in 2006. It is an open-source, neutral, and community-based IoT OS.
RT-Thread is mainly written in C language, easy to understand, and supports quickly porting to a variety of mainstream MCUs and module chips. RT-Thread applies the object-oriented method to the real-time system design, which helps to build the system with elegant code, clear architecture, high modularization, and great tailorability.
RT-Thread has a Standard version and Nano version.
For resource-constrained microcontroller (MCU) systems, developers can tailor a Nano kernel that requires only 3KB Flash, 1.2KB RAM through the easy-to-use tools.
For resource-rich IoT devices, RT-Thread Standard version is recommended, which enables intuitive and fast modular tailoring through the online package management tools and system configuration tools, and the standard version can seamlessly import a wealth of software package, to achieve android-like graphical interface and touch sliding effects, smart voice interaction effects and other more complex functions.
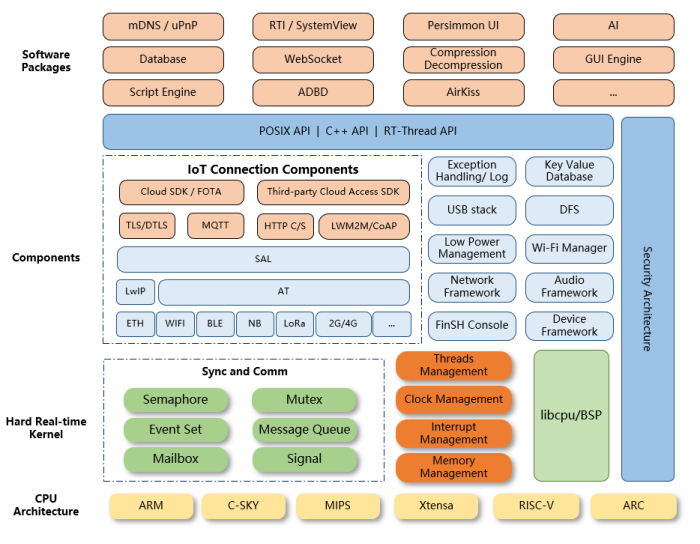
The full version of RT-Thread has full functionality but accordingly, as the functionality increases, the resource footprint is also increasing, which is not very friendly for small resource platforms. But as RT-Thread has high tailorability, it is still easy to be used on the platforms with the small resource by tailoring the full version through the env tool provided by RT-Thread, which is shown in the following image:
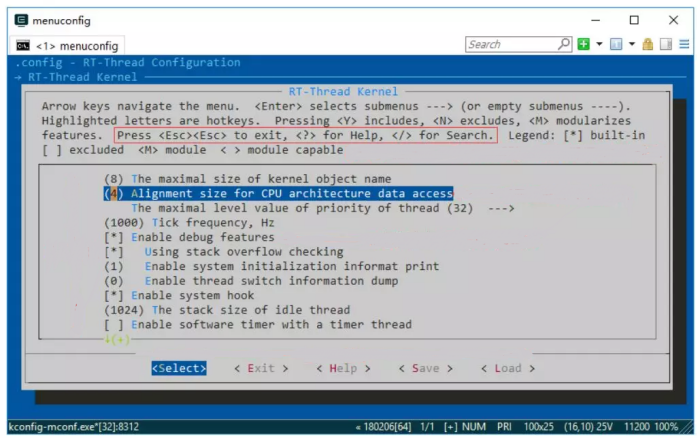
03
Tailoring
Resource is tailorable
The resources here refer to both hardware resources and software resources. Hardware resources are basically chosen at the time of design, and it gets finally determined after the reasonable planning and design of the software are done. It includes the allocation of relevant pins, power-up timing, operating rationality, as well as the requirements of power consumption, peripheral situation, pre-software development debugging, post-factory testing. Software developers take advantage of these specified hardware resources to complete the details of the software-level planning. A good hardware design makes the configured product more stable and reliable.
When running RT-Thread, we need to check the hardware’s ROM resources and RAM resources at the beginning of the design to evaluate whether the resources are reasonable to run an RTOS.
For example, the RT-Thread Nano version uses very little RAM and ROM. It needs only 1 KB RAM and 4KB ROM to support the semaphore and mailbox features, and run two threads (main thread + idle threads).
For applications that require a large amount of RAM and ROM, reasonable use of each resource is a good habit. First of all, let’s analyze the use and tailoring of RT-Thread memory.
1.Heap Space
Generally, there is a macro definition of the heap size in the board.h of the specific BSP:
1#define RT_HW_HEAP_BEGIN    (void*)&__bss_end
2#define RT_HW_HEAP_END      (void*)(RT_HW_HEAP_BEGIN + 64 * 1024 * 1024)
When designing the system, we need to evaluate the heap space required by the system. Memory management is allocated and released on the memory heap. For scenarios where memory resources are abundant in the chip, large heap space can be allocated for memory management, so that memory usage is more reasonable. For scenarios where memory resources in the chip are relatively limited, try not to use dynamic memory management, the static memory is more appropriate.

The heap space is generally used by allocating memory or creating threads and IPCs dynamically. If we create all the threads and IPCs and only use the static memory, the heap management mechanism could be removed. This is the typical situation in RT-Thread Nano.
2.Thread Stack Space
The stack space allocation is determined according to the complexity of the tasks, for the complex tasks handled in a thread, and the function spent more local variables, as well as the function calling connection is more complex, then the thread needs to be allocated with large stack space, while the task in the thread is relatively simple and the local variables are less used, then the thread can be allocated with a smaller stack space.
The stack is used to store the context of a thread, the size of which must be specified when creating a thread:
Where the size of the stack is generally affected by the firmware function call depth and the required resources. Generally, the maximum value is given at the beginning of development.
If you want to reduce it, here are three methods:
-
Run the system for a while and adjust the stack space by the list_thread command.
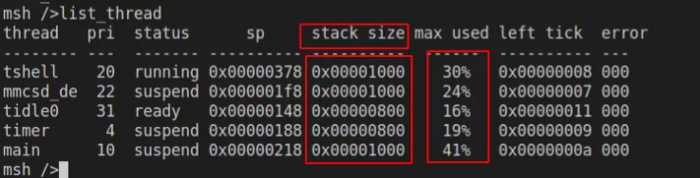
-
In Microcontroller Development Kit (MDK), you can view the Static Call Graph for the image file to see the usage of the stack.

Calculate the depth of the largest stack by checking the Function calling connection file, as shown above.
-
Manual calculation
Evaluate the local variable and the call relationship in each function, which needs to be calculated manually. Manual calculations can only approximate the size of the stack because when calling a function, the parameter values of the function and the local variables are pressed into the stack space. To calculate the size of the current thread stack, you need to add up the parameters of the current thread function, the size of the local variables, and the parameters and local variable sizes of the called function. Therefore, we should select the maximum stack space required in the function execution branch as the minimum stack space that needs to be allocated in the thread.
Kernel is tailorable
RT-Thread is composited of is components and kernel. Let’s start with the kernel tailoring, which can be observed through the RT-Thread env tool:
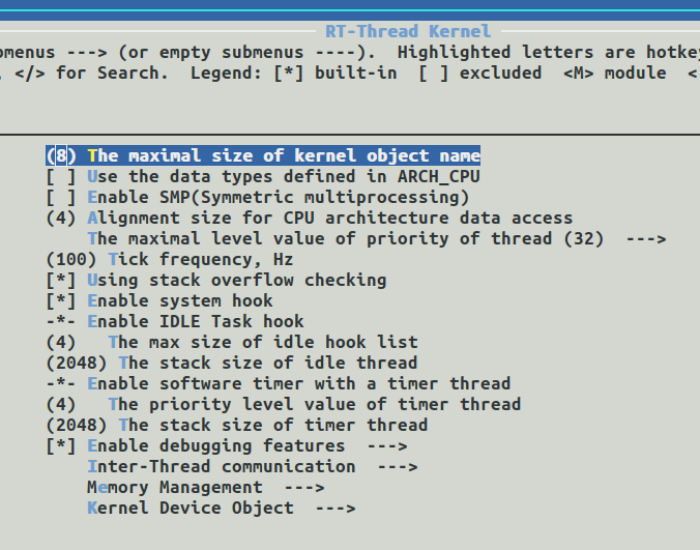
1. Inter-thread communication mechanism
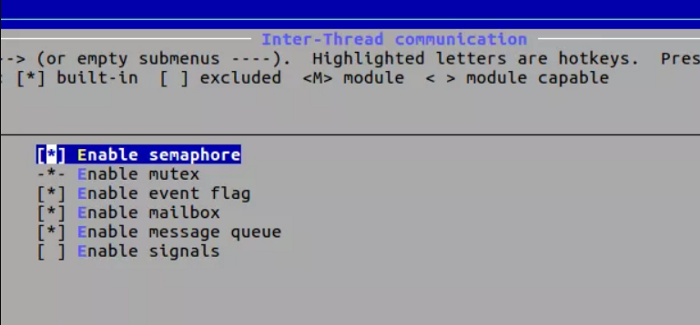
Tailor according to the features or components commonly used in our system.
2. Memory Management
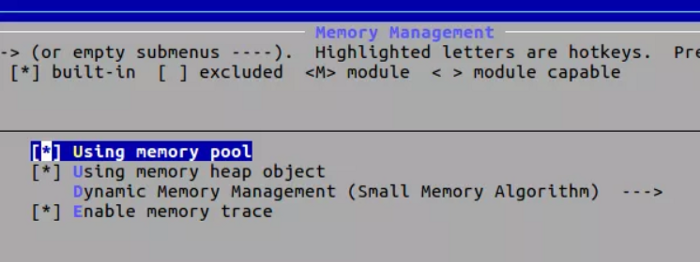
Choose different memory management strategies depending on the specific situation.
3. Kernel Device
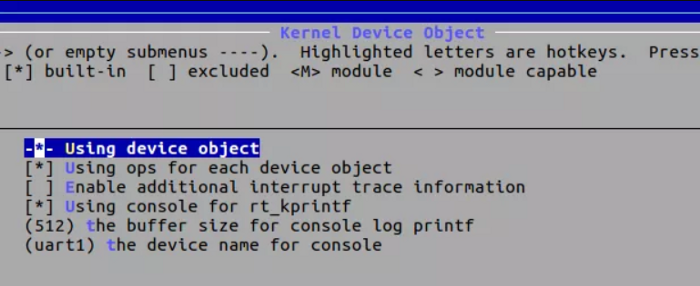
Console related configuration.
Components are tailorable
The components help us design specific business logic more efficiently.
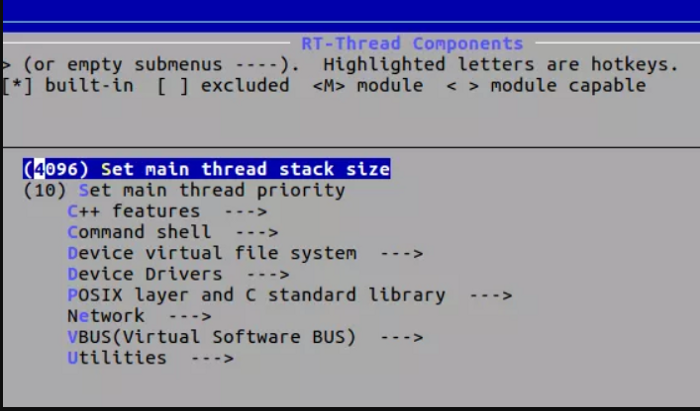
- Set the stack space and the priority of the main thread
- Check whether to use the C++
- The configuration of shell-related operations
- Device Virtual File System
- Device-driven framework
- POSIX Interfaces
- Network
- Tools
These tailoring needs to be considered when designing your application.
By using RT-Thread in embedded systems, the complexity of system design would be significantly reduced when implementing up-level applications. However, to make RT-Thread small and efficient, developers have to configure and cut the system according to their needs. The RT-Thread projects are configured and built via the scons tool, which explores Kconfig and SConscripts files to decide how to construct the final products. So, it’s necessary to understand their syntax and principles for users to make the whole system extensible and scalable. Specific instructions about RT-Thread Env and scons, please refer to HERE.
RT-Thread Contact Info:
Website: https://www.rt-thread.io
Github: https://github.com/RT-Thread
Twitter: https://twitter.com/rt_thread
Facebook: https://www.facebook.com/RT-Thread-IoT-OS-110395723808463
Youtube: https://www.youtube.com/channel/UCdDHtIfSYPq4002r27ffqPw
RT-Thread is an open-source embedded real-time operating system (RTOS) that provides a wide range of components and 200+ software packages for the Internet of Things (IoT).
Here are 7 tips to help you quickly start learning RT-Thread.
1. Find the RT-Thread official learning materials.
There is a documentation center on the RT-Thread official website , from which you can learn about RT-Thread online.
2. What are the basics required to learn RT-Thread?
A good C language master is a basic skill, have development experience of common MCUs or other RTOSs can also benefit you to be quicker to get started RT-Thread.
To understand the RT-Thread principles in-depth requires a certain degree of data structure, operating system principles, object-oriented programming, and other knowledge.
3. Have a board on hand, how to quickly run RT-Thread on this board?
RT-Thread provides a large number of BSPs(Board Support Package) for common development boards and chips. Find the corresponding BSP to get started directly, or find the similar one that you can also adjust it onto your board.
Also, RT-Thread self-developed a one-stop development tool: RT-Thread Studio IDE that can help you build the projects in seconds and keep you productive.
4. Can you use RT-Thread freely in your projects?
RT-Thread 3.1.0 version onwards follows the Apache License 2.0 open source license agreement. 3.1.0 version and its earlier versions follow the GPL V2 open source license agreement.
All the real-time operating system kernel and open source components can be used Free of Charge for Commercial Products.
5. RT-Thread has several versions, how to choose one?
Resource-constrained project can choose RT-Thread Nano that requires only 3KB Flash and 1.2KB RAM resources.
If you like something NEW and want to experience the latest features of RT-Thread, you can choose the Master version or 4.x.x Version.
If you have high requirements on stability and have the intention to put RT-Thread for commercial use, you are more recommended to choose 3.1.x version.
6. You don't have a board on hand, how to learn RT-Thread?
RT-Thread provides qemu-vexpress-a9 BSP(Board Support Package), which can be used without a hardware platform. Or you can use the Keil MDK simulator STM32F103 to start your RT-Thread learning journey.
7. If you have questions when learning RT-Thread, how to seek help?
You can ask for help on RT-Thread's Reddit Channel / Facebook Channel/ Twitter Channel. While asking questions, remember to provide as much information as possible about the relevant code screenshots, debug logs, and other related information.
RT-Thread Contact Info:
Website: https://www.rt-thread.io
Github: https://github.com/RT-Thread
Twitter: https://twitter.com/rt_thread
Facebook: https://www.facebook.com/RT-Thread-IoT-OS-110395723808463
Youtube: https://www.youtube.com/channel/UCdDHtIfSYPq4002r27ffqPw
1. Code Contribution:
The statistics are fetched from merged PR on the Github master code branch.

We want to acknowledge and thank the following community members for their contributions to RT-Thread in July. They are:
luhuadong、uselessboard、 ifreecoding 、 SantaPasserby 、guohp1128 、 LYH-ux、NU-LLadd 、 XYX12306、margguo、 DavidLin1577 、xfwangqiang 、zhiweih、liuduanfei 、mysterywolf、 sgf201 、 iysheng and Nuvoton Technology Corporation.
Thanks to all contributors who share their time, energy, and talent to help RT-Thread. Thank you very much!
Code updating:
-
Fix a bug about rt_event_recv function without assigning event_set/event_info, when there is a correspond event, the thread does not need to wait #3787
-
avoid deadlock (rt_hw_interrupt_disable and rt_enter_critical when enable smp #3786
-
[format] code style of rt_strcmp function #3777
-
update SConstruct fix compilation error #3785
-
specify date string length in FINSH date command #3784
-
[update] function must have parameter #3767
-
fix bug: keep user’s lib configuration while running — target=eclipse #3766
-
[at_socket] support alloc socket dynamically with at device #3755
-
[bsp] [stm32] [wdt] Optimize code style #3760
-
minor optimization for mempool.c #3762
-
[update] add English README.md #3759
-
[bsp/nrf5x] add the config of softdevice #3761
-
[update] add STM32MP1xx template project #3746
-
fixed scons — dist in IMXRT BSP #3754
-
Update tcpclient.c #3753
-
[components] [wlan] fixed an issue at some cases of without user_buff in function rt_wlan_event_dispatch ()#3752
-
[bsp] add missing dist_handle function for two stm32 bsp #3747
-
[sensor] fixed sensor cmd delay time #3741
-
fixbug:eclipse.py do not remove all unused path list #3744
-
mainly update some supports on-chip peripheral driver about stm32f413-st-nucleo board #3724
-
stm32g070-st-nucleo bsp #3732
-
first commit of tm4c123bsp, validate on MDK5 #3722
-
raspi4 spi0 driver can run #3739
-
Submit nrf5x gpio driver #3706
-
[DeviceDriver] [SFUD] Update the ‘sf bench’ command #3740
-
fix an error, invoking rt_snprintf function with surplus parameter #3736
-
add a checking about size, equaling 0, in stm32_flash_erase function #3733
-
bsp: ls2k: pwm driver #3735
-
[Sensor] Add AMS sensor vendor info #3738
-
support Nuvoton M480 Platform #3697
-
fix gic ack irq problem #3730
-
add CAN configurature and CubeMx generate mode of Mspinit code
-
fix no compile .s source file under linux
2. The Software Packages Updating (RT-Thread has a total of 239 packages now)
-
qled released v1.00
-
update ft5426 driver
-
add a quick bootloader component
-
add crc library
-
add sensor mlx90632
-
add send and recv buffer parameters
-
add ws2812b software package
-
add gps_rmc software package
-
add Lorawan driver
-
add minIni and modify syntax error
-
NNoM updates the new version
-
add index information for RT3020 package
-
add gesture detection module PAJ7620
-
support for the PMS particulate concentration sensors
-
add gas sensor package ccs811
Thanks to qiyongzhong0、 liuduanfei、xupenghu、LXGMAX、 maplerian、zyk6271、XiaojieFan、majianjia、luhuadong、orange2348 for contributing the software packages.
3. Development tools:
RT-Thread Studio IDE V1.1.3 is released that supports:
-
QEMU Simulator
-
DAP-LINK
Refer to Here for more info.
Free Download RT-Thread Studio.
Kernel porting refers to the kernel running on different chip architectures and boards. It can have functions such as thread management and scheduling, memory management, inter-thread synchronization and communication, and timer management, etc. Porting can be divided into two parts: CPU architecture porting and BSP (Board support package) porting.
In this article, the CPU architecture porting part will be introduced in conjunction with the Cortex-M CPU architecture. RT-Thread opensource RTOS Kernel will be as an example.
CPU Architecture Porting
There are many different CPU architectures in the embedded world, for example, Cortex-M, ARM920T, MIPS32, RISC-V, etc. In order to enable RT-Thread to run on different CPU architecture chips, RT-Thread provides a libcpu abstraction layer to adapt to different CPU architectures. The libcpu layer provides unified interfaces to the kernel, including global interrupt switches, thread stack initialization, context switching, and more.
RT-Thread's libcpu abstraction layer provides a unified set of CPU architecture porting interfaces downwards. This part of the interface includes global interrupt switch functions, thread context switch functions, clock beat configuration and interrupt functions, Cache, and so on. The following table shows the interfaces and variables that the CPU architecture migration needs to implement.
libcpu porting related API
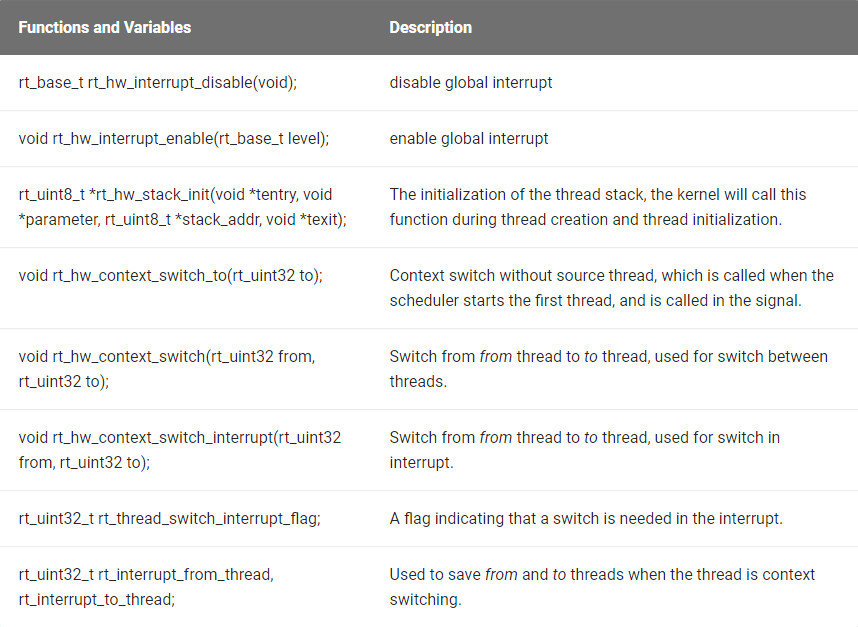
Implement Global Interrupt Enable/Disable
Regardless of kernel code or user code, there may be some variables that need to be used in multiple threads or interrupts. If there is no corresponding protection mechanism, it may lead to critical section problems. In order to solve this problem, RT-Thread provides a series of inter-thread synchronization and communication mechanism. But these mechanisms require the global interrupt enable/disable function provided in libcpu. They are, respectively:
/* disable global interrupt */
rt_base_t rt_hw_interrupt_disable(void);

/* enable global interrupt */
void rt_hw_interrupt_enable(rt_base_t level);
The following describes how to implement these two functions on the Cortex-M architecture. As mentioned earlier, the Cortex-M implements the CPS instruction in order to achieve fast switch interrupts, which can be used here.
CPSID I ;PRIMASK=1, ; disable global interrupt
CPSIE I ;PRIMASK=0, ; enable global interrupt
Disable Global Interrupt
The functions that need to be done in order in the rt_hw_interrupt_disable() function are:
1). Save the current global interrupt status and use the status as the return value of the function.
2). Disable the global interrupt.
Based on MDK, the global interrupt disabled function on the Cortex-M core, is shown in the following code:
Disable global interrupt
;/*
; * rt_base_t rt_hw_interrupt_disable(void);
; */
rt_hw_interrupt_disable    PROC      ;PROC pseudoinstruction definition function
    EXPORT  rt_hw_interrupt_disable  ;EXPORT output defined function, similar to C language extern
    MRS     r0, PRIMASK              ;read the value of the PRIMASK register to the r0 register
    CPSID   I                        ;disable global interrupt
    BX      LR                       ;function renturn
    ENDP                             ;ENDP end of function
The above code first uses the MRS instruction to save the value of the PRIMASK register to the r0 register, then disable the global interrupt with the "CPSID I" instruction, and finally returns with the BX instruction. The data stored by r0 is the return value of the function. Interrupts can occur between the “MRS r0, PRIMASK” instruction and “CPSID I”, which does not cause a global interrupt status disorder.
There are different conventions for different CPU architectures regarding how registers are managed during function calls and in interrupt handlers. A more detailed introduction to the use of registers for Cortex-M can be found in the official ARM manual, "Procedure Call Standard for the ARM ® Architecture."
Enable Global Interrupt
In rt_hw_interrupt_enable(rt_base_t level), the variable level is used as the state to be restored, overriding the global interrupt status of the chip.
Based on MDK, implementation on the Cortex-M core enables a global interrupt, as shown in the following code:
Enable global interrupt
;/*
; * void rt_hw_interrupt_enable(rt_base_t level);
; */
rt_hw_interrupt_enable    PROC      ; PROC pseudoinstruction definition function
    EXPORT  rt_hw_interrupt_enable  ; EXPORT output defined function, similar to "extern" in C language
    MSR     PRIMASK, r0             ; write the value of the r0 register to the PRIMASK register
    BX      LR                      ; function renturn
    ENDP                            ; ENDP end of function
The above code first uses the MSR instruction to write the value register of r0 to the PRIMASK register, thus restoring the previous interrupt status.
Implement Thread Stack Initialization
When dynamically creating threads and initializing threads, the internal thread initialization function _rt_thread_init() is used. The _rt_thread_init() function calls the stack initialization function rt_hw_stack_init(), which manually constructs a context in the stack initialization function. The context will be used as the initial value for each thread's first execution. The layout of the context on the stack is shown below:
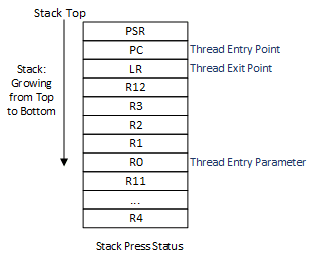
The following code is the stack initialization code:
Build a context on the stack
rt_uint8_t *rt_hw_stack_init(void       *tentry,
void       *parameter,
rt_uint8_t *stack_addr,
void       *texit)
{
    struct stack_frame *stack_frame;
    rt_uint8_t         *stk;
    unsigned long       i;

    /* align the incoming stack pointer */
    stk  = stack_addr + sizeof(rt_uint32_t);
    stk  = (rt_uint8_t *)RT_ALIGN_DOWN((rt_uint32_t)stk, 8);
    stk -= sizeof(struct stack_frame);

    /* obtain the pointer to the stack frame of the context */
    stack_frame = (struct stack_frame *)stk;

    /* set the default value of all registers to 0xdeadbeef */
    for (i = 0; i < sizeof(struct stack_frame) / sizeof(rt_uint32_t); i ++)
    {
        ((rt_uint32_t *)stack_frame)[i] = 0xdeadbeef;
    }

    /* save the first parameter in the r0 register according to the ARM APCS calling standard */
    stack_frame->exception_stack_frame.r0  = (unsigned long)parameter;
    /* set the remaining parameter registers to 0 */
    stack_frame->exception_stack_frame.r1  = 0;                 /* r1 register */
    stack_frame->exception_stack_frame.r2  = 0;                 /* r2 register */
    stack_frame->exception_stack_frame.r3  = 0;                 /* r3 register */
    /* set IP (Intra-Procedure-call scratch register.) to 0 */
    stack_frame->exception_stack_frame.r12 = 0;                 /* r12 register */
    /* save the address of the thread exit function in the lr register */
    stack_frame->exception_stack_frame.lr  = (unsigned long)texit;
    /* save the address of the thread entry function in the pc register */
    stack_frame->exception_stack_frame.pc  = (unsigned long)tentry;
    /* Set the value of psr to 0x01000000L, which means that the default switch is Thumb mode. */
    stack_frame->exception_stack_frame.psr = 0x01000000L;

    /* return the stack address of the current thread       */
    return stk;
}
Implement Context Switching
In different CPU architectures, context switches between threads and context switches from interrupts to context, the register portion of the context may be different or the same. In Cortex-M, context switching is done uniformly using PendSV exceptions, and there is no difference in the switching parts. However, in order to adapt to different CPU architectures, RT-Thread's libcpu abstraction layer still needs to implement three thread switching related functions:
-
1) rt_hw_context_switch_to(): no source thread, switching to the target thread, which is called when the scheduler starts the first thread.
-
2) rt_hw_context_switch():In a threaded environment, switch from the current thread to the target thread.
-
3) rt_hw_context_switch_interrupt ():In the interrupt environment, switch from the current thread to the target thread.
There are differences between switching in a threaded environment and switching in an interrupt environment. In the threaded environment, if the rt_hw_context_switch() function is called, the context switch can be performed immediately; in the interrupt environment, it needs to wait for the interrupt handler to complete processing the functions before switching.
Due to this difference, the implementation of rt_hw_context_switch() and rt_hw_context_switch_interrupt() is not the same on platforms such as ARM9. If the thread's schedule is triggered in the interrupt handler, rt_hw_context_switch_interrupt() is called in the dispatch function to trigger the context switch. After the interrupt handler has processed the interrupt, check the rt_thread_switch_interrupt_flag variable before the schedule exits. If the value of the variable is 1, the context switch of the thread is completed according to the rt_interrupt_from_thread variable and the rt_interrupt_to_thread variable.
In the Cortex-M processor architecture, context switching can be made more compact based on the features of automatic partial push and PendSV.
Context switching between threads, as shown in the following figure:
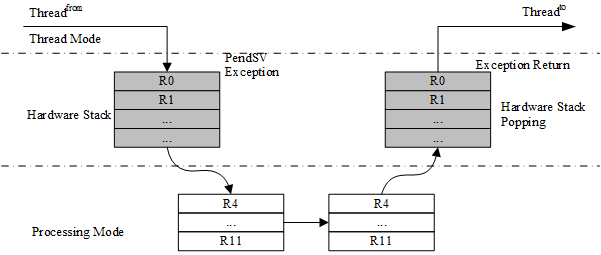
The hardware automatically saves the PSR, PC, LR, R12, R3-R0 registers of the from the thread before entering the PendSV interrupt, then saves the R11~R4 registers of the from thread in PendSV, and restores the R4~R11 registers of the to thread, and finally, the hardware automatically restores the R0~R3, R12, LR, PC, PSR registers of the to thread after exiting the PendSV interrupt.
The context switch from interrupt to thread can be represented by the following figure:
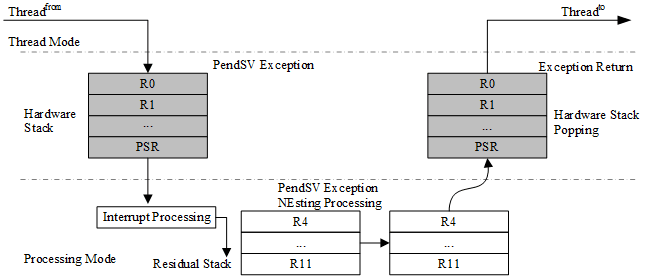
The hardware automatically saves the PSR, PC, LR, R12, R3-R0 registers of the from thread before entering the interrupt, and then triggers a PendSV exception. R11~R4 registers of the from thread are saved and R4~R11 registers of the to thread are restored in the PendSV exception handler. Finally, the hardware automatically restores the R0~R3, R12, PSR, PC, LR registers of the to thread after exiting the PendSV interrupt.
Obviously, in the Cortex-M kernel, the rt_hw_context_switch() and rt_hw_context_switch_interrupt() have the same functions, which is finishing saving and replying the remaining contexts in PendSV. So we just need to implement a piece of code to simplify the porting.
Implement rt_hw_context_switch_to()
rt_hw_context_switch_to() has only the target thread and no source thread. This function implements the function of switching to the specified thread. The following figure is a flowchart:
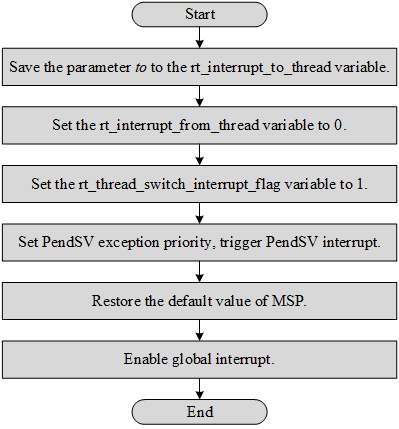
The rt_hw_context_switch_to() implementation on the Cortex-M3 kernel (based on MDK), as shown in the following code:
MDK version rt_hw_context_switch_to() implementation
;/*
; * void rt_hw_context_switch_to(rt_uint32 to);
; * r0 --> to
; * this fucntion is used to perform the first thread switch
; */
rt_hw_context_switch_to    PROC
    EXPORT rt_hw_context_switch_to
    ; r0 is a pointer pointing to the SP member of the thread control block of the to thread
    ; save the value of the r0 register to the rt_interrupt_to_thread variable
    LDR     r1, =rt_interrupt_to_thread
    STR     r0, [r1]

    ; set the from thread to empty, indicating that no context is needed to save from
    LDR     r1, =rt_interrupt_from_thread
    MOV     r0, #0x0
    STR     r0, [r1]

    ; set the flag to 1, indicating that switching is required, this variable will be cleared when switching in the PendSV exception handler
    LDR     r1, =rt_thread_switch_interrupt_flag
    MOV     r0, #1
    STR     r0, [r1]

    ; set PendSV exception priority to lowest priority
    LDR     r0, =NVIC_SYSPRI2
    LDR     r1, =NVIC_PENDSV_PRI
    LDR.W   r2, [r0,#0x00]       ; read
    ORR     r1,r1,r2             ; modify
    STR     r1, [r0]             ; write-back

    ; trigger PendSV exception (PendSV exception handler will be executed)
    LDR     r0, =NVIC_INT_CTRL
    LDR     r1, =NVIC_PENDSVSET
    STR     r1, [r0]

    ; abandon the stack from chip startup to before the first context switch, set the value of the MSP as when it is started
    LDR     r0, =SCB_VTOR
    LDR     r0, [r0]
    LDR     r0, [r0]
    MSR     msp, r0

    ; enable global interrupts and global exceptions. After enabling, the PendSV exception handler will be entered.
    CPSIE   F
    CPSIE   I

    ; will not execute to here
    ENDP
Implement rt_hw_context_switch()/ rt_hw_context_switch_interrupt()
The function rt_hw_context_switch() and the function rt_hw_context_switch_interrupt() have two parameters, the from thread and the to thread. They implement the function to switch from the from thread to the to thread. The following figure is a specific flow chart:
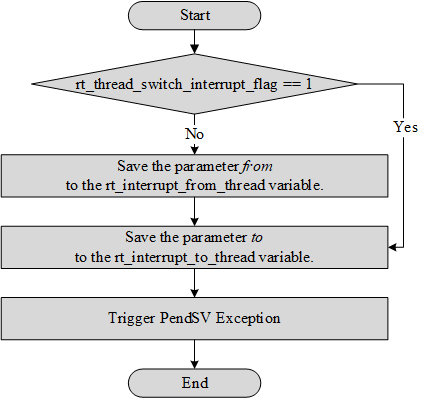
The rt_hw_context_switch() and rt_hw_context_switch_interrupt() implementations on the Cortex-M3 kernel (based on MDK) are shown in the following code:
Implement rt_hw_context_switch()/rt_hw_context_switch_interrupt()
;/*
; * void rt_hw_context_switch(rt_uint32 from, rt_uint32 to);
; * r0 --> from
; * r1 --> to
; */
rt_hw_context_switch_interrupt
    EXPORT rt_hw_context_switch_interrupt
rt_hw_context_switch    PROC
    EXPORT rt_hw_context_switch

    ; check if the rt_thread_switch_interrupt_flag variable is 1
    ; skip updating the contents of the thread from if the variable is 1
    LDR     r2, =rt_thread_switch_interrupt_flag
    LDR     r3, [r2]
    CMP     r3, #1
    BEQ     _reswitch
    ; set the rt_thread_switch_interrupt_flag variable to 1
    MOV     r3, #1
    STR     r3, [r2]

    ; update the rt_interrupt_from_thread variable from parameter r0
    LDR     r2, =rt_interrupt_from_thread
    STR     r0, [r2]

_reswitch
    ; update the rt_interrupt_to_thread variable from parameter r1
    LDR     r2, =rt_interrupt_to_thread
    STR     r1, [r2]

    ; trigger PendSV exception, will enter the PendSV exception handler to complete the context switch
    LDR     r0, =NVIC_INT_CTRL
    LDR     r1, =NVIC_PENDSVSET
    STR     r1, [r0]
    BX      LR
Implement PendSV Interrupt
In Cortex-M3, the PendSV interrupt handler is PendSV_Handler(). The actual thread switching is done in PendSV_Handler(). The following figure is a specific flow chart:
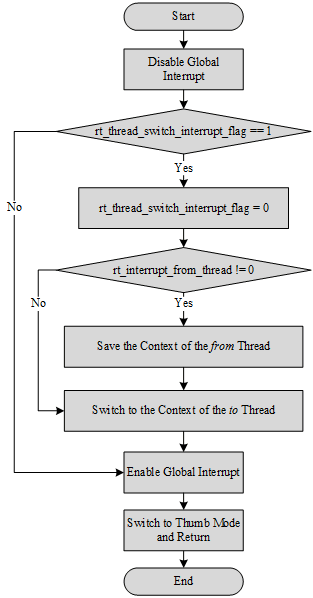
The following code is a PendSV_Handler implementation:
; r0 --> switch from thread stack
; r1 --> switch to thread stack
; psr, pc, lr, r12, r3, r2, r1, r0 are pushed into [from] stack
PendSV_Handler   PROC
    EXPORT PendSV_Handler

    ; disable global interrupt
    MRS     r2, PRIMASK
    CPSID   I

    ; check if the rt_thread_switch_interrupt_flag variable is 0
    ; if it is zero, jump to pendsv_exit
    LDR     r0, =rt_thread_switch_interrupt_flag
    LDR     r1, [r0]
    CBZ     r1, pendsv_exit         ; pendsv already handled

    ; clear the rt_thread_switch_interrupt_flag variable
    MOV     r1, #0x00
    STR     r1, [r0]

    ; check the rt_thread_switch_interrupt_flag variable
    ; if it is 0, the context save of the from thread is not performed.
    LDR     r0, =rt_interrupt_from_thread
    LDR     r1, [r0]
    CBZ     r1, switch_to_thread

    ; save the context of the from thread
    MRS     r1, psp                 ; obtain the stack pointer of the thread from
    STMFD   r1!, {r4 - r11}       ; save r4~r11 to the thread's stack
    LDR     r0, [r0]
    STR     r1, [r0]                ; update the SP pointer of the thread's control block

switch_to_thread
    LDR     r1, =rt_interrupt_to_thread
    LDR     r1, [r1]
    LDR     r1, [r1]                ; obtain the stack pointer of the thread to

    LDMFD   r1!, {r4 - r11}       ; restore the register value of the thread to in the stack of the thread
    MSR     psp, r1                 ; update the value of r1 to psp

pendsv_exit
    ; restore global interrupt status
    MSR     PRIMASK, r2

    ; modify bit 2 of the lr register to ensure that the process uses the PSP stack pointer
    ORR     lr, lr, #0x04
    ; exit interrupt function
    BX      lr
    ENDP
Impalement OS Tick
With the basics of switching global interrupts and context switching, RTOS can perform functions such as creating, running, and scheduling threads. With OS Tick, RT-Thread can schedule time-to-roll rotations for threads of the same priority, implementing timer functions, implementing rt_thread_delay() delay functions, and so on.
In oder to finish the porting of libcpu, we need to ensure that the rt_tick_increase() function is called periodically during the clock tick interrupt. The call cycle depends on the value of the RT_TICK_PER_SECOND macro of rtconfig.h.
In Cortex M, the OS tick can be implemented by SysTick's interrupt handler.
void SysTick_Handler(void)
{
    /* enter interrupt */
    rt_interrupt_enter();

    rt_tick_increase();

    /* leave interrupt */
    rt_interrupt_leave();
}
BSP Porting
In a practical project, for the same CPU architecture, different boards may use the same CPU architecture, carry different peripheral resources, and complete different products, so we also need to adapt to the board. RT-Thread provides a BSP abstraction layer to fit boards commonly seen. If you want to use the RT-Thread kernel on board, in addition to the need to have the corresponding chip architecture porting, you need to port the corresponding board, that is, implement a basic BSP. The job is to establish a basic environment for the operating system to run. The main tasks that need to be completed are:
-
1) Initialize the CPU internal registers and set the RAM operation timing.
-
2) Implement clock driver and interrupt controller driver and interrupt management.
-
3) Implement UART and GPIO driver.
-
4) Initialize the dynamic memory heap to implement dynamic heap memory management.
RT-Thread Contact Info:
Website: https://www.rt-thread.io
Github: https://github.com/RT-Thread
Twitter: https://twitter.com/rt_thread
Facebook: https://www.facebook.com/RT-Thread-IoT-OS-110395723808463
Youtube: https://www.youtube.com/channel/UCdDHtIfSYPq4002r27ffqPw
RT-Thread is an Internet of Things(IoT) operating system that applies Apache License v2, and it is been over a decade since the first release of RT-Thread in 2006. RT-Thread is developed collaboratively on Github during the whole development process and released many versions since 2006.
This document will make an explicit explanation of how to choose the right RT-Thread version.
RT-Thread’s version/branch has the following available options:
Development branch (master branch), long-term support branch (lts-v3.1.x branch), release version (release), you are more recommended to use the released version.
RT-Thread Branch & Version Introduction
The RT-Thread existed branches:
- stable-v1.2.x (not maintained)
- stable-v2.0.x (not maintained)
- stable-v2.1.x (not maintained)
- stable-v3.0.x (not maintained)
- lts-v3.1.x (long-term support and maintain)
- Master (master is RT-Thread development branch, it is active as always)
When there are large version changes, such as 3.0.x updates to 3.1.x, or master version changes, a new branch will be created on the master branch to maintain the old version.
Version-Release: RT-Thread has released a number of versions, such as 3.1.1, 3.1.2, 4.0.0, etc. The new version is released on the basis of the master branch or on the branch that is under-maintained.
For example, the latest release of the long-term support branch lts-v3.1.x is 3.1.2, and there will be 3.1.3, 3.1.4 、… and so on, but the 3.2.x version will not be released on that branch.
A second example, the version of the current master branch is 4.0.1, the latest release is 4.0.0, and there will be 4.0.1, 4.0.2 、… and so on. When there are large version changes, such as when 4.1.0 is released, a 4.0.x branch will be created to maintain 4.0.x.
Branch Diagram:
Take the Option:
GitHub Releases
RT-Thread all releases are stored on Github. The releases are highly stable and the latest releases are more recommended. There are two latest releases: version 3.1.2 and version 4.0.0, both of which can be selected for your needs.
Latest Release 3.1.2
- For products/projects: This version is more suitable for the company to put on products or projects.
- If your product is using the earlier release of RT-Thread, it is recommended to keep maintaining the product on that release.
- For a new start product, it’s recommended to use the latest release of 3.1.x, for example, the 3.1.2 release of the 3.1.x.
- For Learning / Research: This release is great for beginners to get started with RT-Thread.
Latest Release 4.0.0
- For products/projects: This version is also suitable for the company to put on products or projects.
- 4.0.0 supports SMP for products or projects with multiple core needs.
- Learning / Research: Good for beginners and experienced developers to learn RT-Thread.
Development Branch (GitHub master)
The development branch is a branch of code that the RT-Thread team committed during development, it is stored on the Github master branch. The branch will iterate and update continually and frequently.
- Product/project: Development branch is unstable and not suitable for product or project use.
- Learning /Research: Because of the speed of updates, it’s more suitable for experienced developers.
- Code Contributions: Welcome to pull request code or fix bugs on this branch.
Long-term Support Branch (GitHub Its-v3.1.x)
The long-term support branch is stored on Github, the long-term support branch is the maintenance branch of the 3.1.x version, primarily to fix bugs and update BSPs. Since more features have been added from 4.0.0, such as SMP, lwp, and more. There is a big change for 3.1.x, so 3.1.x will be maintained over the long term.
- Product/project: Development branch is unstable and not suitable for products or projects.
- Learning /Research: It’s more suitable for experienced developers.
RT-Thread Contact Info:
Website: https://www.rt-thread.io
Github: https://github.com/RT-Thread
Twitter: https://twitter.com/rt_thread
Facebook: https://www.facebook.com/RT-Thread-IoT-OS-110395723808463
Youtube: https://www.youtube.com/channel/UCdDHtIfSYPq4002r27ffqPw
Thanks to RT-Thread OpenSource Community Developer #hyafz contributed and opensource this application.
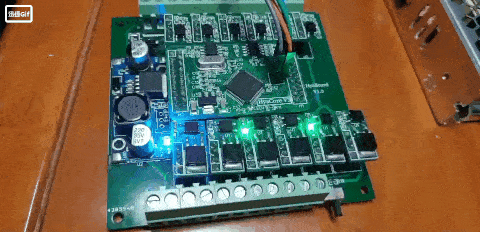
1 Introduction
plccore is a RT-Thread-based runtime core for programmable logic controller (PLC), together with the upper computer programming software plcide that I developed, forms a complete PLC development system. With RT-Thread's extensive board support packages (BSP), plccore can be quickly ported to more MCUs, which saves a lot of development time. For MCU developers, the combination of plcide, plccore and rt-thread provides a graphical, tabular way to develop MCU control programs, which is very convenient and simple.
1.1 The Objectives of plccore
There are three objectives that the PLC system with plccore + plcide can achieve:
- To achieve a scalable, open PLC programming system that fully complies with IEC61131–3 standards and improve the reuse rate of code modules;
- To achieve a compiled PLC, the instruction density or execution efficiency of which are greatly improved compared to the explanatory PLC;
- Explore the development of embedded applications in graphical and tabular forms to simplify MCU development;
1.2 What can plccore do?
For MCU developers, once you have ported the RT-Thread and plccore, you can use plcide for:
1.Write the control logic through graphical interfaces, which supports multi-platform reuse
2.Configure multitasking systems in tabulations without writing code, which supports different task-driven modes:
-
Loop execution
-
External signal trigger
-
Timing trigger
1.3 Catalog
1.4 License
plccore package complies with the LGPLv2.1 license, as detailed in the 'LICENSE' file.
1.5 Dependence
- RT-Thread nano 3.1.3+
2 How to port plccore?
Please refer to the Porting Tutorial given in the docs directory (Note: Apology first. The RT-Thread community developers contribute a lot of valuable applications, but the tutorials are not written in English yet, so when you read this article you need to use online translation software. We are working on translating those documents into English, please stay tuned. )
3 How to get the upper computer programming software plcide?
Leave us a message on RT-Thread Twitter or Facebook.
4 How to use plcide?
Please refer to the PLC Integrated Development Environment User Manual given in the software package docs directory:
And here’s the Programming Guidelines
RT-Thread Contact Info
Website: https://www.rt-thread.io
Github: https://github.com/RT-Thread
Twitter: https://twitter.com/rt_thread
Facebook: https://www.facebook.com/RT-Thread-IoT-OS-110395723808463/?modal=admin_todo_tour
Email: contact@rt-thread.org
1. Code Contribution in June:
The statistics are fetched from merged PR on the Github master code branch.
First of all, we want to acknowledge and thank the following community members for their contributions to RT-Thread in June. They are:
liuduanfei、uselessboard、ArdaFu、geniusgogo、xuzhuoyi、luhuadong、DavidLin1577、xfwangqiang、ShermanShao、longtengmcu、Nuclei System Technology、Nuvoton Technology Corporation!
Code updating:
-
- [BSP] [gd32vf103] add drv_gpio.c #3725
-
- Delete duplicate header files #3727
-
- BSP: ls2k: internal rtc driver #3717
-
- BSP [TM4C129X] Fix the bug that HEAP is not initialized at system start up #3721
-
- [update] add drivers for stm32mp1 #3715
-
- Add lwIP 2.1.2 for RT-Thread #3709
-
- Fix ls2k irq #3711
-
- [add] STM32MP157A Discovery bsp #3708
-
- BSP [stm32] [drv_sdio.c] adapt stm32f2 series#3704
-
- [fix] lwip clock confict with minilibc clock #3703
-
- [net/lwip]: enable LWIP_SO_LINGER option feature of LWIP #3702
-
- [libcpu] [arm] [cortex-m23] Change exception return call address #3701
-
- [libcpu/arm/*/cpuport.c]fixed __rt_ffs bug on account of armclang LTO #3700
-
- BSP: ls2k: initial clk driver #3695
-
- BSP/nuclei: Add more drivers support for gd32vf103_rvstar board #3694
-
- [BSP] [AT32] fixed scons — dist #3687
-
- Add raspi4 gpio interrupt #3692
-
- Fix ls2k #3693
-
- [BSP] [IMXRT]fixed scons — dist in IMXRT BSP #3680
-
- Update udpserver.c #3683
-
- Update udpclient.c #3682
-
- Update tcpserver.c #3684
-
- [SFUD] Update the flash chip information table. #3686
-
- [finsh]Fixed a bug may cause stackover flow #3679
-
- Improve the SPI framework and drive-related functions #3685
-
- [Sensor] Add Plantower sensor info #3678
-
- [tools] fixed python 2.x cmp #3677
-
- [lwip]Fixed a memset bug in ethernetif.c #3674
-
- [libcpu]Fixed the wrong notes in context_iar.S #3673
-
- Optimize project group sort by name #3670
-
- [bsp] [imxrt] fix the gpio drivers warning,’int_mode’ may be used unit #3663
-
- Fix pthreads #3662
-
- [bsp] [imxrt] fix docs and templates err #3660
-
- Adjust the interrupt priority configuration of some of the STM32 series BSP #3653
-
- [W25Q32BV]Support fast read QUAD_OUTPUT and QUAL_IO. #3644
-
- Fix raspi BSP #3650
-
- BSP: ls2k: initial gpio driver without irq support #3642
-
- Fix bugs for import error in stm32f103-hw100k-ibox iar project #3645
-
- [BSP]Add nrf5x SPI BSP #3624
-
- Fix three bugs about ethernet #3618
2. The Newly Added 8 Packages in June:
-
- ramdisk:A ramdisk block device based on RT-Thread device driver framework. It works as a block device that allows being format to most of the filesystems supported by RT-Thread.
-
- yd_crypto: Some encryption algorithms are organized into libraries to facilitate the application of low- and medium-end 32-bit microcontrollers and decryption.
-
- Add Lora-radio-driver package: support sx126x\sx127x、support Lora communication.
-
- Tencent IoT package update to v3.1.3.
-
- kawaii MQTT release v1.1.0.
-
- uMQTT:A lightweight, powerful, customizable, easy-to-use, and embeddable MQTT client for RT-Thread.
-
- To facilitate access to different operator networks using the BC28 NB-IoT module, the Band configuration items have been added.
-
- at_device adapts NB-IoT module N21、 LTE Cat-1module N58.
-
Thanks to majianjia、china-hai、Forest-Rain、yougaliu007、jiejietop、luhuadong、Shuobatian for contributing the software packages.
3. Development tools:
RT-Thread Studio:
RT-Thread Studio IDE V1.1.1 is released:
-
Add Engineering Chip Support Package switching function
-
Add Engineering RT-Thread version switching function
-
Add auto-build feature sits on startup debugging
-
Add Engineering Creation Default Settings is UTF8 Coding
-
Upgrade engineering chip switching function
-
Upgrade download and debug shortcuts
-
Upgrade new engineering wizard
-
Upgrade the prompt of new engineering creation failure
-
Upgrade the internal path of the debug configuration to save as a relative path
-
Upgrade SDK Manager offline resource pack import function
-
Solve the dragging shaking problem of tree-diagram configuration column width
-
Fix some packages addition failure issues
-
Resolve the SDK Manager installation status icon display exception
-
Free Download RT-Thread Studio.
RT-Thread Contact Info
Website: https://www.rt-thread.io
Github: https://github.com/RT-Thread
Twitter: https://twitter.com/rt_thread
Facebook: https://www.facebook.com/RT-Thread-IoT-OS-110395723808463/?modal=admin_todo_tour
Email: contact@rt-thread.org
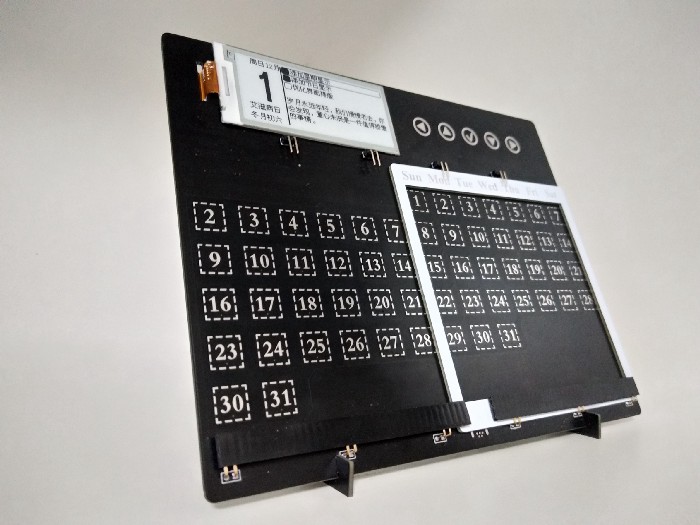
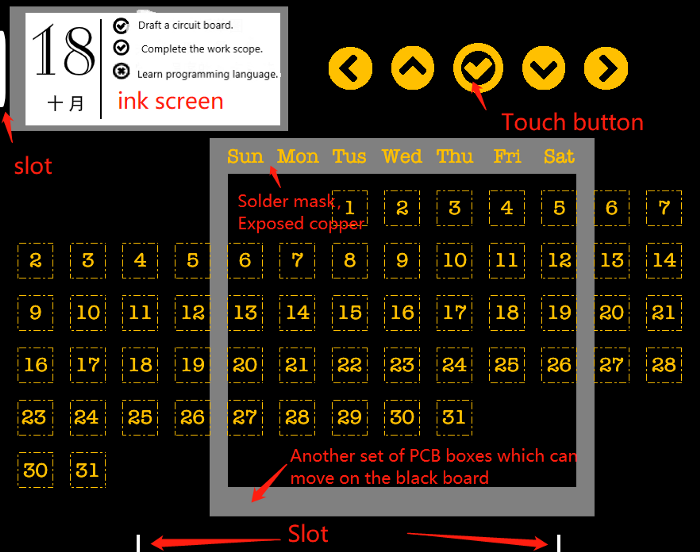
Overview
- Top left corner is an ink screen
- The top right corner has 5 touch buttons
- There are 57 dates in the middle, each with a touch button
- The grey box is another PCB board with an abbreviation of Monday to Sunday
- There are two empty slots below, and there are two slender PCBs that can be hooked up to form an angle so that the circuit board is stabilized on the desktop
- PCB uses a black-oil tin-spray process, no circuit would be shown on the front
- Chips and electronics are on the back
Ink Screen
Let’s see the information shown on the ink screen.
- The top left part is the date
- The top right part is the memo when tasks finished, you can make a mark
- The button part is the quotes randomly obtained from the web
Features
- Ink screen displays dates, weeks, festivals, and a few memos, each with a bar to mark the task completion status
- Press the top right “up” & “down” touch button can move to the corresponding to-do list section
- Click the confirm button, the task completion status that would be marked as complete, and double-click can mark as incomplete
- Press the top right “left” & “right” touch button, can view the memo of the previous day or the day after.
- Click the date under monthly calendar can see memos for different dates in the current month
- Internet access via WIFI
- The mobile phone or computer side can sync the relevant memos via the web page and can update and view the status at any time.
Architecture
The entire calendar project consists of three parts:
- Business process services
- Web client
- Device end
Since the business process services and the web client are about the server-side, so I won’t further go deep on this. This article will focus on the device end introduction.
Business Processing Services
The device transmits data through MQTT, enters into the business processing service, and processes and stores the corresponding data. This part uses Python and Mysql.
Main features:
- Monitoring and receiving MQTT messages
- Topic’s resolution and forwarding
- Data storage
Web Client
Flask is used in this project, Flask is a micro web framework written in Python. Users can add modified memos by logging to the web page.
The current version has the features of:
- User login via device number
- Switch different dates to view memos
- Add a memo
- Modify memo
- Delete memo
Device End
WIFI chip W600 is used in this project combined with RT-Thread IoT OS, RT-Thread is an open-source embedded real-time operating system that has a wide range of software packages, and its compilation environment is very similar to the compilation environment under Linux.
The hardware of the device is using a PCB as the main panel, the front only has an ink screen as a display, using a removable calendar box to divide the screen so that you can intuitively see the date of each month. The back of the PCB is welded with the relevant components and with a battery, it is separated from the wire, which makes the calendar like a real paper desktop calendar.
Hardware Specification
The GPIO available for the W600 chip has 17 pins and all being used in this project, as follows:
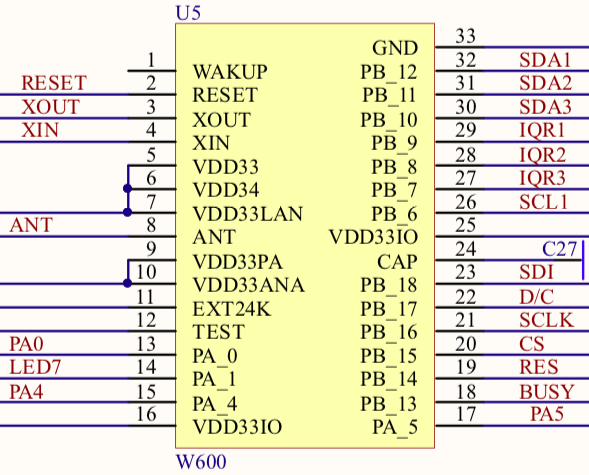
Architecture
This is the structure of my project folder, where the package section is slightly mentioned. I’ll share the used software packages in the next section.
desk_calendar/
├── Kconfig
├── README.md
├── SConscript
├── SConstruct
├── applications
│   ├── SConscript
│   ├── defines.h
│   ├── init.c
│   ├── keyboard.c
│   ├── logic.c
│   ├── main.c
│   ├── mqtt.c
│   ├── network.c
│   ├── qrcode_array.h
│   ├── screen.c
│   └── timer.c
├── makeimg.py
├── packages
│   ├── EasyFlash-v3.3.0
│   ├── SConscript
│   ├── airkissOpen-latest
│   ├── bs8116a-latest
│   │   ├── LICENSE
│   │   ├── README.md
│   │   ├── SConscript
│   │   ├── inc
│   │   ├── samples
│   │   └── src
│   ├── cJSON-v1.0.2
│   ├── fal-v0.3.0
│   ├── lunar_calendar-latest
│   │   ├── LICENSE
│   │   ├── README.md
│   │   ├── SConscript
│   │   ├── inc
│   │   ├── samples
│   │   └── src
│   ├── netutils-v1.1.0
│   ├── packages.dbsqlite
│   ├── pahomqtt-v1.1.0
│   ├── pkgs.json
│   ├── pkgs_error.json
│   └── u8g2-c-latest
├── ports
│   ├── SConscript
│   ├── easyflash
│   │   ├── SConscript
│   │   └── ef_fal_port.c
│   ├── fal
│   │   ├── SConscript
│   │   ├── fal_cfg.h
│   │   ├── fal_flash_port.c
│   │   └── fal_flash_sfud_port.c
│   └── wifi
│       ├── SConscript
│       ├── wifi_config.c
│       └── wifi_config.h
├── rtconfig.h
└── rtconfig.py
Logic Flowcharts
Software Package
There are a total of 9 packages have been used on this project, those packages were obtained from RT-Thread Github, it is open source and free of charge, check it out Here.
'EasyFlash-v3.3.0'
'airkissOpen-latest'
'bs8116a-e'
'cJSON-v1.0.2'
'fal-v0.3.0'
'lunar_calendar-'
'netutils-v1.1.0'
'pahomqt-v1.1.0'
'u8g2-c-latest'
Besides, I’ve also contributed a package, which is ‘bs8116a-last’:
‘bs8116a-last’ is an operating package for the Holtek touch chip.
Github Address
Thanks to RT-Thread Community Developer #illusionlee that has created this project. Find more information about this project on Github.
And for more information about RT-Thread, please visit www.rt-thread.io.
RT-Thread Contact Info
Website: https://www.rt-thread.io
Github: https://github.com/RT-Thread
Twitter: https://twitter.com/rt_thread
Facebook: https://www.facebook.com/RT-Thread-IoT-OS-110395723808463/?modal=admin_todo_tour
Email: contact@rt-thread.org
You’ll need to build a MicroPython firmware if you don’t have a development board officially supported by RT-Thread. RT-Thread provides the MicroPython software package, and the MicroPython package has been adapted to the RT-Thread driver framework when bound to the underlying hardware, so it’s easy to add MicroPython to a board that runs RT-Thread.
Note: RT-Thread MicroPython requires RT-Thread 3.0 and above.
Find the suitable BSP platform
RT-Thread MicroPython mini version occupies less than
ROM: 190KB
RAM: 20KB
As long as system resources meet the above requirements, many common development boards can run MicroPython, such as the boards supported by STM32 Series BSP.
Let’s take the MDK project on rt-thread\bsp\stm32\stm32f407-atk-explorer as an example of how to build MicroPython firmware on a BSP basis.
Obtain Micropython software package
Update the package list with the pkgs --upgrade command, then select the MicroPython package with the RT-Thread Env tool and finally pull the package locally using the pkgs --update command.
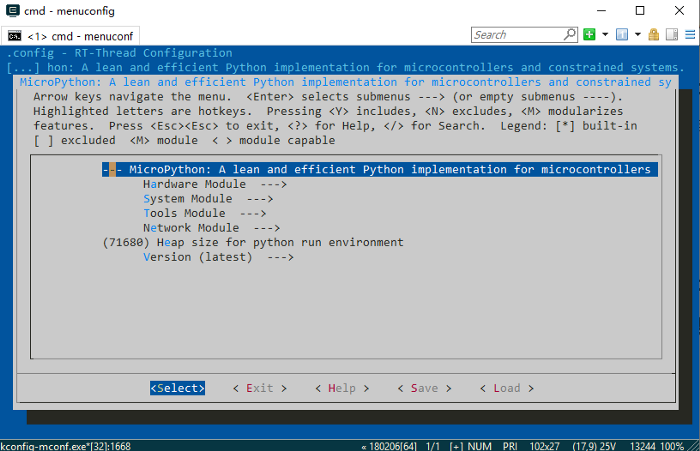
Increase the main thread stack
To subsequently enable the MicroPython runtime environment in the main thread, we need to increase the stack size of the main thread. We increase the stack size to 8k here.
Configure the size of the MicroPython run environment heap
Next, allocate memory to the MicroPython running environment based on the remaining memory, and the higher the number filled in here, the larger the amount of code you can run the Python program. However, if the value written here exceeds the actual allocatable memory, there may be an error caused by memory allocation. Therefore, before you configure this project, you need to have some understanding of the allocation of system RAM resources.
View the remaining memory of the system
Rebuild the project, compile and download, then view the memory usage via the free command in the msh command.

Configure the system
By checking the memory allocation in the last step, we get to know the system RAM resources. In this example, we allocate 20k memory for the MicroPython runtime environment. If you want to run more MicroPython code later, you can allocate more memories, as shown in the following illustration:
Mount the file system at the root of the system
Finally, make sure that the file system is mounted on the root directory (‘/’). With the file system, you can then use the MicroPython development environment to synchronize Python code files to the board to run.
1. Open MicroPython file-sync option.
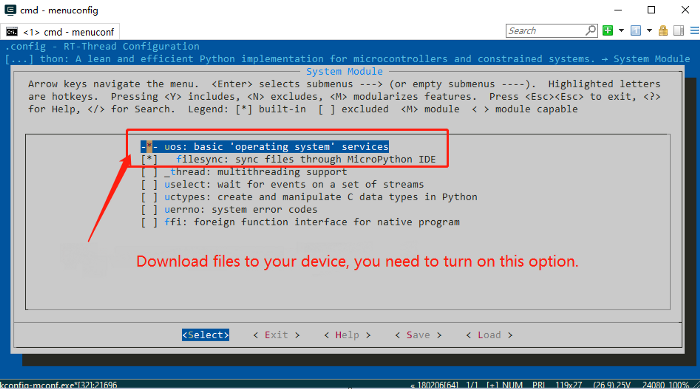
2. For the development board used in this example, the file system is stored on SPI Flash and the BSP support for the storage device is already done, you only need to enable the elm-fat file system, and configure the system as follows:

After the configuration is completed, remember to regenerate the project with the scons --target=mkd5 command so that the configuration takes effect in the project.
When you run MicroPython on your board, you are free to choose the storage media for the file system, but remember that the file system needs to be mounted to the root directory (‘/’) so that you can ensure that there are no errors in subsequent file transfers using MicroPython IDE.
MicroPythonStart MicroPython in the main thread
Start MicroPython in the main thread, the code modification is shown as follow:

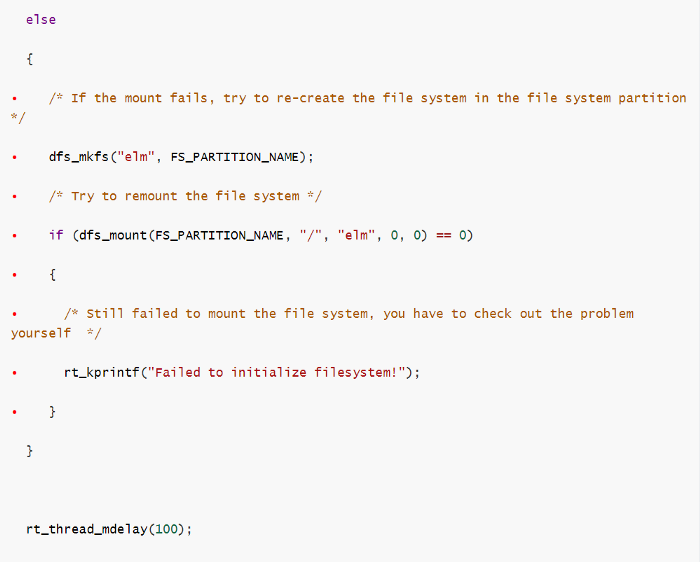
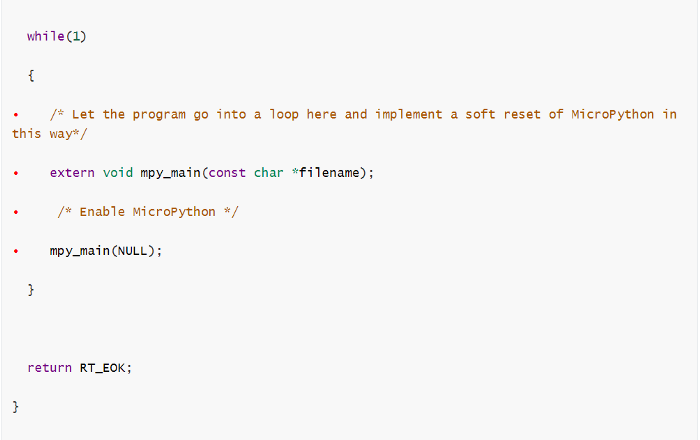
Recompile the project and download the program to the board, then MicroPython is run in the main thread, and the RT-Thread MicroPython IDE is available for application development. By connecting the development environment to the board, you can see MicroPython’s interactive environment REPL, as shown in the following image:
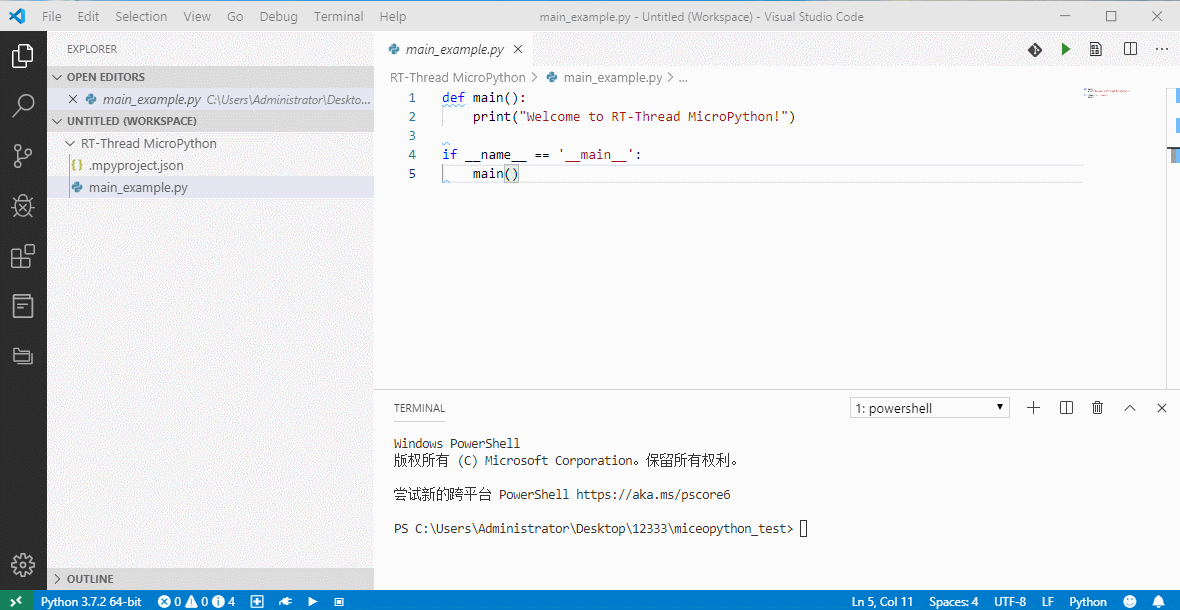
RT-Thread Contact Info:
Website: https://www.rt-thread.io
Github: https://github.com/RT-Thread
Twitter: https://twitter.com/rt_thread
Facebook: https://www.facebook.com/RT-Thread-IoT-OS-110395723808463
Youtube: https://www.youtube.com/channel/UCdDHtIfSYPq4002r27ffqPw
Introduction
MicroPython has been ported to RT-Thread opensource IoTOS and could be run on RT-Thread 3.0 or above. This package allows you to run Python on any embedded system carrying RT-Thread.
Catalog Structure
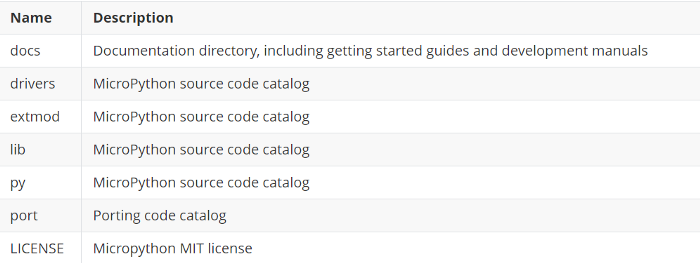
License
RT-Thread Micropython follows MIT License, find more details in LICENSE.
Dependence
RT-Thread 3.0+
Open RT-Thread MicroPython
First, select Micropython packages in RT-Thread package manager, as follows:
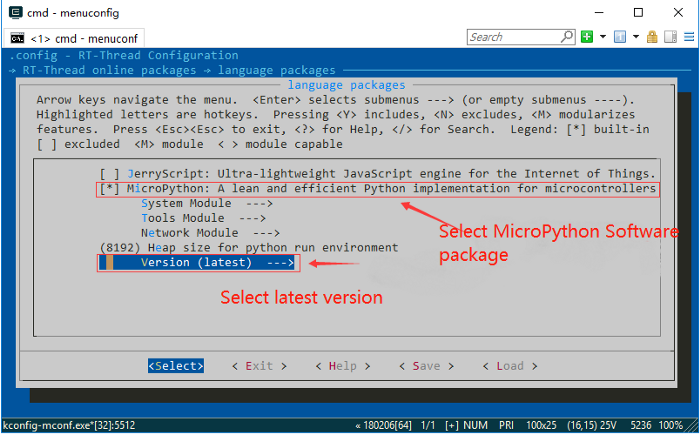
RT-Thread’s package manager will download the selected packages automatically. Also, you can explicitly order the package manager to download packages into the BSP directory by using the pkgs --update command.
Process
When MicroPython Package is selected, it is added to the bsp project for compilation when bsp compiles again.
MicroPython Firmware Development Guides please refer to Here.
For more information about RT-Thread Micropython, please refer to Here.
Using MicroPython IDE
The RT-Thread MicroPython IDE provides a powerful development environment, which is downloadable through the VScode App Store, as follows:

Add C extensions to MicroPython
To make it easier for users to add their own C functions to MicroPython, which could be invoked in Python scripts, a MicroPython C binding code-generator(https://summergift.top/RT-MicroPython-Generator/) is provided by RT-Thread. With this tool, the C function extensions can be implemented in just a few simple steps, and the following image shows the form of the automatically generated C code.
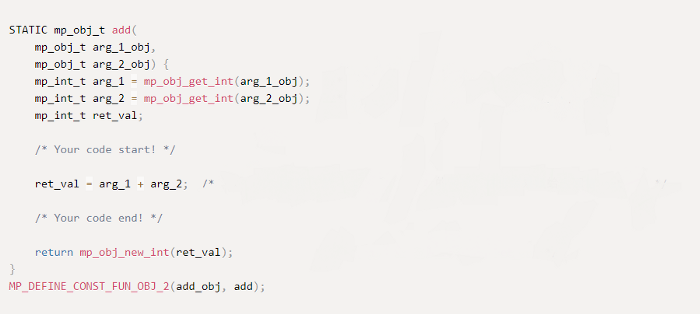
Note
- Only available on RT-Thread V3.0 and above.
- Select the latest version of Micropython in the menuconfig.
- Currently, the ffi component in System Module is only supported by the GCC toolchain and adding the relevant segment information into the link script is required.
RT-Thread Contact Info:
Website: https://www.rt-thread.io
Github: https://github.com/RT-Thread
Twitter: https://twitter.com/rt_thread
Facebook: https://www.facebook.com/RT-Thread-IoT-OS-110395723808463
Youtube: https://www.youtube.com/channel/UCdDHtIfSYPq4002r27ffqPw
1. Code Contribution in May:
The statistics are fetched from merged PR on the Github master code branch.
First of all, we want to acknowledge and thank the following community members for their contributions to RT-Thread in May. They are:
luhuadong、wosayttn、xckhmf、NU-LL、egbert-h、XYX12306 、Prry、whj4674672 、ousugo 、2000000 、wosayttn 、cliff-cmc、A-orz 、Sunwancn、ifreecoding 、DriftSnail、jch12138r and Artery Technology company.
Thanks to all contributors who have shared their time, energy, and talent to help RT-Thread. Thank you very much!
Code updating:
-
Set Systick interrupt priority to the lowest #3637
-
Add the prefix ‘static’ to avoid the name conflicts with user-defined functions #3634
-
[bsp/at32] 1.Add support for AT-START-F407 board, 2.Add eth and rtc driver
-
Support raspi4 all uart #3627
-
Add raspi4 32bit #3626
-
Add Studio IDE dist feature for stm32 BSP #3625
-
Add BSP for STM32F103RET6-OneNET-NBIoT Board. #3622
-
Add bsp/ls2k windows compilation instructions #3619
-
Fix the occasional error when setting up RTC #3617
-
[bsp/stm32/stm32h743-atk-apollo]support stm32h7 fal #3613
-
[AT] Adjust where the AT socket callback function #3612
-
[drivers][watchdog] Fix the written mistake in watchdog.c comments#3611
-
[BSP]Add stm32l433-st-nucleo BSP #3610
-
Fix eclipse.py version #3609
-
[Kernel] Fix the maxlen issue in rt_object_get_pointers #3608
-
Add SD Card driver for stm32h743-atk-apollo board #3605
-
[Kernel] Fix double release for thread #3604
-
[dlmodule] Fix crash when dlmodule exit #3603
-
Fix the error about the NSS type when initializing SPI devices #3602
-
Fix the incorrect function declarations and the lack of ‘break’ in switch-case #3601
-
Update changelog. #3594
-
[BSP] Fix 2bugs in drv_can.c #3593
-
[BSP] Fix stm32 f1 series rtc bug #3591
-
[update] Fix the pathname error in ubuntu #3589
-
Fixed typo: nead => need #3587
-
[BSP] 0ptimize dist handle for stm32l412-nucleo according to #3582 #3585
-
[BSP] 0ptimize bsp dist handle process #3582
-
Fix led0 → led1 #3580
-
[nrfx] Add the qspi_flash of nordic pdk #3579
-
[bsp/stm32/stm32h743-atk-apollo]Support stm32h7 uart dma #3576
-
Add vendor information(TI) of sensor #3575
-
Ename the Thread/Mutex/Semaphore.cpp to cxx_Thread/Mutex/Semaphore to avoid same name issue in C++ component #3572
-
Add bsp/stm32/stm32f413-st-nucleo #3570
-
mstorage.c: Fix the issue bug in_read_capacity() #3569
-
Support SPI/ADC/TIME on-chip peripheral driver #3568
-
[bsp\nrf5x]Support BSP UART0 #3566
-
Get stuck issue after open-close-open CAN device. #3565
-
[nrfx] Add the on-chip flash #3564
-
Add raspi mbox option #3562
-
Add stm32l412-st-nucleo BSP #3561
-
Fix c99/siginfo_t issue caused by gcc_version #3558
-
gizwits-gokitv21 support uart2 #3553
-
[stm32l475-atk-pandora] Modify the configuration of SPI3 to work at the “transmit only master” mode, to prevent the LCD pin being used as SPI3 MISO #3557
2. The Newly Added 6 Packages in May:
(RT-Thread has a total of 221 packages now)
-
- [vt100] Add the command ‘lsimg’, which decodes the JPEG format and display the image through the console #630
-
- [vt100] Add the function to display colorful pictures through MSH #628
-
- Add can_ymodem #627
-
- Add hc-sr04 driver package index #626
-
- Fix the multi_rtimer PKG_MULTI_RTIMER_PATH #624
-
- Fix syswatch, release version v1.0.0 #623
-
Thanks to qiyongzhong0、Forest-Rain 、alec-shan、redocCheng 、wuhanstudio for contributing the software packages.
3. Development tools:
-
RT-Thread Studio:
RT-Thread Studio IDE V1.1 is released with 7 New Features.
-
- The whole STM32 series are supported in the new version 1.1.
-
- Upgrade configuration features.
-
- Supports all chip manufacturers to add chips.
-
- Add a concise mode for the compiler output.
-
- MDK and IAR projects are available to be imported directly.
-
- Add a new DevStyle theme with a beautiful color scheme.
-
- Add the code analysis feature and offer the preference configuration to support analyzing code.
-
Check out more Here!
-
Free Download RT-Thread Studio.
RT-Thread Contact Info
Website: https://www.rt-thread.io
Github: https://github.com/RT-Thread
Twitter: https://twitter.com/rt_thread
Facebook: https://www.facebook.com/RT-Thread-IoT-OS-110395723808463/?modal=admin_todo_tour
Email: contact@rt-thread.org
1. Fail to receive phone verification number when sign-up?
Phone verification and Email verification is optional, but email verification is more recommended. Users failed to receive the phone verification number, please try with email verification.
2. How to add files to the project?
There are various ways to add a file or a set of files to the project, like:
- Copy the file and paste it at the RT-Thread Studio IDE.
- Copy the directory and paste it at the RT-Thread Studio IDE, add all the files in the directory at a time.
- Right-click and select the New wizard, create a new directory, a C file or a header.
If it is declared that some headers are missing, please add their directories into the search paths in the configuration of the project.
3. How to show the line numbers of source code?
Right-click on the left bar of the source edit window, select
Show Line Numbers as below:
4. Find the entry to import project?
Right-click at the Project Explorer window, open the Import
wizard and select the RT-Thread Studio Projects into Workspace item, as
shown below:
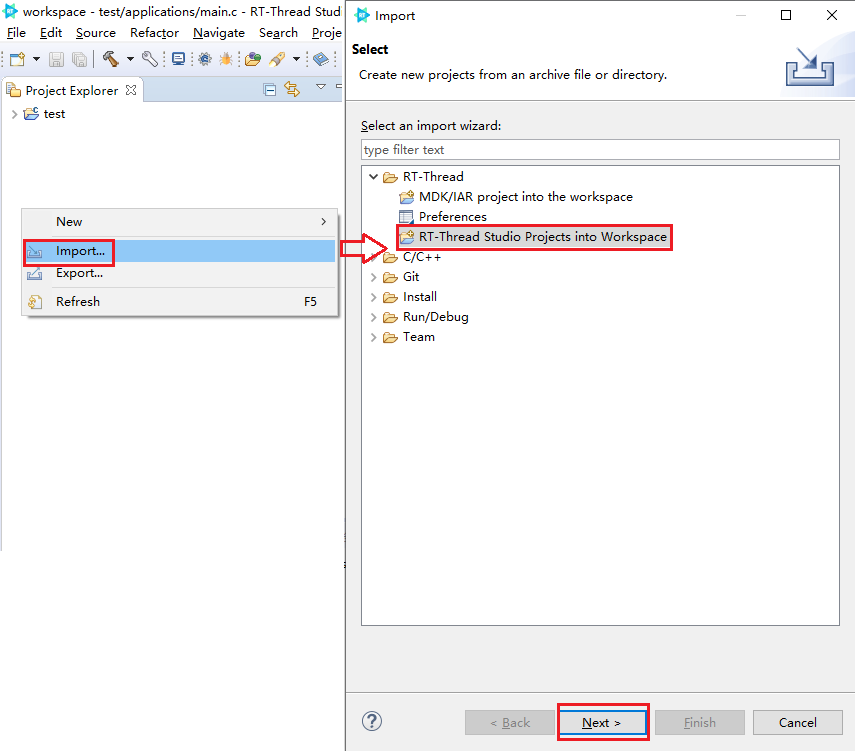
Click Next, then the Browse ... button in the
Import Projects window, the import wizard lists all the projects in the
specified path. Select the one to import and click the Finish button, the
selected project is imported, illustrated as below:
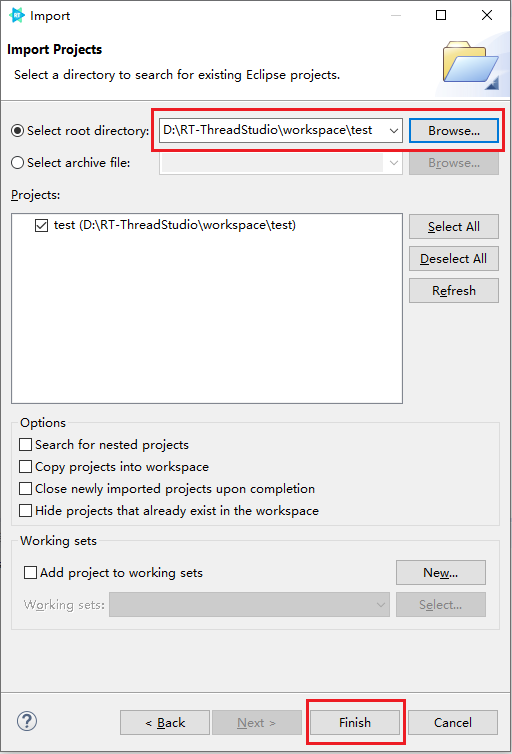
5. How to generate the HEX file?
Right-click on the left bar of the source edit window, select
Show Line Numbers as below:
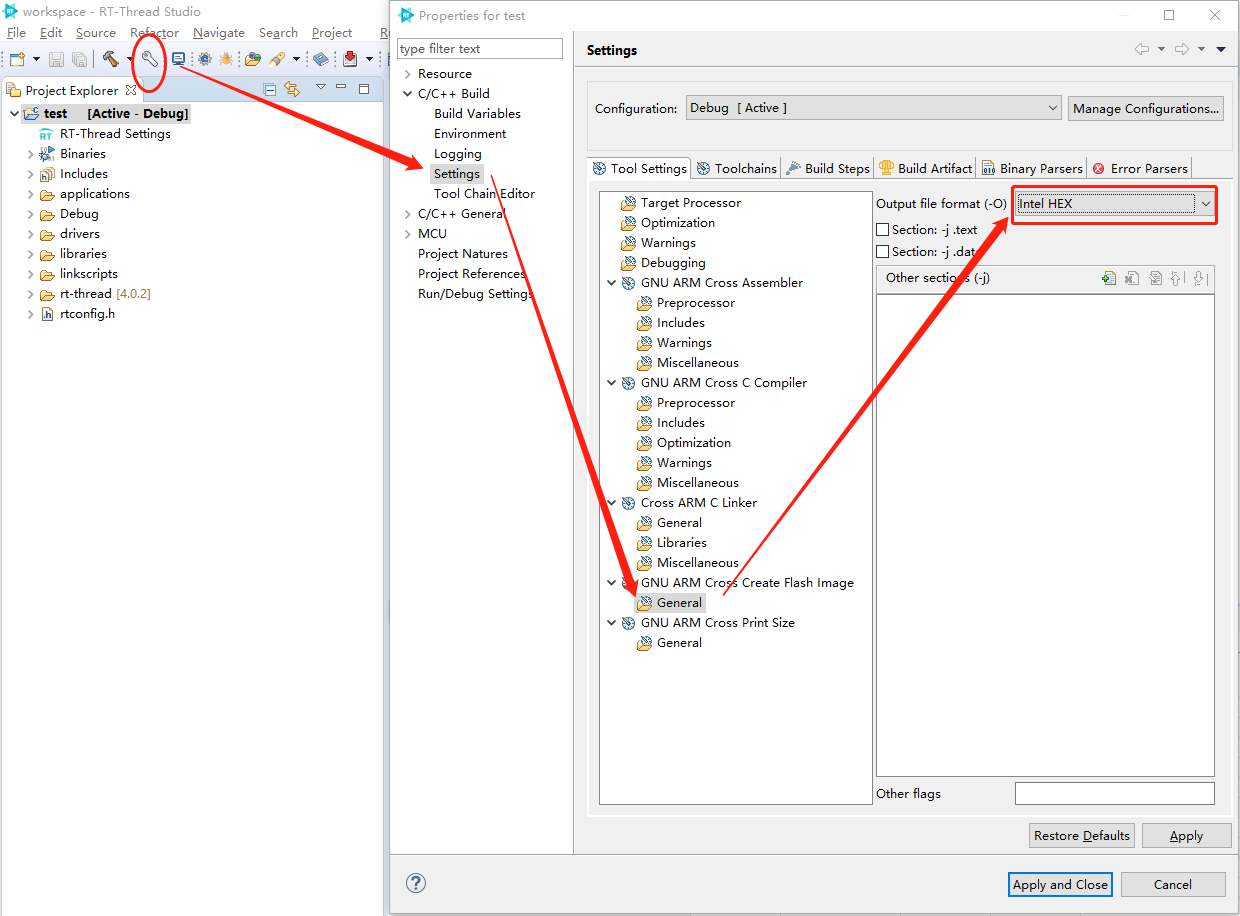
If both BIN and HEX files are needed, add the command to generate the HEX file to
Post-build steps->Command, illustrated as below:
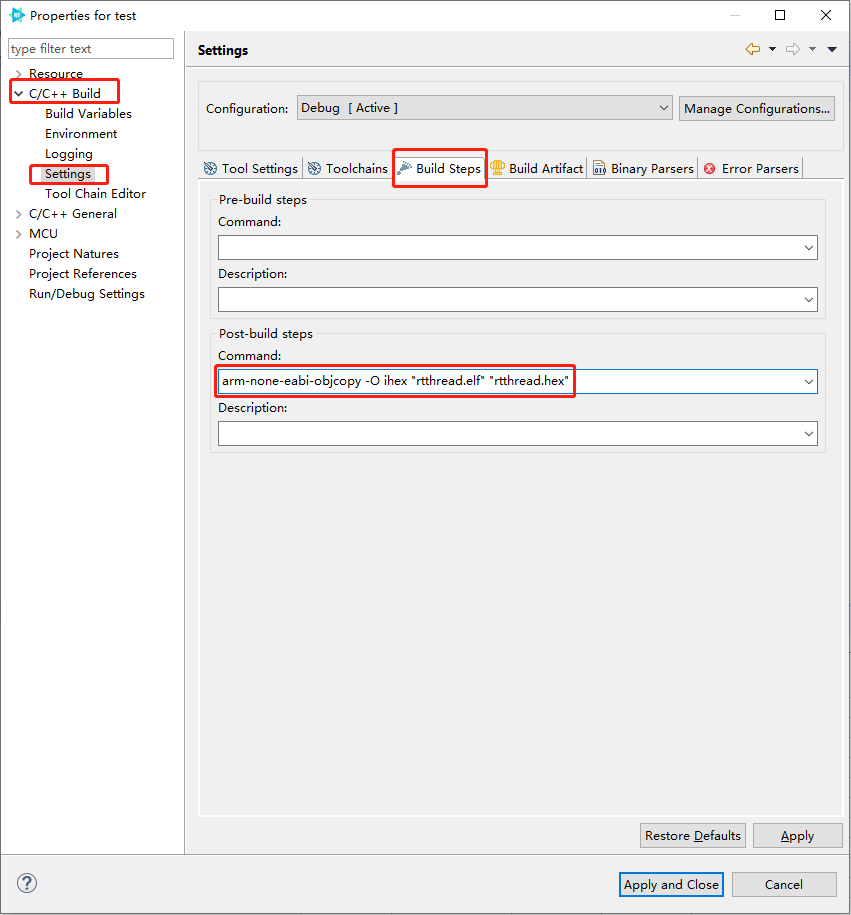
The generated HEX file is located in the Debug directory, shown as below:
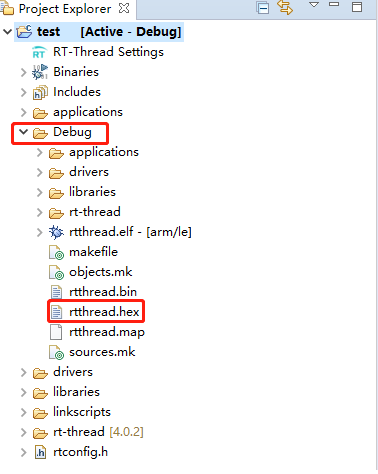
6. Characters are lost via the serial port?
First, make sure it’s not a program bug. It’s usually caused by broken wires or the baud-rate is set too high. Use another set of wires or lower the baud-rate.
7. Not able to remove a project?
Some files might be accessed by git when the user tries to remove a project, which
causes a failure and RT-Thread Studio prompts that the file is used by other programs.
Close the project or restart the IDE before remove it. The Restart and the
Close Project options are located in the File menu and the
right-click menu on the project item in the Project Explorer window.

8. Can users modify the files or configurations in the rt-thread and packages directories?
It’s not permitted. Files in the rt-thread and packages directories are managed and
configured under RT-Thread Settings. When needed in the compilation, they
should be turned on in RT-Thread Settings.
For instance, if users want the rt-thread/components/dfs to be compiled, as
below:
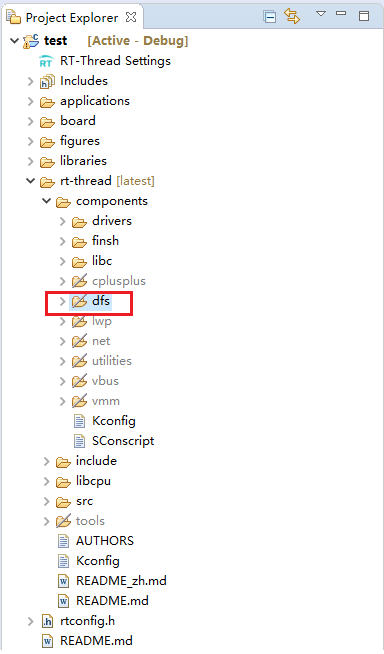
Users should not modify the properties of the dfs directory. Instead, they
should turn on the DFS in RT-Thread Settings and save the configuration,
which causes the dfs directory to
be added to the compilation process, illustrated as below:
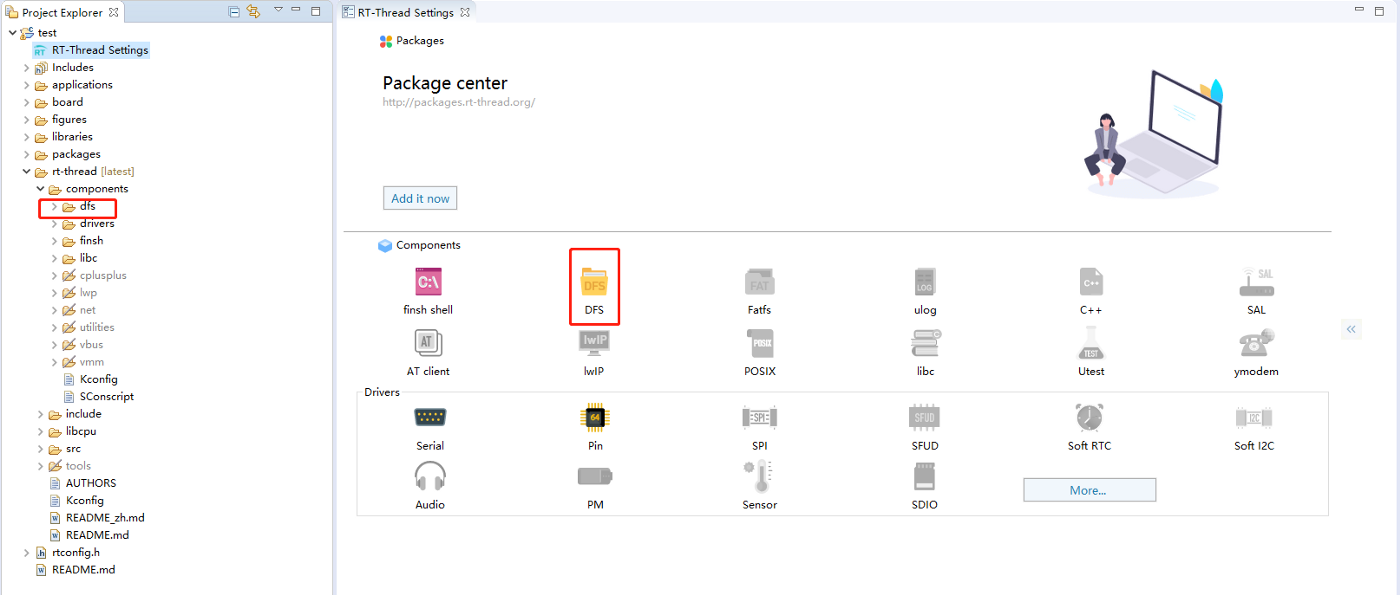
9. What is the meaning of text, data, bss, dec and hex in the outputs of compilation?
The compilation outputs in Studio are shown below:
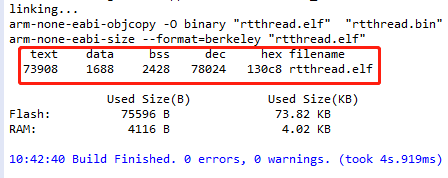
- text: code segment, used to store code and read-only constants.
- data: data segment, used to store initialized global variables and static variables.
- bss: bss segment, used to store uninitialized global variables, set to 0 when programs startup.
- dec: the abbreviation for decimal, which is the total size of text, data and bss. In our example, the sum of 51344, 372 and 2808 is 54524.
- hex: the abbreviation for hexadecimal. in our example, the number 54524 in decimal equals d4fc in hexadecimal.
-
filename: the name of the target file, which is
rtthread.elf.
About how to calculate the memory usage of the target file:
the used flash size = the size of text
the used RAM size = the size of data + the size of bss
10. The ST-LINK port is already used?
When the error dialog “TCP Port 61234 not available” pops up, modify the
GDBServer Port Number of ST-LINK in
The configuration of Project, as below:
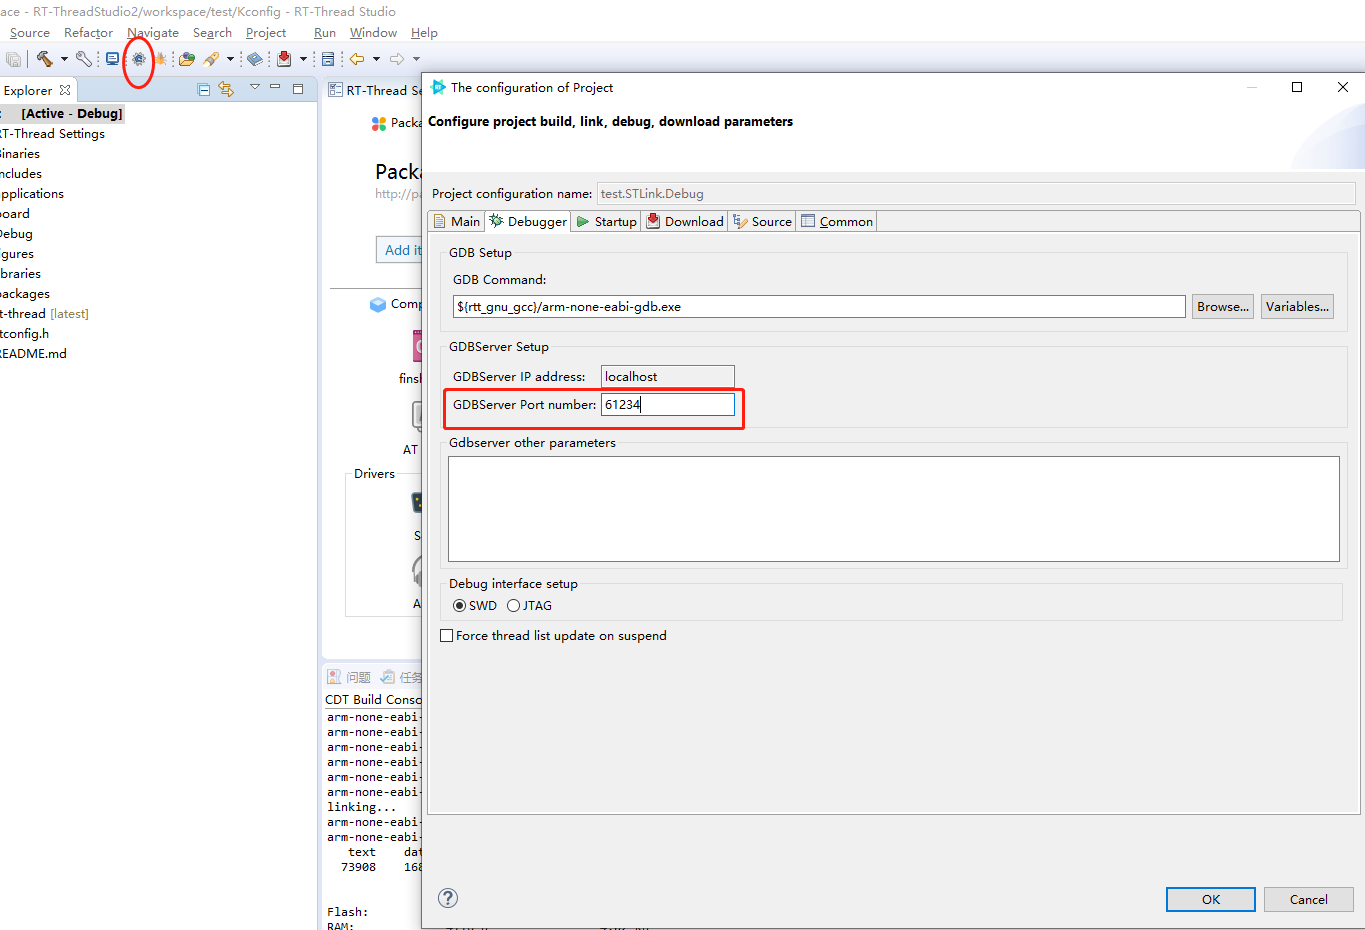
11. Could not see the icons of components in RT-Thread settings?
There are no components in RT-Thread Nano, which is a lite version. Choose the standard version of RT-Thread when creating a new project.
12. Fail to update RT-Thread Studio?
If the statement “No Repository found” or the error in the picture below appears, probe the updates manually. Cancel the selection “Group items by category” and “Contact all update sites during install to find required software” in the update window, select “Eclipse Platform Launcher Executables” and then install the Studio updates. If it fails, close the window and try again.
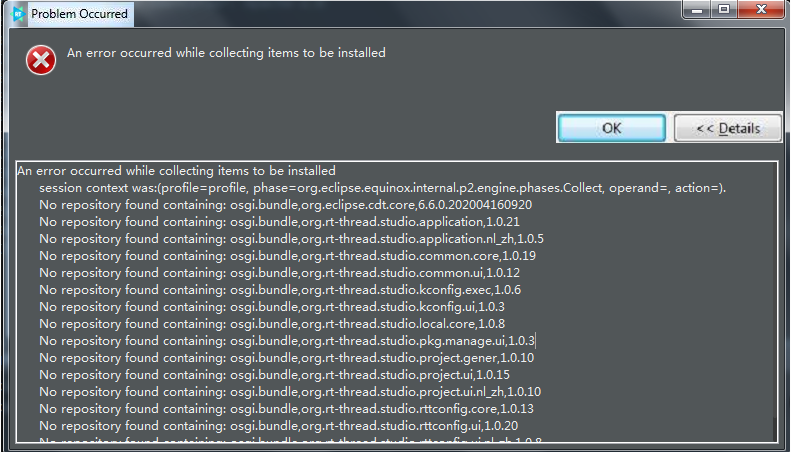
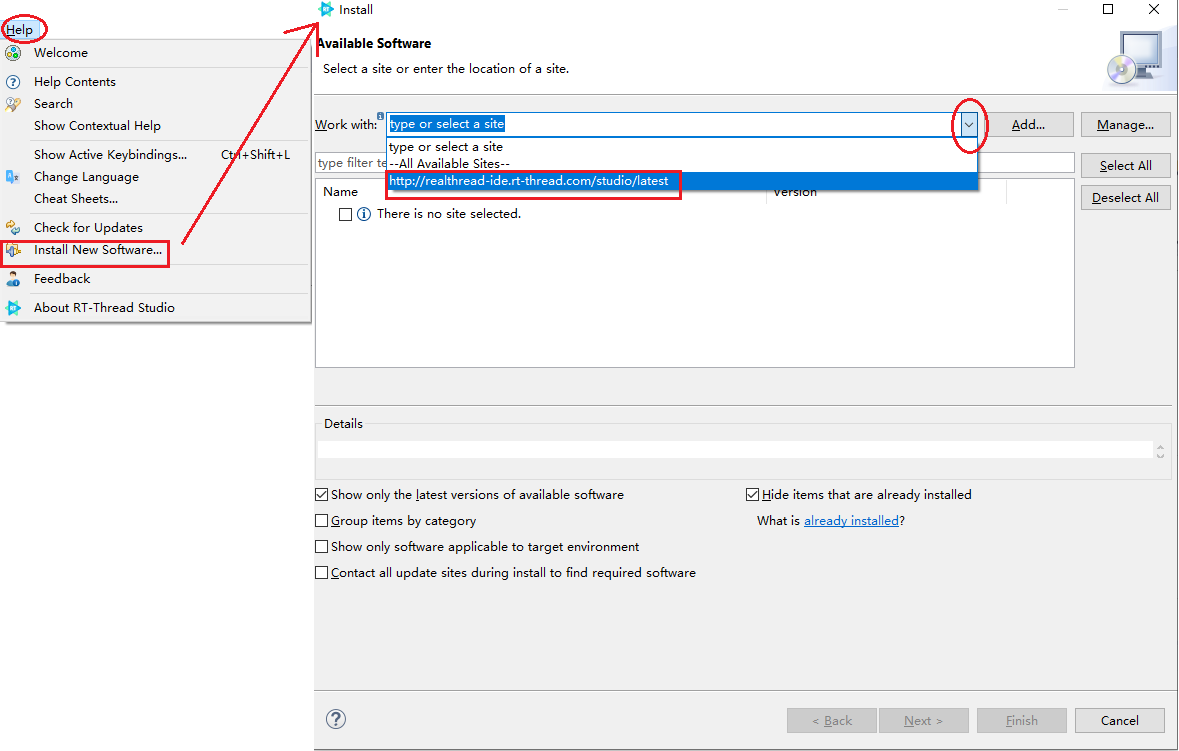
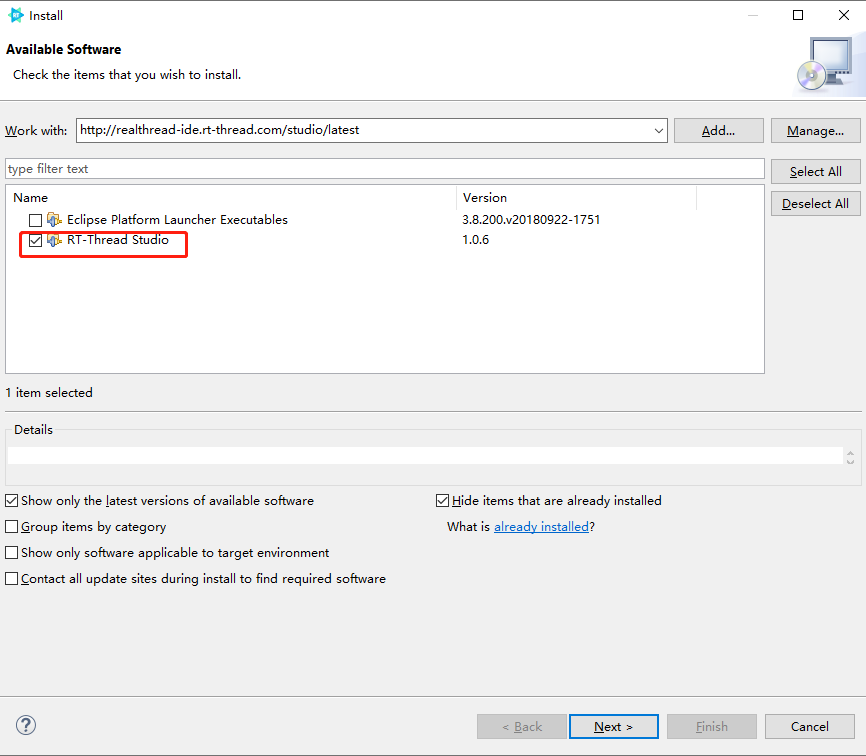
13. How to enable the dark theme and set up the colors used by the editor?
In “DevStyle Theme” in Preference->DevStyle, select
Use enhanced DevStyle Themes. To make the selected theme take effect,
restart the IDE.
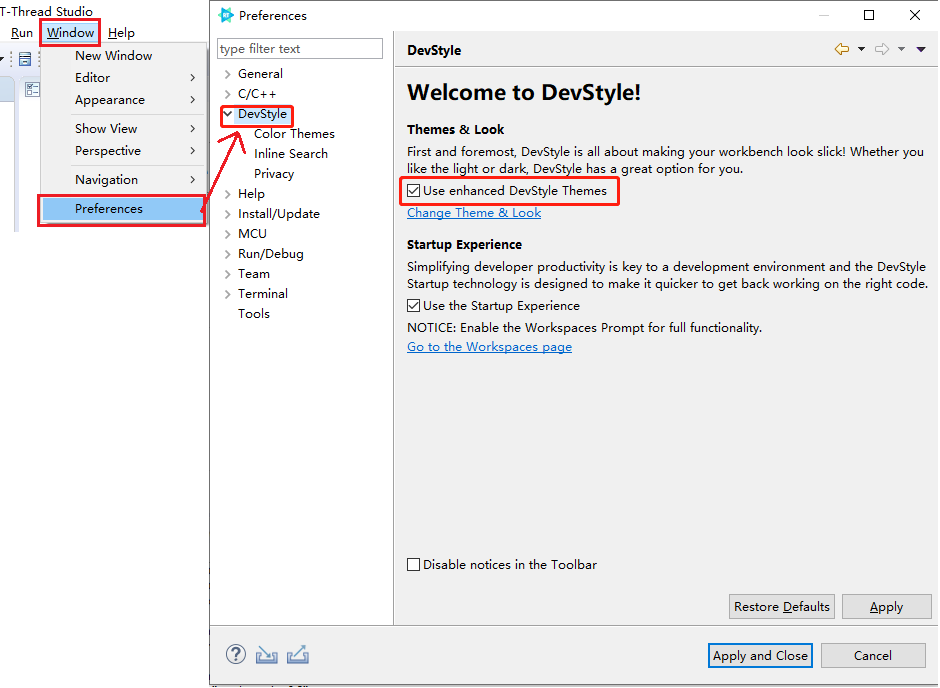
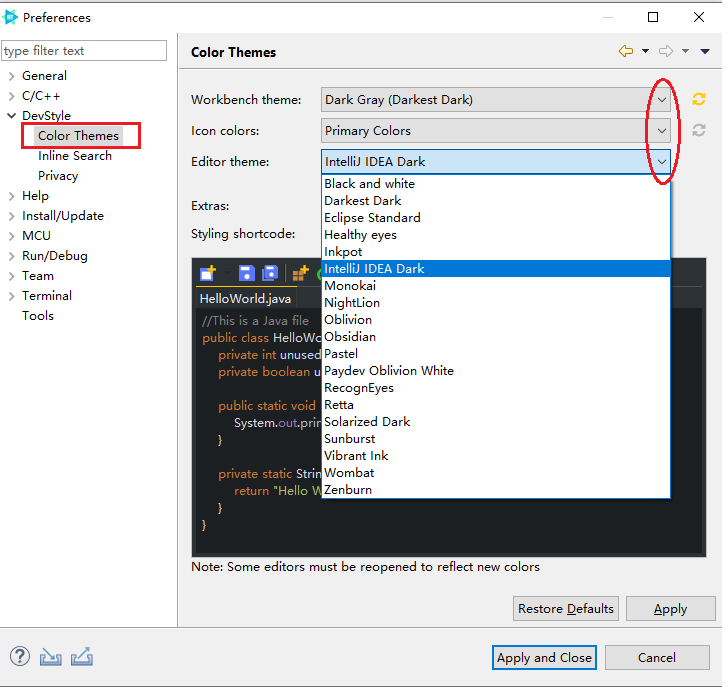
14. How to view and change the key bindings?
Click Show Active Keybindings ... in the Help menu, where
users could view and change the key bindings.
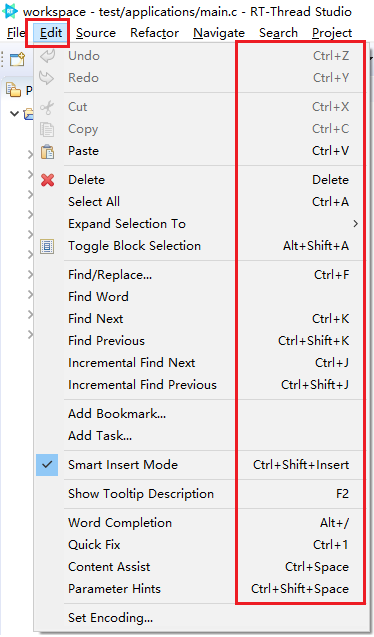
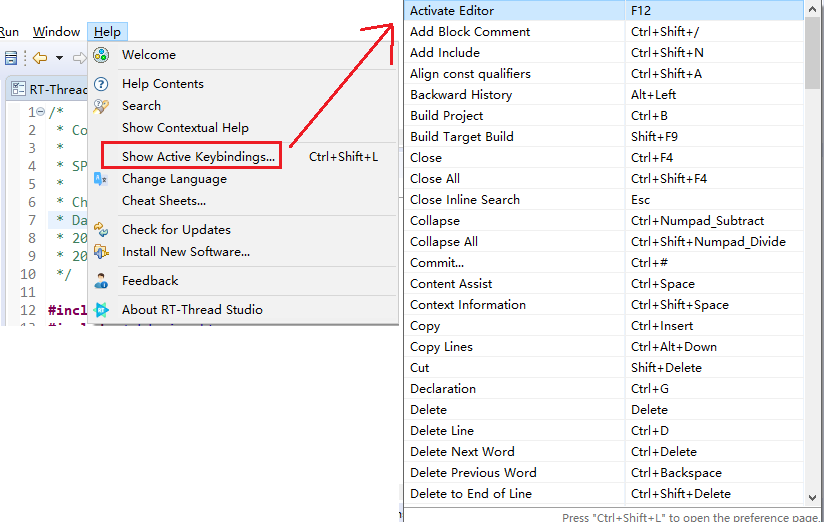
15. How to restore the perspectives?
Click the item
Window->Perspectives->Reset Perspectives ...
to restore the perspectives to the default settings.
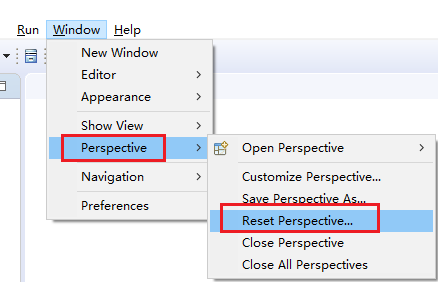
16. How to open the closed projects?
Right-click on the project item in Project Explorer, select
Open Project on the menu.
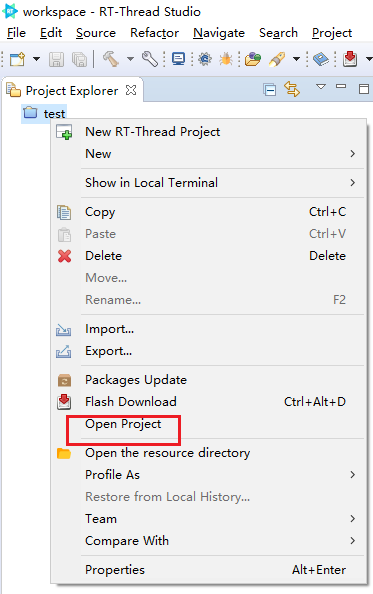
17. Error on loading Python DLL when creating a project?
When creating a project, an error window pops up and the message “Error loading Python DLL xxx/xxxx/python36.dll” shows up in the console window.
Please re-install the Visual C++ Redistributable.
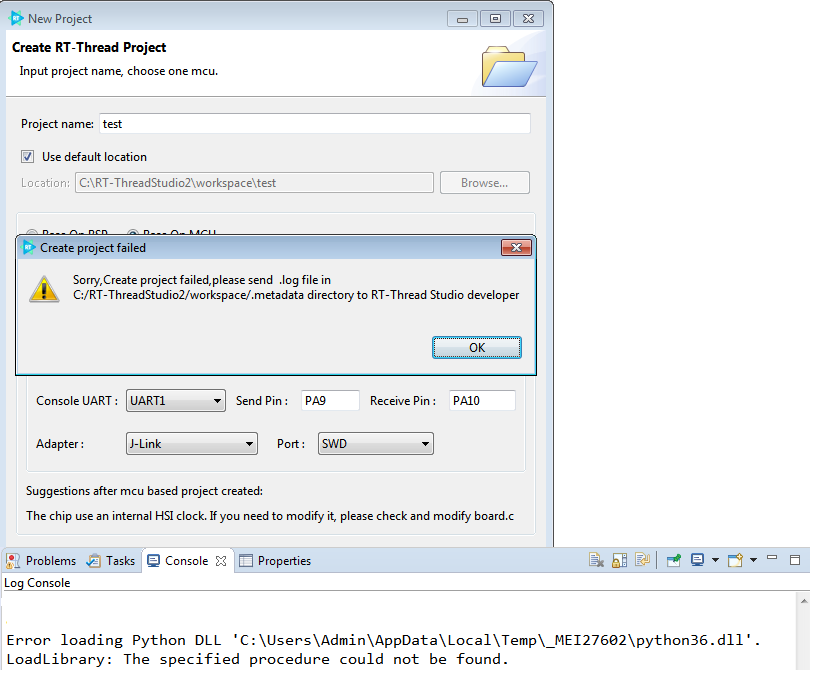
RT-Thread Contact Info
Website: https://www.rt-thread.io
Github: https://github.com/RT-Thread
Twitter: https://twitter.com/rt_thread
Facebook: https://www.facebook.com/RT-Thread-IoT-OS-110395723808463/?modal=admin_todo_tour
Email: contact@rt-thread.org
1. Introduction
The AT device package is the RT-Thread AT component with the porting files and sample codes for different AT devices, it supports ESP8266, ESP32, M26, MC20, RW007, MW31, SIM800C, W60X, SIM76XX, A9/A9G, BC26, AIR720, ME3616, M 6315, BC28, EC200X series of devices, and more. This package implements the AT socket on all the devices above, which allows communications through the standard socket interfaces in AT commands. Refer to the “RT-thread programming guide “ for the descriptions of specific functions.
RT-Thread is an open-source embedded real-time operating system (RTOS) born in 2006 that provides developers with a wide range of components and 200+ software packages.
1.1. Catalog
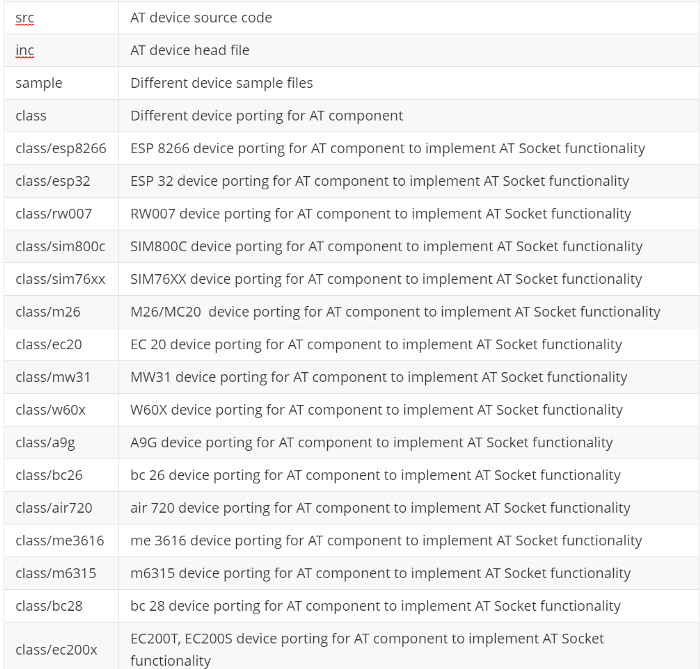
1.2 License
at_device package follows the LGPLv2.1 license, check out LICENSE file for more information.
1.3 Dependence
- RT_Thread 4.0.2+
- RT_Thread AT component 1.3.0+
- RT_Thread SAL component
- RT-Thread netdev component
2. Fetching
The AT device software package is porting for AT components and AT socket functionality, you need to enable the AT component library and AT socket functionality to get the AT device package.
Version Description
The AT device package has been updated with multiple versions, different versions require different configuration option and need to be fit into the corresponding system version. The following mainly listing the currently available AT device package version information:
- V1.2.0: For RT-Thread versions less than V3.1.3, AT component version equals V1.0.0;
- V1.3.0: For RT-Thread versions less than V3.1.3, AT component version equals V1.1.0;
- V1.4.0: For RT-Thread versions less than V3.1.3 or equal to V4.0.0, AT component version equals V1.2.0;
- V1.5.0: For RT-Thread versions less than V3.1.3 or equal to V4.0.0, AT component version equals V1.2.0;
- V1.6.0: For RT-Thread versions equal to V3.1.3 or V4.0.1, AT component version equals V1.2.0;
- V2.0.0/V2.0.1: For RT-Thread versions higher than V4.0.1 or higher than 3.1.3, AT component version equals V1.3.0;
- Latest version: For RT-Thread versions higher than V4.0.1 or higher than 3.1.3, AT component version equals V1.3.0;
Version judgment will be done automatically in menuconfig, at_device package selection will give the best version support based on the current system environment, the above version description is used as a reference for the running environment.
Different versions require different configuration option, which is introduced as follows:
V1.X.X Configuration Option Introduction
Enable AT device software package. This version only supports to enable one AT device at the same time, the configuration option as follows:
RT-Thread online packages  --->
     IoT - internet of things  --->
        -*- AT DEVICE: RT-Thread AT component porting or samples for different device
        [ ]   Enable at device init by thread
              AT socket device modules (Not selected, please select)  --->
              Version (V1.6.0)  --->
- Enable at device init by thread: Whether configuration creates a separate thread to initialize the device network;
- AT socket device modules: AT device selection, currently supported RW007, ESP8266, M26/MC20, EC20, SIM800C, SIM76XX, A9/A9G, BC26, air720, ME3616, M6315, BC28, EC200X and more;
- Version: Download the package version.
V2.X.X (laster) Configuration Option Introduction
Enable AT device software package. This version supports to enable multiple AT device at the same time, the configuration option as follows:
RT-Thread online packages  --->
     IoT - internet of things  --->
        -*- AT DEVICE: RT-Thread AT component porting or samples for different device
        [*]   Quectel M26/MC20  --->
          [*]   Enable initialize by thread
          [*]   Enable sample
          (-1)    Power pin
          (-1)    Power status pin
          (uart3) AT client device name
          (512)   The maximum length of receive line buffer
        [ ]   Quectel EC20  --->
        [ ]   Espressif ESP32  --->
        [*]   Espressif ESP8266  --->
          [*]   Enable initialize by thread
          [*]   Enable sample
          (realthread) WIFI ssid
          (12345678) WIFI password
          (uart2) AT client device name
          (512)   The maximum length of receive line buffer
        [ ]   Realthread RW007  --->
        [ ]   SIMCom SIM800C  --->
        [ ]   SIMCom SIM76XX  --->
        [ ]   Notion MW31  --->
        [ ]   WinnerMicro W60X  --->
        [ ]   AiThink A9/A9G  --->
        [ ]   Quectel BC26  --->
        [ ]   Luat air720  --->
        [ ]   GOSUNCN ME3616  --->
        [ ]   ChinaMobile M6315  --->
        [ ]   Quectel BC28  --->
        [ ]   Quectel ec200x  --->
        Version (latest)  --->
Quectel M26/MC20: Enable M20/MC20( 2G module) device supporting;
- Enable initialize by thread:Enable the functionality of using thread to initialize the device().
- Enable sample:Enable sample code. There is a registration for the sample device in the sample code
- Power pin:Choose the pin to supply power.
- Power status pin:Choose the pin to indicate the power state.
- AT client device name:Configure the name of the serial device used by the sample device;
- The maximum length of receive line buffer:Configure the maximum length of the sample device data receiving.
Quectel EC20:Enable EC20(4G module) device supporting;
Espressif ESP8266: Enable ESP8266 (WIFI Module) device supporting;
- Enable initialize by thread:Enable the functionality of using thread to initialize the device(Non-blocking mode initialization);
- Enable sample:Enable sample code. There is a registration for the sample device in the sample code;
- WIFI ssid:Configure the WIFI user name which connects the sample device;
- WIFI password:Configure the WIFI password which connects the sample device;
- AT client device name:Configure the name of the serial device used by the sample device;
- The maximum length of receive line buffer:Configure the maximum length of the sample device data receiving.
Espressif ESP32:Enable ESP32 (WIFI Module)device supporting;
Realthread RW007:Enable RW007 (WIFI Module)device supporting;
SIMCom SIM800C:Enable SIM800C (2G Module)device supporting;
SIMCom SIM76XX:Enable SIM76XX (4G Module)device supporting;
Notion MW31:Enable MW31 (WIFI Module)device supporting;
WinnerMicro W60X:Enable W60X (WIFI Module)device supporting;
AiThink A9/A9G:Enable A9/A9G (2G Module)device supporting;
Quectel BC26:Enable BC26(NB-IOT Module)device supporting;
Luat Air720:Enable air720(4g Module)device supporting;
GOSUNCN ME3616:Enable ME3616(NB-IOT Module)device supporting;
ChinaMobile M6315:Enable M6315 (2G Module)device supporting;
Quectel BC28:Enable BC28(NB-IoT Module)device supporting;
Quectel EC200X:Enable EC200T、EC200S(4G Module)device supporting;
Version: Download the package version.
The configuration options mentioned above are using the 2G module and WIFI module options as examples, introduced the AT device package configuration option of the V2.X.X version, here are a few things to note:
- V2.X.X version supports to enable multiple AT devices at the same time, the enabled device information can be viewed via ifocnfig command in FinSH;
- V2.X.X version requires the device to register before using, the registration can be done in the samples directory file or customized in the application layer;
- Pin options such as Power pin and Power status pinare configured according to the device's hardware connection and can be configured as '-1' if the hardware power-on function is not used;
- One AT device should correspond to one serial name, and the AT client device name for each device should be different.
AT components configuration options introduction
When the AT device package is selected and the device supporting is enabled, client functionality for the AT component will be selected by default, and here are the AT component configuration options.
RT-Thread Components  --->
    Network  --->
        AT commands  --->
    [ ]   Enable debug log output
    [ ]   Enable AT commands server
    -*-   Enable AT commands client
    (1)     The maximum number of supported clients
    -*-     Enable BSD Socket API support by AT commnads
    [*]     Enable CLI(Command-Line Interface) for AT commands
    [ ]     Enable print RAW format AT command communication data
    (128)   The maximum lenght of AT Commonds buffe
The configuration options related to the AT device package:
- The maximum number of supported clients: Selecting multiple devices in the AT device package requires this option to be configured as the corresponding value;
- Enable BSD Socket API support by AT commands: This option will be selected by default when selecting the AT device package;
- The maximum length of AT Commands buffe:The maximum length of AT commands data sending.
3. Notes
- Modules that are adapted to the AT device package are not supported as TCP Server to complete the server-related operations (e.g. accept, etc.);
- The default device type of the AT device package is unselected and needs to be specified for use;
- The latest version supports multiple selected in multiple AT devices to implement AT Socket functionality, the V1.X.X version only supports access to a single AT device;
- Multiple versions of the AT device package that currently used are primarily for the adaptation of AT components and system changes, the latest version of the RT-Thread system is recommended and thelatest version can be selected in the menuconfig option.
RT-Thread Contact Info:
Website: https://www.rt-thread.io
Github: https://github.com/RT-Thread
Twitter: https://twitter.com/rt_thread
Facebook: https://www.facebook.com/RT-Thread-IoT-OS-110395723808463
Youtube: https://www.youtube.com/channel/UCdDHtIfSYPq4002r27ffqPw
Introduction
RT-Thread open-source Internet of Things operating system provides MicroPython Developers with an excellent development environment that helps them to get started IoT OS quickly.
RT-Thread MicroPython is plug-in in VScode, which provides a powerful development environment for MicroPython development. The main features are as follows:
-
The convenient connection mode of development board (serial port, network, USB)
-
Support MicroPython-based code intelligent completion and syntax check
-
Support MicroPython REPL interactive environment
-
Provides many code samples and demo program
-
Support full project synchronization function
-
Support to download files or folders to the development board
-
Supports fast running code files in memory
-
Supports code snippets to run functions
-
Supports several major MicroPython development boards
-
Support Windows and Ubuntu operating systems
-
Development board support list
Preparation
1- Using plug-in under the Windows operating system requires changing the default terminal of VScode to Powershell, as shown below:
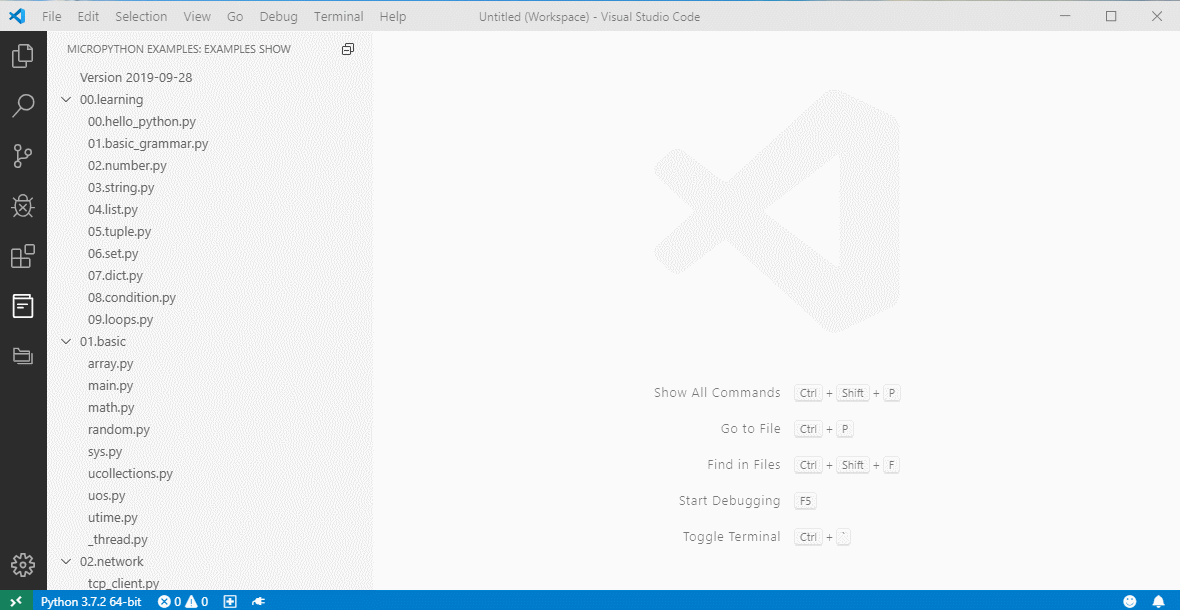
If you want to use the MicroPython autocompletion feature (you can skip the next step if you don't need autocompletion for now), you need to do the following:
2- Install the Python plug-in
3- Install Python3 on your PC and add it to the system environment variables as instructed by the Python plug-in
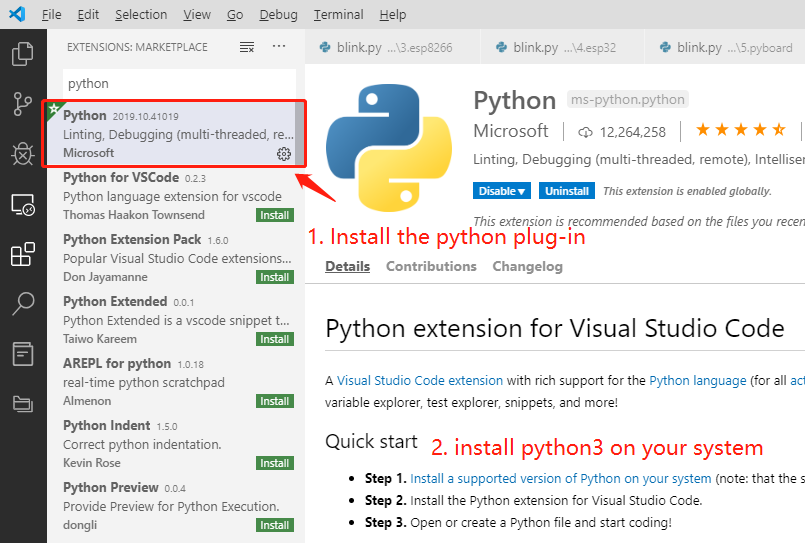
If you already have the above plug-ins and programs installed on your PC, you can skip this preparation step.
Ubuntu support
This plug-in supports running under ubuntu 18.04. In order to avoid frequent
access to serial port permissions under the ubuntu system, the current user needs to be
added to the user group dialout. Manually enter
the following command ($USERNAME is the current USERNAME of the system ) :
sudo usermod -ag dialout $USERNAME
Note: the configuration change requires to restart the operating system for the configuration to take effect.
Mac support
RT-Thread MicroPython plug-in supports Mac 10.15 Catalina OS.
Quick Start
Create a MicroPython project
The first step in MicroPython development is to create a MicroPython project within which all subsequent operations must run. There are two ways to create a new MicroPython project, a blank project and a demo-based project, which are shown below.
![]()
Connecting development board
You can connect to the MicroPython development board by clicking the connection button in the lower-left corner and then selecting the device you want to connect to in the pop-up list of devices.

View the sample code file
The MicroPython plug-in provides a wealth of sample code and library files to view in the left active bar. Right-click on the sample file to add the sample file to the project from the drop-down menu.
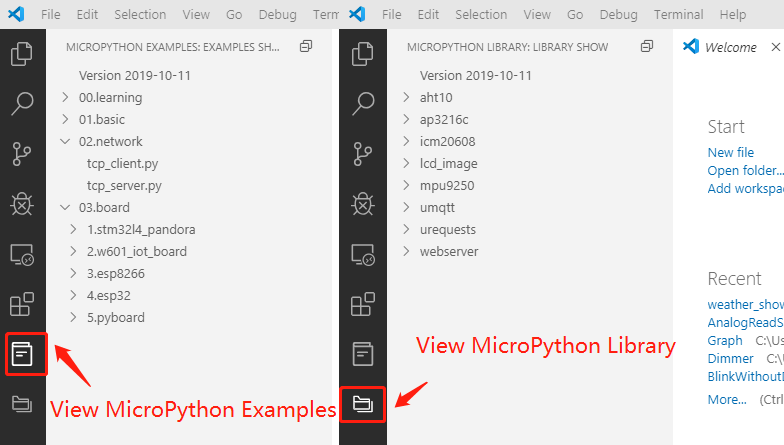
Run MicroPython files directly on the development board (kind for debug)
This feature is used to quickly debug a single file and is frequently used in
debugging code. When we write the test program in a separate file, we can use this
function to download the current python file to the
memory of the development board to run, achieving the effect of rapid debugging. We can
also use the shortcut key Alt + q to trigger this function.
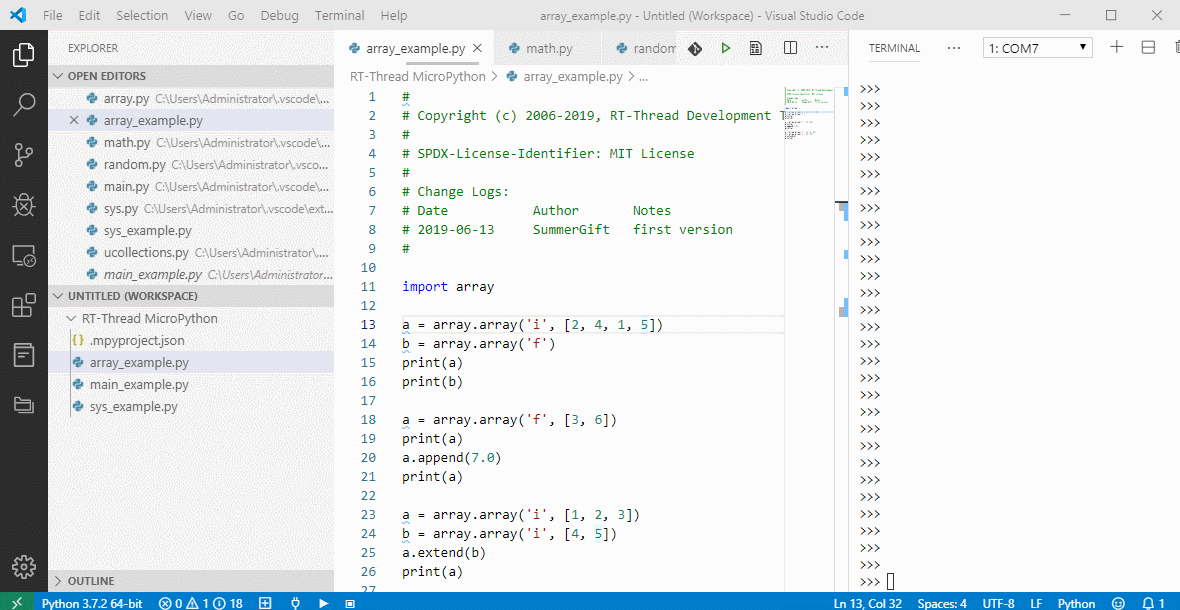
Run MicroPython code snippets on the development board
If you just want to debug a small amount of code without downloading files to the development board, you can use the code snippet function. You can run the selected code in the REPL environment by selecting the snippet you want to run in the editor, and then selecting the execute the selected MicroPython code option on the device from the right-click menu.
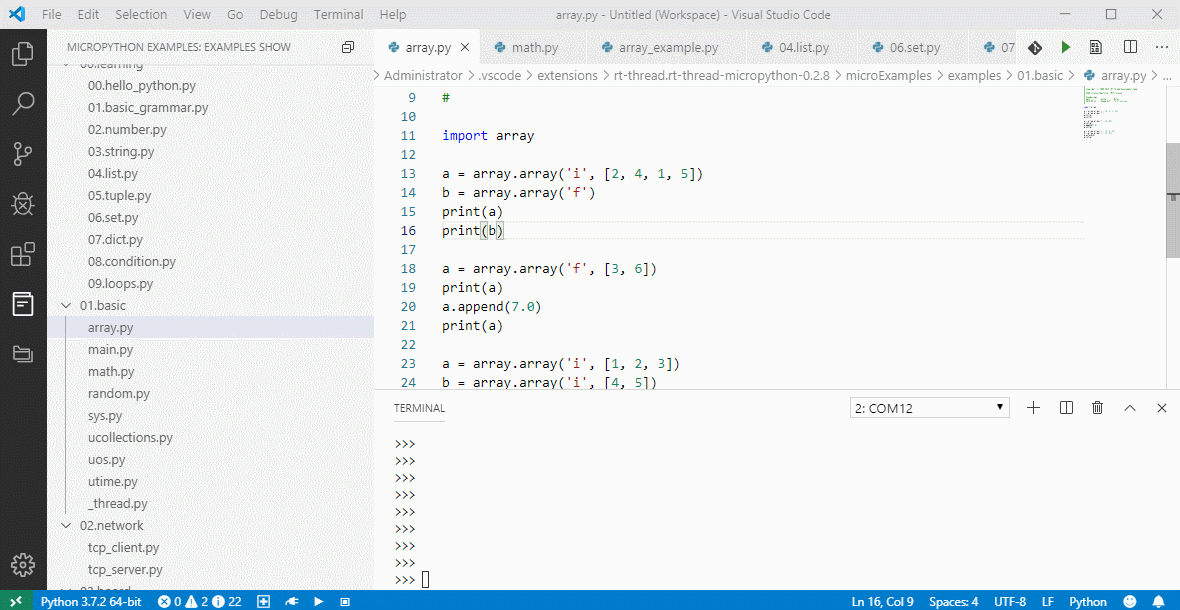
Download files/folders to the development board
If you want to download individual files/folders to the development board, you can use the function of to download individual files/folders to the development board. Select the file/folder in the project that you want to download to the development board and use this feature in the drop-down menu.
Note that if there are files/folders with the same name on the development board, the download will overwrite the existing files/folders.
By entering the command os.listdir() in repl, you can check whether the
corresponding file/folder has been downloaded successfully. Similarly, you can also use
the corresponding command to delete the file or folder in repl. The command list
is as follows:
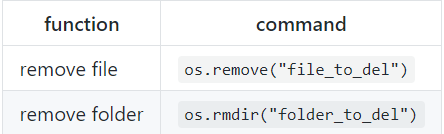
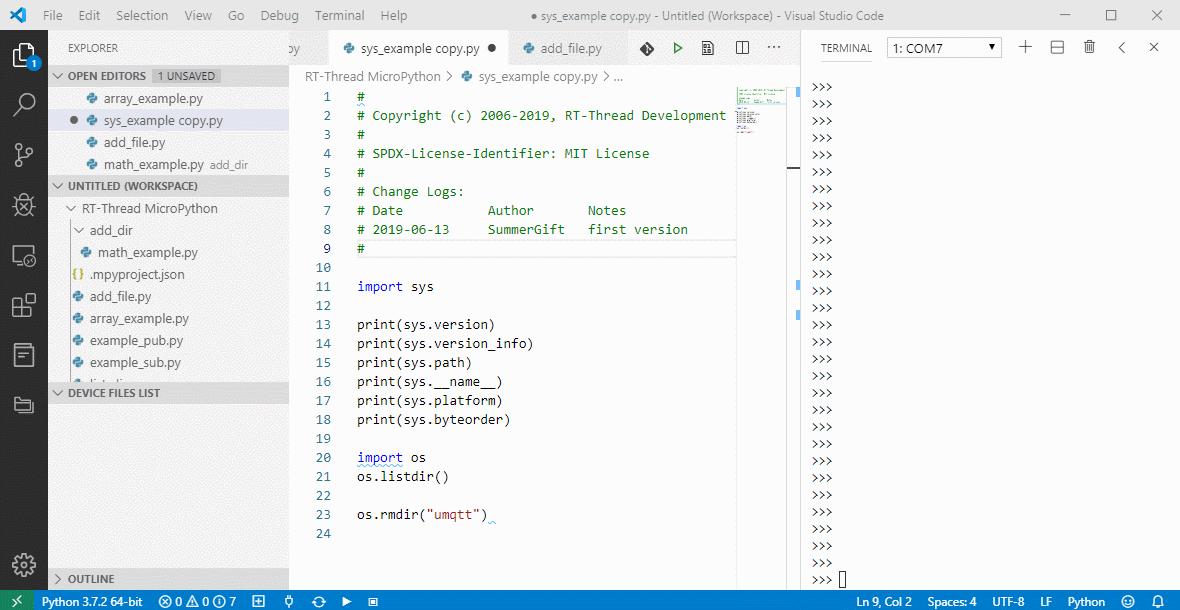
Project synchronization
Click the synchronization button in the lower left corner to start the project synchronization function. This feature synchronizes all directory files in the local project to the development board's file system. This feature is recommended to be used after the code is debugged, without the need to synchronize the project frequently during debugging.
After the project synchronization is completed, the list of files in the DEVICE can be seen in the DEVICE FILES LIST column.
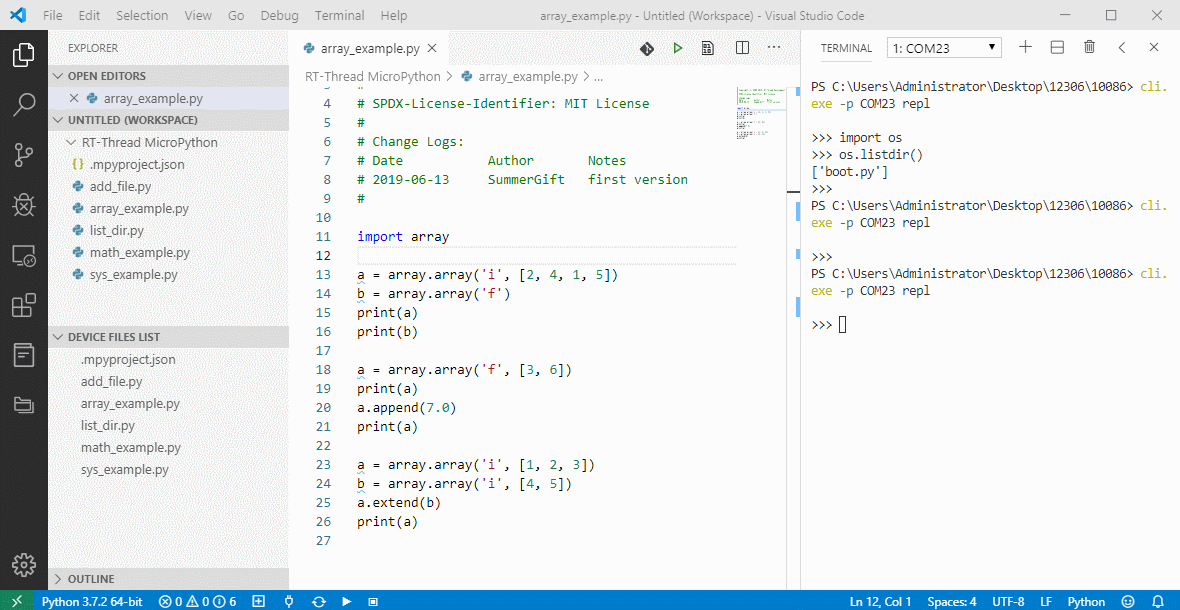
Intelligent code completion based on MicroPython
This plug-in supports intelligent code completion and syntax checking based on MicroPython syntax, which is a powerful tool for developing MicroPython code. It allows developers to write functions while looking at API parameter hints, and it gives them a visual reminder that makes it easier to find errors in code.
For more information about RT-Thread Micropython, please reach RT-Thread Github.
About RT-Thread
An open-source embedded real-time operating system born in 2006 that provides developers with a wide range of components and 200+ software packages.
RT-Thread Contact Info
Website: https://www.rt-thread.io
Github: https://github.com/RT-Thread
Twitter: https://twitter.com/rt_thread
Facebook: https://www.facebook.com/RT-Thread-IoT-OS-110395723808463
Youtube: https://www.youtube.com/channel/UCdDHtIfSYPq4002r27ffqPw
1. Code Contribution:
The statistics are fetched from merged PR on the Github master code branch.
We want to acknowledge and thank the following community members for their contributions to RT-Thread in April. They are:
xckhmf、 luhuadong、DavidLin1577、Keyun-Johan、supperthomas、qzhang1535 、tekkamanninja、majianjia 、 z14git、DeclanHuaChen 、jch12138 、GitHubIDforRoger and Nuclei System Technology.
Thanks to all contributors who share their time, energy, and talent to help RT-Thread. Thank you very much!
Code updating:
-
# Add Nuclei to main README.md
-
# Modify nrf5x nrf52840 for [No Softdevice]&[RT_USING_USER_MAIN]
-
# Fix aarch64 warning
-
# Add Libraries when when run ‘scons — dist’
-
# Add Nuclei RISC-V processor support
-
# Fix the stack overflow bug; Change the note encoding from GB18030 to UTF-8
-
# Add raspi4 bsp
-
# Fix the issue when socket_new() returns error
-
# Add nrf5x bsp
-
# Update bsp for mini2440
-
# K210 drv uart upstream
-
# Fix the STM32 HAL SPI timeout bug
-
# Add the configure option ‘PWM1_CONFIG’
-
# Export file examples to MSH
-
# Fix the stack overflow bug
-
# Remove the duplicate definition of ‘mode_t’
-
# Fix some spelling mistakes
-
# Update mini2440 BSP
-
# De-initialize ‘tx_dma->data_queue’ when close the UART to avoid memory leak
-
# MIPS: Fix FPU compile error for ls1bdev
-
# Add the clear command for FINSH
-
# Add stm32l010 st-nucleo BSP,and pass the LED flicker test and msh console output
-
# Add the APIs ‘rt_object_get_length()’ and ‘rt_object_get_pointers()’, which pass tests in QEMU-VExpress-A9
-
# Add ls2k BSP
-
# Add rt_data_queue_deinit
-
# Fix x1000 memory use bug
-
# Add soc timer cntpct
-
# Fix the spelling error of ‘NETDEV_IPV4’ in ‘netdev’, which causes the resolve error in ‘inet_ntop’
-
# Modify the ‘link.sct’ path of stm32h743-st-nucleo MDK project and the ‘icf’ path of stm32f429-st-disco IAR project
-
# Modify the ‘link.sct’ path of MDK project
-
# Fix the compiling error ‘pid_t undefined’ in libc
2. The Newly Added 13 Software Packages in April (RT-Thread has a total of 217 packages now)
-
# pms_series: Digital universal particle concentration sensor driver library
-
# multi_rtimer: a real-time and low power software timer module
-
# nrf5x_sdk:Software development kit for the nRF52 Series and nRF51 Series SoCs
-
# rx8900:Extern RTC driver for rx8900
-
# nuclei_sdk:Nuclei RISC-V Software Development Kit
-
# bmi088: Universal sensor drive package
-
# nrfx:Standalone set of drivers for peripherals present in Nordic Semiconductor’s SoCs
-
# UrlEncode:a simple tool to Encode/Decode Url
-
# bc28_mqtt:connect to AliCloud with Quectel BC28 model
-
# cmux:connection multiplexing protocol for RT-Thread, support GSM0710 .etc.
-
# hmc5883:bmi088 software package
-
# max6675: Digital temperature sensor package
-
# tmp1075: Digital temperature sensor driver package
Thanks to panrui 、Jonas、MYGuo、xiangxistu、luhuadong、 jch12138、xckhmf、supperthomas、Forest-Rain、MrpYoung for contributing the software packages.
3. Development tools:
RT-Thread Studio:
- Upgraded from v1.0.4 to v1.0.6, which adds new features and improves user experience.
- Add entrances to import MDK/IAR projects; ROM/RAM usage statistics are shown in the compile results.
RT-Thread Contact Info
Website: https://www.rt-thread.io
Github: https://github.com/RT-Thread
Twitter: https://twitter.com/rt_thread
Facebook: https://www.facebook.com/RT-Thread-IoT-OS-110395723808463
Youtube: https://www.youtube.com/channel/UCdDHtIfSYPq4002r27ffqPw
1. Code Contribution in March:
The statistics are fetched from merged PR on the Github master code branch.
First of all, we want to acknowledge and thank the following community members for their contributions to RT-Thread in March. They are: Greed-island、qz721、 leeehui、DavidLin1577、Sunwancn、luhuadong、gyd0317、sheltonyu、shawn1221、cliff-cmc、zhao0116、supperthomas、redocCheng、 Chinese66、tanglj86、djndl1 and Artery Technology company.
Also, thanks to all contributors who have shared their time, energy, and talent to help RT-Thread. Thank you very much!
Code updating:
-
# Update RT-Thread repo readme, add more introduction about rt-thread.
-
# Fix system memory leaks that rt_realloc might cause.
-
# Fix bug#3484” USB can’t properly recognize a composite device”.
-
# Fix the warning issue of the hifive1 BSP with scons.
-
# Optimize UART driver.
-
# Fix the error caused by some macros that are defined with values when running ‘scons — target=eclipse’.
-
# Fix usb stack overflow issue.
-
# Fix compiling errors in some of the STM32 due to the absence of the corresponding ADC channel macro definitions in the HAL library.
-
# Add Aarch64 cache API.
-
# Add STM32L1 HAL DRIVER.
-
# Fix the issue “MMC protocol stack allows the driver to set a frequency higher than highspeed to drive eMMC”.
-
# Add sc mode auto-switching.
-
# spi: support switching between slave mode and master mode at runtime.
-
# Fix stack overflow issue in sdrv_crypto.c.
-
# Add stm32l496zg-Nucleo BSP.
-
# Add the support for on-board AP6181.
-
# Fix the issue “bank2 of stm32f103vgt6 flash can’t work”.
-
# Fix the issue” the long startup time caused by the protocol stack trying an invalid line width”.
-
# Fix the issue “the SD card can not be used if formatted into only one partition”.
-
# Fix the issue y-modem can not read the file size.
-
# Add Artery at32 BSP.
-
# Add support to open PM peripherals in cubemx.
-
# Add ST NUCLEO-F410RB BSP.
-
# Add C++ support in clock_time.h.
-
# Add drivers for the 64-bit raspberry: gpio, wdg, hdmi and mbox.
-
# Fix the issue of UART DMA transfers in STM32 BSPs.
-
# Add interfaces to the WLAN framework of bare-data sending, frame-filtering management and callback registration.
2. The Newly Added 13 Packages in March:
-
(RT-Thread has a total of 204 packages now)
-
hdc1000: hdc1000 sensor driver base on RT-Thread sensor frame.
-
max7219: A MAX7219 package for the digital tube.
-
bmp280: bmp280 iic drive.
-
SHTC1: SHTC1 sensor driver package, support: temperature, humidity.
-
BMP180: This is the BMP180 sensor driver package, support: barometric, temperature.
-
DS3231: Extern RTC driver for ds3231.
-
beep: Control the buzzer to make beeps at different intervals.
-
easyblink: Blink the LED easily and use a little RAM for RT-Thread or RT-Thread Nano.
-
joylink: Joylink Cloud SDK for IoT platform.
-
kawaii-mqtt: A kawaii mqtt client based on the socket API, has a very simple API interface, supports QoS2, mbedtls.
-
lkdGui: lkdGui is a graphical interface for monochrome displays.
-
plccore: plccore for RT-Thread.
-
sys_load_monitor:system load monitor.
-
Check out more information about Software Packages, please visit Here!
3. Development tools:
-
RT-Thread env: Env updated to v1.2.0, also add GIT tool.
-
RT-Thread Studio: Studio is upgraded from V1.0.2 to V1.0.4, optimized the user experience and added new features, such as build log simplified output and detailed output, link.lds script graphics editor, and more.
RT-Thread Contact Info
Website: https://www.rt-thread.io
Github: https://github.com/RT-Thread
Twitter: https://twitter.com/rt_thread
Facebook: https://www.facebook.com/RT-Thread-IoT-OS-110395723808463/?modal=admin_todo_tour
Email: contact@rt-thread.org
RT-Thread has standard version and Nano version, the standard version consisting of kernel layer, components and service layer, and IoT framework layer. The Nano version with a very small size and refined hard real-time kernel, which is very suited for the resource-constrained micro controller unit (MCU) system. This article would go into detail about the Nano version of RT-Thread.
RT-Thread Nano is a refined hard real-time kernel, written in C programming language and it applies object-oriented paradigm. RT-Thread Nano is a preemptive real-time multitasking RTOS, easy to tailor. Although Nano uses a small memory footprint, it still has a wealth of operating system features, such as multiple tasks scheduling, software timer, semaphore, mailbox and real-time scheduler. And RT-Thread Nano fits well for low-end 32-bit ARM MCU applications in the fields of home appliances, consumer electronics, medical equipment, industrial control, etc.
RT-Thread Nano is tailored from RT-Thread standard version, contains only the minimal core set of features. Nano architecture is shown as follow:

Supported Architecture: ARM: Cortex M0/ M3/ M4/ M7 etc, RISC-V and more.
Nano Features:
Simplicity
-
1. Simplified source code
Different from the standard version, Nano doesn't have Scons buidling system, and no Kconfig and Env configuration tools, even some device frameworks and components that are meaningful to the standard version have been removed from Nano version. Nano is just a kernel.
-
2. Easy to port
Benefit from the minimalist nature of Nano, it is quite easy to port Nano to a specific platform. By adding Nano source files to the project, 90% of the porting efforts are done. And Commercial IDEs such as Keil MDK and Cube MX even integrated the Nano packages that can be added to project with a single click.
-
3. Easy to use
It's easy to create an application using RT-Thread Nano. Easy to tailor: Nano's config file is rtconfig.h, it lists all the macros of the kernel, some of it has been turned off, you could turn it on when you need. Easy to add FinSH: FinSH component doesn't depend on the device framework, so it is easy to port to the Nano and require only two functions to implement. Opt in drive library: Many firmware drive libraries provided by manufacturer are available, for example, STD lib from ST, HAL lib, LL lib, etc. Documents: RT-Thread offers developers with a set of documents that can be found on RT-Thread Github, and you are welcome to request the documents from RT-Thread official Twitter.
Super small footprint
Lower resource consumption: Nano uses a fairly small size of RAM and ROM, for example, with semaphore and mailbox functionality, two threads (main + idle) run, requiring only about 1KB RAM and 4KB ROM.
Nano resource requirements case: two threads (main + idle), for Cortex M3 architecture, MDK project with -O3 reports:
Total RO  Size (Code + RO Data)                 4000 (   3.91kB)
Total RW  Size (RW Data + ZI Data)              1168 (   1.14kB)
Total ROM Size (Code + RO Data + RW Data)       4092 (   4.00kB)
Note: If the project needs rich components, drive or software packages, please take the RT-Thread standard version.
Open Source and Free (Apache 2.0)
RT-Thread Nano follows Apache License version 2.0. All the real-time operating system kernel and open source components can be used free of charge for commercial products, there is no potential commercial risk and you will not being request to publish application source.
Hands on experience is way more valuable, we would like invite you to experience RT-Thread Nano Version, download it from : https://github.com/RT-Thread/rtthread-nano
Also, if you have any great ideas for RT-Thread, please contact RT-Thread or make contribution on RT-Thread Github directly, Issue and Pull Request are all welcomed.
Github: https://github.com/RT-Thread
Twitter: https://twitter.com/rt_thread

RT-Thread is thrilled to start an exciting journey with LVGL, the open-source graphics library for embedded GUI.
LVGL has registered as a software package of RT-Thread. By using Env tool or RT-Thread Studio IDE, RT-Thread users can easily download LVGL source code and combine it with the RT-Thread project. The RT-Thread community has port LVGL to several BSPs
Get in more details: https://docs.lvgl.io/master/get-started/rt-thread.html
About LVGL:
LVGL (Light and Versatile Graphics Library) is a free and open-source graphics library providing everything you need to create an embedded GUI with easy-to-use graphical elements, beautiful visual effects and a low memory footprint.
RT-Thread Contact Info:
Website: https://www.rt-thread.io
Github: https://github.com/RT-Thread
Twitter: https://twitter.com/rt_thread
Facebook: https://www.facebook.com/RT-Thread-IoT-OS-110395723808463
Youtube: https://www.youtube.com/channel/UCdDHtIfSYPq4002r27ffqPw
RT-Thread IoT OS, a leading open-source operating system platform for the Internet of Things (IoT), today announced it has joined RISC-V International, a global open hardware standards organization, to help expand the open-source embedded ecosystem, bring innovative and ground-breaking embedded technologies to open source developers and accelerate the next generation of IoT projects!
RT-Thread has been building an open-source operating system platform for over a decade, supporting all the mainstream architectures. The free and open RISC-V architecture offers exciting new possibilities for this industry with its modularity, extensibility, and scalability.
Over the past few years, RT-Thread has actively been involved in the RISC-V ecosystem by offering support for many chips and hardware boards based on the RISC-V architecture, such as HiFive, GD32V103, AB32VG1, K210,CH32V307, and Allwinner D1, along with other solutions for RV32, RV64, and RV soft cores. The all-in-one IDE RT-Thread Studio also provides support for RISC-V chips. With its support for RISC-V QEMU functionality, developers can experience the features of RISC-V without having a board on hand.

“In addition to the growing number of enterprises joining the RISC-V ecosystem, we’re pleased to see other open source communities like RT-Thread join our efforts to drive a new era of silicon innovation,” said Calista Redmond, CEO of RISC-V International. “RT-Thread has already seen significant traction in the IoT space, so we look forward to having the organization help further accelerate the growth of RISC-V based IoT devices.”
RT-Thread will continue working to drive RISC-V momentum around the globe and accelerate the adoption of RISC-V technologies in IoT projects. RT-Thread is also looking forward to working with partners to explore more possibilities for the open-source embedded ecosystem!
About RT-Thread:
RT-Thread is an open-source embedded real-time operating system, with its rich middle-tier components and extensive hardware and software ecosystem delivering robust support for the Internet of Things (IoT) industry. Since its inception in 2006, RT-Thread has powered 1 billion devices, which includes applications for wearable devices, smart home appliances, energy, automotive electronics, medical electronics, consumer electronics, and many other industries.
RT-Thread’s mission is to help open-source projects benefit more people!
RT-Thread Contact Info:
Website: https://www.rt-thread.io
Github: https://github.com/RT-Thread
Twitter: https://twitter.com/rt_thread
Facebook: https://www.facebook.com/RT-Thread-IoT-OS-110395723808463
Youtube: https://www.youtube.com/channel/UCdDHtIfSYPq4002r27ffqPw

RT-Thread has entered into a partnership with WCH Microelectronics to promote more applications in the RISC-V ecosystem. WCH is known in the chip industry for providing powerful chips that focused on connectivity and control. This cooperation will bring both projects into a position to create a RISC-V development application ecosystem, based on the WCH RISC-V MCU and running the open-source RT-Thread IoT operating system. The two sides shared the same goal of making RISC-V MCU application development easy and efficient.
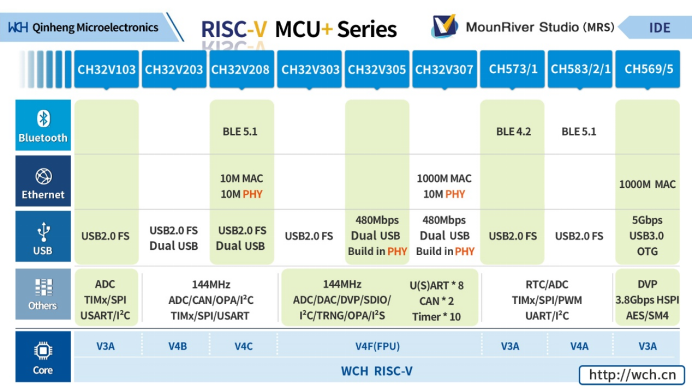
WCH Microelectronics RISC-V MCU will be natively equipped with RT-Thread IoT OS and onboard RT-Thread Studio IDE and WCH Mounriver Studio IDE to provide developers with a complete development ecosystem and engage a more user-friendly development experience. Meanwhile, the two sides will carry out all-round cooperation in the developer community construction and university programs, etc., and actively promote the development of the RISC-V application ecosystem.
Luckily, we’ll have Yang Yong CTO of WCH Mircoelectronics gives a presentation at the RT-Thread IoT OS Global Tech Conference on Sep 16–17 to share his vision on RISC-V for Embedded MCUs! Join us to learn more: https://forms.gle/8W1j2ZhCSLKFfyFQ8
Can’t wait to tell, WCH Mircoelectronics will giveaway their RISCV-based dev boards for participants at RT-Thread IoT OS Global Tech Conference! Don’t miss out on the chance to get one!
Free register to RT-Thread IoT OS Global Tech Conference:
https://forms.gle/8W1j2ZhCSLKFfyFQ8
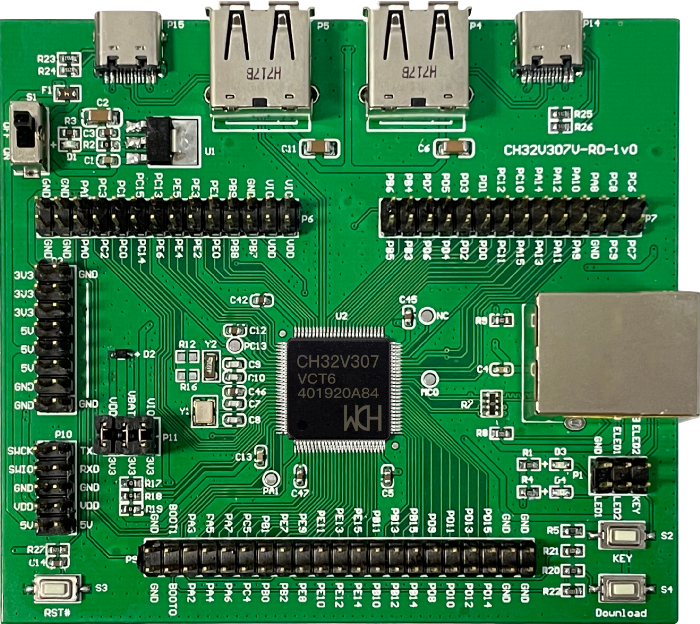
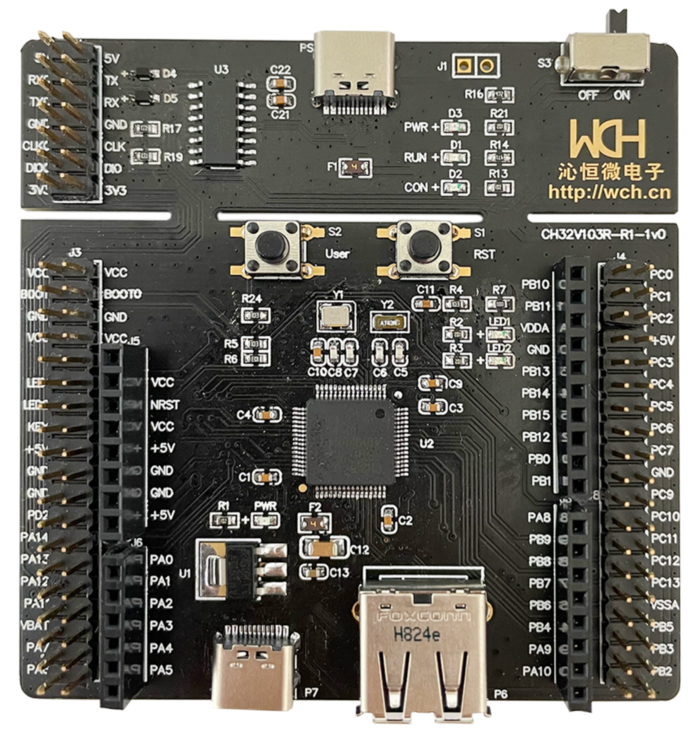
RT-Thread Contact Info:
Website: https://www.rt-thread.io
Github: https://github.com/RT-Thread
Twitter: https://twitter.com/rt_thread
Facebook: https://www.facebook.com/RT-Thread-IoT-OS-110395723808463
Youtube: https://www.youtube.com/channel/UCdDHtIfSYPq4002r27ffqPw
- Brings an open-source RTOS and a handy IDE to ST products to make IoT development easier and built with trust
- RT-Thread RTOS supports the STM32 series dev boards
- RT-Thread Studio IDE has an easy-to-use graphical configuration system that can access 270+ RT-Thread software packages and a wide range of RT-Thread components resources, to speed up the development process, making IoT development efficient
RT-Thread IoT OS, an open-source, neutral, and community-based IoT platform today announced that it has joined the STMicroelectronics Partner Program.
RT-Thread has been collaborating with ST since 2008 when many manufacturers chose to run RT-Thread on STM32 microcontrollers. The developers can take full advantage of the combination of the STM32 and RT-Thread to experience a more convenient and fast-speed development process to come out with more high-performance products.
RT-Thread offers comprehensive Board Supported Packages(BSP) that are ready-to-use for the STM32 series products including the STM32F0/F1/F3/F4/F7 series, STM32G0/G4 series, STM32L0/L4 series, STM32H7 series, STM32MP1 series, and STM32WB series (BSPs are stored on RT-Thread Github). In 2019, RT-Thread Studio one-stop integrated development environment (IDE) was launched, with a powerful graphic configuration system and 270+ out-of-box software packages and a wide range of components resources to offer a way for STM32 developers to simplify software-development complexity.
RT-Thread has also launched many activities with ST, customized the STM32 IoT board, published a book Programming with RT-Thread on STM32, and held online & offline trainings and developer events.
STMicroelectronics, a global semiconductor leader serving customers across the spectrum of electronics applications created the ST Partner Program to speed customer development efforts by identifying and highlighting to them companies with complementary products and services. Moreover, the program's certification process ensures that all partners are periodically vetted for quality and competence. For more information, please visit www.st.com/partners.
About RT-Thread IoT OS
RT-Thread, an open-source embedded real-time operating system (RTOS) that provides a wide range of components and 270+ software packages for the Internet of Things (IoT). RT-Thread RTOS has a Standard Version and Nano Version that respectively target different resources IoT devices, by the beginning of September 2020, RT-Thread also launched its Microkernel operating system RT-Thread Smart that positioned as a professional high-performance micro-kernel operating system for real-time applications, to benefit the industries in Security( such as IPC Cameras), Industrial Control, Onboard Devices, Consumer Electronics and so on.
RT-Thread Studio Global Version V2.0 released along with this announcement, free download RT-Thread Studio.
RT-Thread Contact Info:
Website: https://www.rt-thread.io
Github: https://github.com/RT-Thread
Twitter: https://twitter.com/rt_thread
Facebook: https://www.facebook.com/RT-Thread-IoT-OS-110395723808463
Youtube: https://www.youtube.com/channel/UCdDHtIfSYPq4002r27ffqPw
Alan Kay said: “Simple things should be simple, complex things should be possible”. This sentence was the inspiration for the founder of RT-Thread to stick to his beliefs.
Background:
RT-Thread was born in 2006, it is an open source, neutral, and community-based real-time operating system (RTOS).
RT-Thread has Standard version and Nano version:
- For resource-constrained microcontroller (MCU) systems, the NANO kernel version that requires only 3KB Flash and 1.2KB RAM memory resources can be tailored with easy-to-use tools;
- For resource-rich IoT devices, RT-Thread can use the on-line software package management tool, together with system configuration tools, to achieve intuitive and rapid modular cutting, seamlessly import rich software packages, thus achieving complex functions like Android's graphical interface and touch sliding effects, smart voice interaction effects, and so on.
RT-Thread Architecture:
RT-Thread has not only a real-time kernel, but also rich components. Its architecture is as follows:
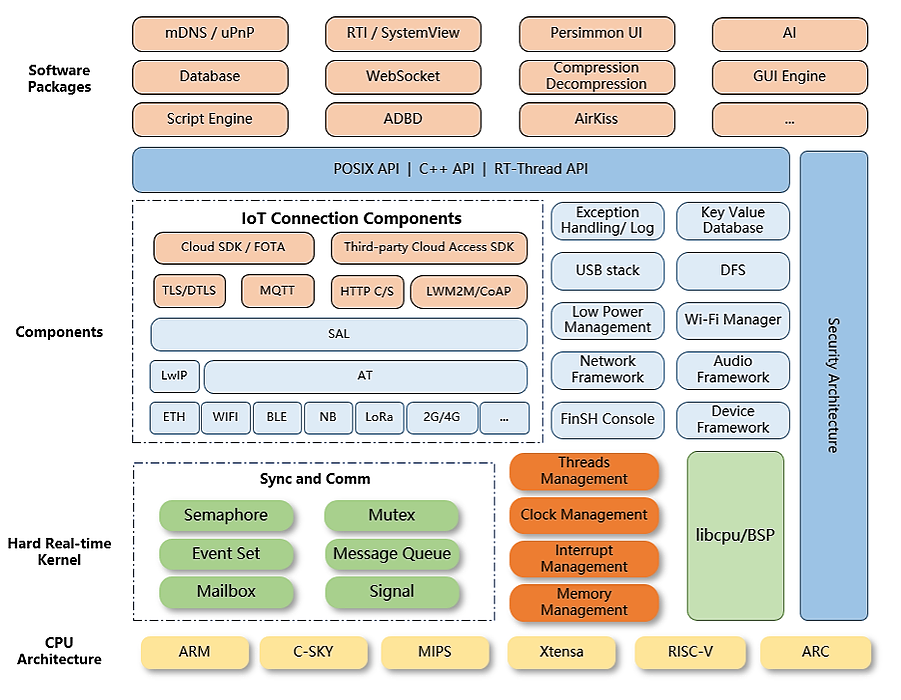
It includes:
- Kernel layer: RT-Thread kernel, the core part of RT-Thread, includes the implementation of objects in the kernel system, such as multi-threading and its scheduling, semaphore, mailbox, message queue, memory management, timer, etc.; libcpu/BSP (Chip Migration Related Files/Board Support Package) is closely related to hardware and consists of peripheral drivers and CPU porting.
- Components and Service Layer: Components are based on upper-level software on top of the RT-Thread kernel, such as virtual file systems, FinSH command-line interfaces, network frameworks, device frameworks, and more. Its modular design allows for high internal cohesion inside the components and low coupling between components.
- RT-Thread software package: A general-purpose software component running on the RT-Thread IoT operating system platform for different application areas, consisting of description information, source code or library files. RT-Thread provides an open package platform with officially available or developer-supplied packages that provide developers with a choice of reusable packages that are an important part of the RT-Thread ecosystem. The package ecosystem is critical to the choice of an operating system because these packages are highly reusable and modular, making it easy for application developers to build the system they want in the shortest amount of time. RT-Thread supports more than 200 software packages.
RT-Thread Features:
- Supports resource-constrained devices, the minimum kernel requires only 1.2KB of RAM and 3 KB of Flash.
- It has rich components and a prosperous and fast growing package ecosystem.
- Elegant code style, easy to use, read and master.
- High Scalability. RT-Thread has high-quality scalable software architecture, loose coupling, modularity, is easy to tailor and expand.
- Supports high-performance applications.
- Supports cross-platform and a wide range of chips.
Supported Architectures:
RT-Thread supports many architectures, and has covered the major architectures in current applications. Architecture and chip manufacturer involved:
- ARM Cortex-M0/M0+:manufacturers like ST.
- ARM Cortex-M3:manufacturers like ST、Winner Micro、MindMotion, ect.
- ARM Cortex-M4:manufacturers like ST、Nuvton、NXP、GigaDevice、Realtek、Ambiq Micro, ect.
- ARM Cortex-M7:manufacturers like ST、NXP
- ARM Cortex-M23:manufacturers like GigaDevice
- ARM Cortex-R4ARM Cortex-A8/A9:manufacturers like NXP
- ARM7:manufacturers like Samsung
- ARM9:manufacturers like Allwinner、Xilinx 、GOKE
- ARM11:manufacturers like Fullhan
- MIPS32:manufacturers like loongson、Ingenic
- RISC-V:manufacturers like Hifive、Kendryte
- ARC:manufacturers like SYNOPSYS
- DSP:manufacturers like TI
- C-Sky
- X 86
Supported IDE and Compiler:
The main IDE/compilers supported by RT-Thread are:
- MDK KEIL
- IAR
- GCC
- RT-Thread Studio(RT-Thread studio is one-stop development tool built by RT-Thread)
Use Python-based scons for command-line builds.
Community:
RT-Thread has received many many supports from the community developers when it starts. Now, RT-Thread has gathered 200+ software packages which are created by the community developers also RT-Thread had 9357 commits and gained 4.2K stars on Github.
Real-time system (RTOS) is increasingly widely used in the high-end Internet of Things (like, AIoT) because of its low cost, high real-time, and fast start-up characteristics, soon or later, more and more RTOSs would support multi-kernel SMP, AI, audio & video and this is inevitable. In near future, RT-Thread Studio IDE, next-generation microkernel architecture, AI frameworks and more will all be released step by step.
This is a new world of RTOS.
RT-Thread Contact Info:
Website: https://www.rt-thread.io
Github: https://github.com/RT-Thread
Twitter: https://twitter.com/rt_thread
Facebook: https://www.facebook.com/RT-Thread-IoT-OS-110395723808463
Youtube: https://www.youtube.com/channel/UCdDHtIfSYPq4002r27ffqPw
In 2023 RT-Thread successfully hosted meetups in 10 cities, marking a significant milestone with our first-ever meetup outside of China, held in Singapore. We are deeply grateful for the unwavering support and contributions from our community that made this possible.

In 2023 RT-Thread successfully hosted meetups in 10 cities, marking a significant milestone with our first-ever meetup outside of China, held in Singapore. We are deeply grateful for the unwavering support and contributions from our community that made this possible.
Here we are thrilled to announce the RT-Thread Global Meetup Hosting Program! If you’re as passionate about the Open Source RT-Thread Project as we are and want to share this excitement with your local community, we invite you to host an event in your city.
Why Host a Meetup?
Hosting a meetup is a fantastic opportunity to:
- Networking Opportunities: Hosting a meetup can help to connect with like-minded individuals in your area. This can lead to collaborations, partnerships, and friendships.
- Knowledge Sharing: Facilitate the exchange of ideas, experiences, and best practices.
- Visibility: Raise your profile within the RT-Thread community to demonstrate your leadership and organizational skills.
- Contribution to the Open Source Community: By hosting a meetup, you are contributing to the growth and strength of the RT-Thread community. This can be a rewarding experience, knowing that you are helping to build a global network of enthusiasts and experts.
- Feedback and Support: Provides a platform for local members to support each other, and gives you direct access to feedback from your local community, which can be invaluable for problem-solving and improving the project.
How to Get Involved?
Getting involved is simple:
- Express Interest: Let us know that you’re interested in hosting a meetup by emailing RT-Thread Cathy at liyan@rt-thread.org
- Plan Your Event: Decide on a date, time, and venue for your event. It could be a local café, a co-working space, or even a virtual platform!
- Prepare Your Content: Use resources from the RT-Thread Project to prepare engaging content for your meetup. We can provide guidance and materials to help you with this.
- Promote Your Event: Share the event details with your local community and invite them to join.
No matter where you are, we encourage all passionate individuals or organizations to get involved. Together, we can make the Open Source Project reach every corner of the globe! Email to RT-Thread Cathy at liyan@rt-thread.org to get involved.
A colossal round of applause to all the participants of the 2023 Embedded GUI Contest! This event, brought to you by our Contest Partners Renesas Electronics and LVGL, and Host RT-Thread, was a resounding success, and it’s all thanks to you! Your projects radiated creativity and passion, and we were in awe of the technical prowess and innovation each entry showcased.

A colossal round of applause to all the participants of the 2023 Embedded GUI Contest! This event, brought to you by our Contest Partners Renesas Electronics and LVGL, and Host RT-Thread, was a resounding success, and it’s all thanks to you! Your projects radiated creativity and passion, and we were in awe of the technical prowess and innovation each entry showcased.
After much deliberation and careful review, we are over the moon to unveil the champions of the 2023 Embedded GUI Contest:
1st Prize:
Zhang Bingru: Smart Mobile Terminal
https://club.rt-thread.org/ask/article/a8319ea96b2999ef.html
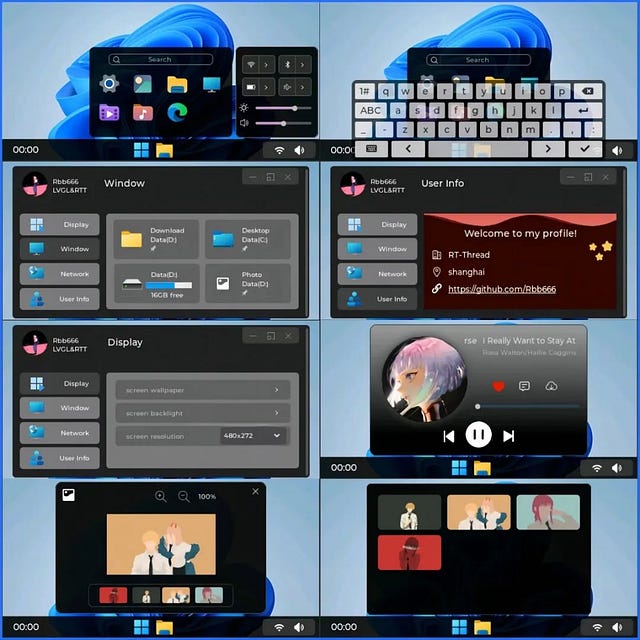
2nd Prize:
Li Ken: Children’s Educational Learning Machine based on RA6M3 HMI-Board and LVGL
https://club.rt-thread.org/ask/article/572b6bd6f909082d.html
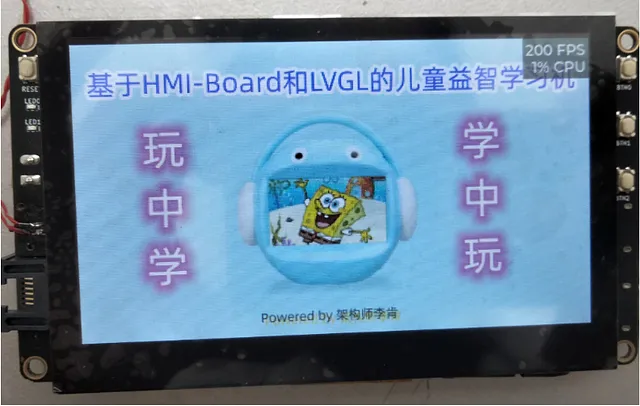
Fabian Näf: Micro-ROS (uROS) Terminal UI
GitHub - NotBlackMagic/UROSTerminalUI: A simple micro ROS Terminal UI interface running on the…
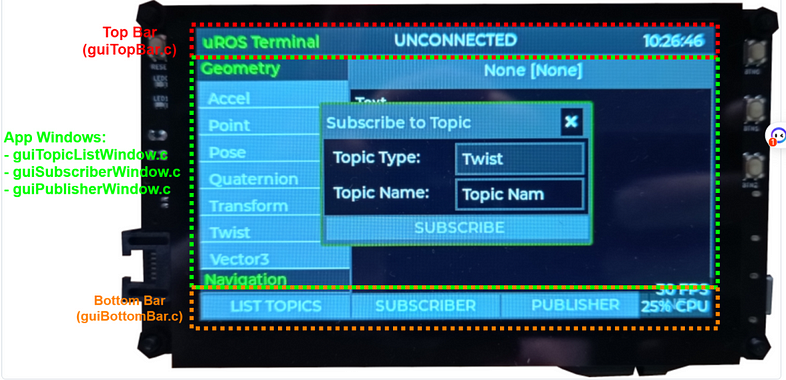
3rd Prize:
Fan Gong: Portable Thermal Imager
https://club.rt-thread.org/ask/article/87c942f79dc42f1f.html
He Xiong: Health Monitor
https://club.rt-thread.org/ask/article/2aa4e8097071d691.html
Wang Qinglong: Portable Diagnostic Device
https://club.rt-thread.org/ask/article/ae057606cffd479c.html
Lv Yuhao: Smart Home Control System
https://club.rt-thread.org/ask/article/0cc9cb8b7d9ab681.html
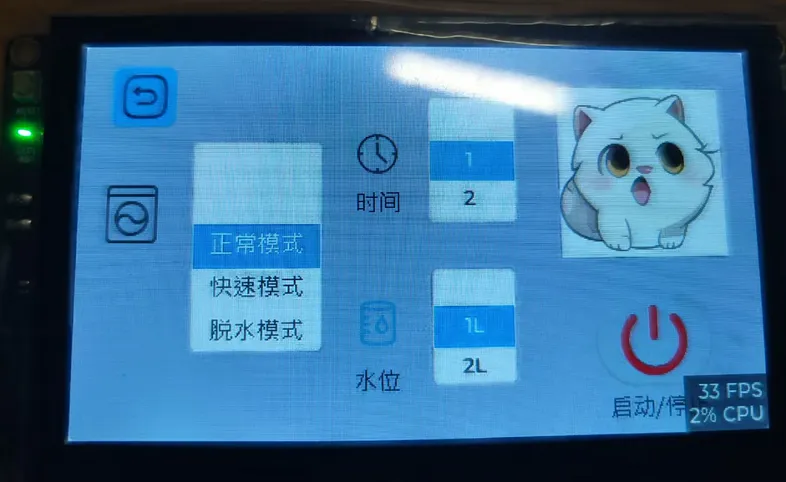
Tang Chengqian: Smart Push Rod Interactive Interface
https://club.rt-thread.org/ask/article/2d05cf4bbd02e291.html
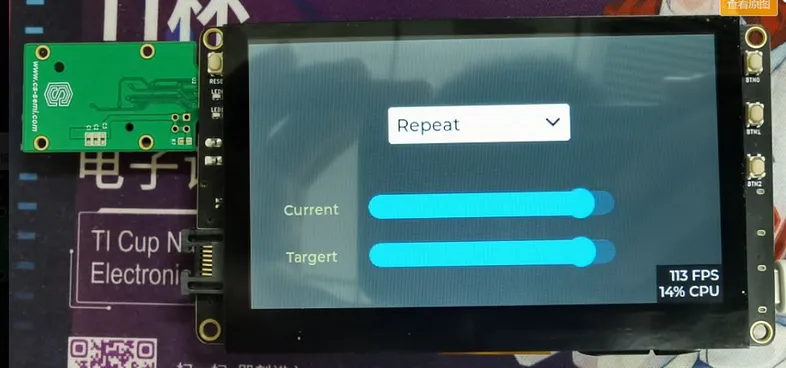
Thanking each of you for trusting us and supporting us to date.
Get ready for a thrilling ride with RT-Thread as we unveil our latest version v5.0.2! Since the grand launch of version v5.0.0, we’ve been on an exhilarating journey of transformation, with our kernel and components undergoing a series of dynamic changes and enhancements.
Get ready for a thrilling ride with RT-Thread as we unveil our latest version v5.0.2! Since the grand launch of version v5.0.0, we’ve been on an exhilarating journey of transformation, with our kernel and components undergoing a series of dynamic changes and enhancements.
RT-Thread code repository address: ● https://github.com/RT-Thread/rt-thread
RT-Thread 5.0.2 version release log details: ● https://github.com/RT-Thread/rt-thread
Here’s a sneak peek into some of the electrifying highlights and pivotal changes:
🧰 Kernel improvements:
● Added AMP support.
● Added message priority for message queues.
● Added rt_hw_interrupt_is_disabled API for detecting whether the interrupt is turned off;
● Added APIs to get object names and thread names.
● Improved errno compatibility with POSIX, enhancing compatibility.
● Improved atomic operation Atomic detection support.
● Improved device_open interface to avoid repeated calls.
● Removed recursion in mutexes, enhancing stability.
● Merged DBG header files, removing redundant code.
● Modified the structure of rt_thread to clearly inherit rt_object.
● Fixed the MQ reception blocking issue in user mode.
● Fixed uninitialized variable rt_err in thread.c and type conversion error in timer.c (IAR).
🔌 Component updates:
● lwp:
○ Added support for checking executable permissions for elf.
○ Supported more features of IEEE Std 1003.1–2017 signals.
○ Supported file descriptor transmission.
○ Fixed memory leak issues, improving stability.
○ Added more system call support.
● libc
○ Adapted rt_channel, added some commonality of rt_channel function on dfs v2, and standardized signalfd.
○ Renamed libc.c to posix/stdio.c.
○ Added timerfd system call function.
○ Implemented lightweight timezone configuration; optimized resource consumption.
○ Supported rt-thread CPP wrapper sub-switch macro, external third-party libc package
○ Supported picolibc’s heap.
○ Redirected sys/ioctl header file to bits/ioctl, improved posix interface message queue.
● utilities
○ Removed zmodem.
○ Supported extensible memory management.
● dfs:
○ Upgraded device file system (dfs) to v2 version, while considering compatibility also retained v1 version for Kconfig configuration selection.
○ Improved fd closing strategy to avoid potential memory leak issues.
○ Fixed tmpfs spin lock error, nfs 64-bit architecture error.
● mm:
○ Added unmap page API.
○ Improved output of list_page .
○ Added API to unmap pages, better managing memory.
○ Fixed lwp _load_script .
○ Modified lwp_struct_copy function to copy working_directory when forking a child process .
● finsh
○ Added MSH auto-completion sub-option function .
○ Fixed issue where Finsh offset was used before range check .
● Network
○ Added more hook functions .
○ Fixed ping timeout calculation error, ipv6 compatibility issue .
○ Fixed issue finding next-hop in lwip_ip4_route_src .
○ Modified using interface to set default network device .
○ Optimized at_vprintfln and network-related Kconfig .
📦 Device drivers:
● Prepared for device driver v2.0 , bringing more features and performance improvements .
● Added device tree sub-node search macro, improving device management efficiency .
● Fixed issue where serial port sometimes repeatedly sends carriage return characters, improving serial communication stability .
● Fixed CPU timer issue in multi-threading , dtb compilation warning .
● Optimized SPI transmission speed and fixed some issues .
● Modified ADC channel data type , and added built-in channel universal number recognition .
● Modified current sensor framework back to v1 version , and made it independent of v2 .
● Fixed inconsistent return type error in Sensor-V1 , redefined Sensor-V2 as sensor framework .
● Modified tty driver program to device , and fixed multiple scanfs causing data loss issues .
⚙️ Libcpu:
● Made multiple fixes and optimizations under architectures such as riscv, arm, aarch64, arc, etc., improving performance and stability .
● Implemented default weak function for rt_hw_cpu_shutdown .
● Added cfi information of gdb unfolding program for aarch64, arm cortex-a, risc-v .
🔧 Tools:
● Supported more BSP driver compilations , ensuring wider hardware compatibility .
● Added CI process , improving project maintainability .
● Added llvm-arm 16.0 support , and added llvm-arm workflow .
● Added function to filter files that do not need cppcheck for file_check.py .
● Added — add-rtconfig parameter for scons , used to add macro definitions during build .
● Fixed issue where c99 and gnu options could not be selected in Keil-MDK .
Fixed deque problem with Env[‘CPPDEFINES’] in scons version 4.5.0 or above .
🔄 Action:
Added CI to compile more changed BSP drivers , added pkgs-test ; added manual trigger and failed BSP check ; added more configurations for manual trigger .
Added repo check ; added review request for code_owner ; added paths-ignore for format and static check .
Added manual trigger for all STM32 , added exp_STM32 SCons .
Refactored and optimized ci execution process , and added manual trigger and cppcheck check for scons dist .
📦 BSP:
Added some new bsp:
● ST: imx6ull, stm32u585-iot02a, stm32f405zgtx, stm32h563-st-nucleo, stm32h563-st-nucleo, stm32f407-rt-spark, stm32f334-st-nucleo, stm32l496-st-discovery
● SOPHGO: cv1800b
● TI: msp432e401y-LaunchPad
● APM32: apm32e103ze-evalboard, apm32e103ze-tinyboard, apm32f030r8-miniboard
● AT32: at32f423-start
● Essemi: es32vf2264
● Imxrt: imxrt1061-forlinx-OK1061-S
● Renesas: ra6m3-hmi-board
● Yichip: yc3122-pos
● Bouffalo_lab: bl808/d0
Fixed some issues:
- Fixed atomic volatility issue in bsp/simulator when compiling in VS2019 .
- Fixed mismatched function type of rt_pin_ops in all drv_gpio.c.
🎉The unveiling of version v5.0.2 is a testament to the relentless dedication and hard work of our developers. A heartfelt thank you for your invaluable contributions to the RT-Thread community! Together, we’re making RT-Thread better and more user-friendly! 💪
Here’s a roll call of our amazing contributors from the mainline v5.0.0 to v5.0.2 (in no particular order):
A standing ovation for developers like Shisan, yanghaiyong, lepus, guo, Junjie Wang, Zheng-Bicheng, Legend, XYZ, zhouminquan, Shicheng Chu, Tennn11, Wayne Lin, liYangYang, cmbjxxiao, Yuqiang Wang, Supper Thomas, zmq810150896, sp-cai, Siwei Xu, Fan YANG, dejavudwh, yuanzihao, DingDing, Eric LGF, Mr.M, yby, liYony, Cheng Mengmeng, 1ridic, vacabun, LTreeshu, Frogrey, Shell, zbtrs, wangqinglin, wusongjie,bxhsiman , XYZboom , flyingcys , WCX , kurisaW , zan319 , Man Jiangting(Meco) , Fan Yang , KunYi Chen , xyz , Jay , cx , geniusgogo , zhugengyu , FragrantRye , Donocean , zhangyan , xqyjlj , GuEe-GUI and many more.
We also extend our gratitude to companies such as NXP、Renesas、Infineon、Nuvoton、Xilinx、Geehy、Xiaohua、Artery Technology、Qingdao Eastsoft、and the Institute of Software of the Chinese Academy of Sciences PLCT Laboratory for their significant contributions to this version update!
On behalf of the Contest Partners and Contest Host of the 2023 IoT Contest, we would like to extend a massive thank you to everyone who participated in our contest and helped make it a success! Your creativity and passion were evident in each project submitted, and we were truly impressed by the high level of technical expertise and innovation demonstrated by all of the entries.
On behalf of the Contest Partners and Contest Host of the 2023 IoT Contest, we would like to extend a massive thank you to everyone who participated in our contest and helped make it a success! Your creativity and passion were evident in each project submitted, and we were truly impressed by the high level of technical expertise and innovation demonstrated by all of the entries.
After careful consideration and review, we are thrilled to announce the winners of the 2023 IoT Contest:
1st Prize:THOMAS: https://www.reidemeister.com/?p=660
2st Prize:Paul Rodolf Castor:https://medium.com/@paulrodolf.castor/development-of-indoor-air-quality-monitoring-system-using-rt-thread-iot-os-and-wch32v208-r0-cf12161920df

Manzel Seet: https://www.hackster.io/zst123/iot-energy-meter-using-rt-thread-stm32u575-212a4d
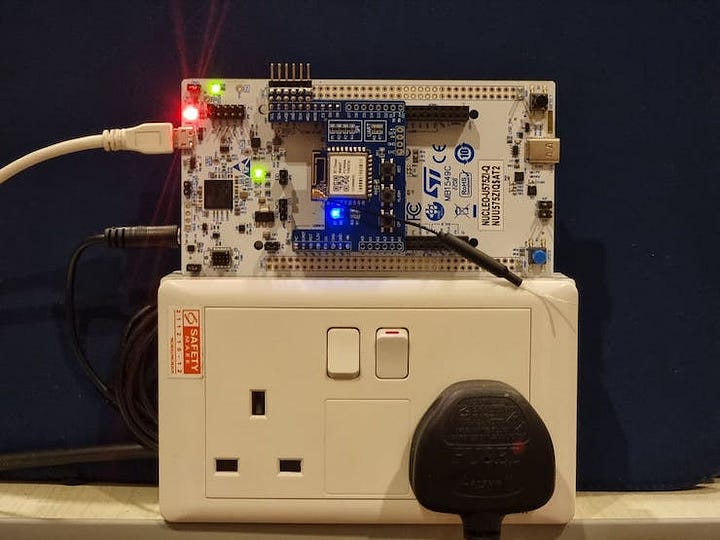
Johan Halmén:https://www.hackster.io/Johan_Ha/rohrenspiel-91de64
Majed Abouhatab: https://www.hackster.io/abouhatab/space-station-pass-alert-on-stm32u575-st-nucleo-422473
Yaofeng: https://www.hackster.io/norths/brushless-motor-control-rt-thread-126dda
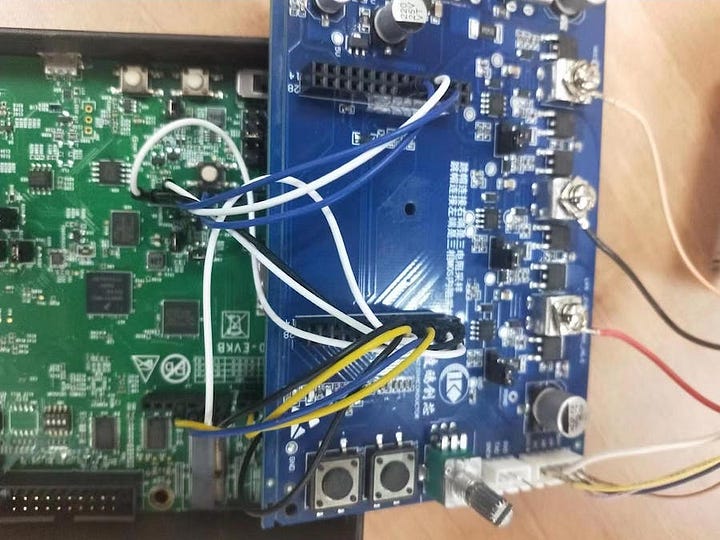
Kaleb Pace: https://github.com/kalebpace/rtthread-nix-zig-ch32v208wbu6-r0
Nico Maas: https://github.com/nmaas87/CCSDS-TM-FSM
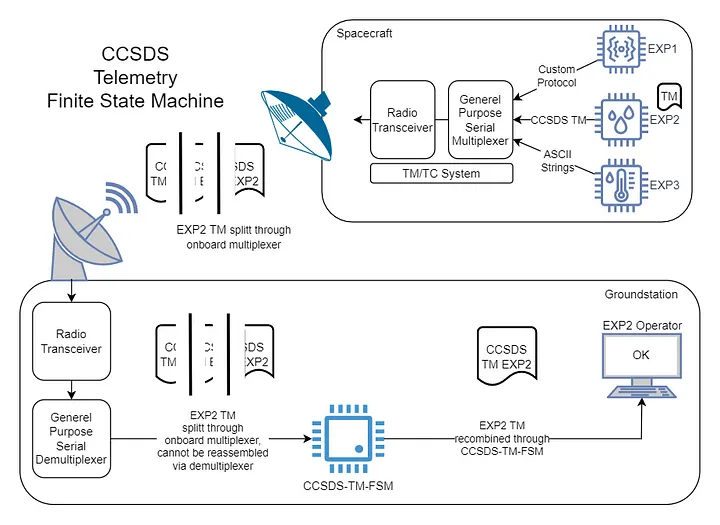
Thanking each of you for trusting us and supporting us to date.
Our upcoming 2023 RISC-V Design challenge will start soon. Get ready, you just might be the subsequent winner.
The Embedded GUI Contest, organized by open-source RT-Thread, LVGL, and Renesas Electronics, challenged participants to develop a project using an HMI Board running the open-source RT-Thread RTOS and LVGL (Light and Versatile Graphics Library).

The Embedded GUI Contest, organized by open-source RT-Thread, LVGL, and Renesas Electronics, challenged participants to develop a project using an HMI Board running the open-source RT-Thread RTOS and LVGL (Light and Versatile Graphics Library).
We want to extend a huge thank you to everyone who entered the 2023 Embedded GUI Contest and helped make it such a success. With limited slots available for registration, we received an overwhelming number of applications. If your proposal wasn’t selected this time, don’t worry — stay tuned to RT-Thread for more contests coming soon!
Congratulations to the final participants! An email has been sent to you with further details — please check your inbox (and your junk mail folder, just in case). 😊
Here is the Entry List.
🌐 Stay Connected: Make sure to follow RT-Thread on our official media platforms to stay updated on the latest contest news, important updates, and helpful resources:
-
Twitter: https://twitter.com/rt_thread
-
Facebook: https://www.facebook.com/RT-Thread-IoT-OS-110395723808463
-
Youtube: https://www.youtube.com/channel/UCdDHtIfSYPq4002r27ffqPw
In May, RT-Thread joined forces with Renesas and LVGL to introduce an exciting new development mode called the HMI Board. This revolutionary approach replaces the traditional HMI + main control board hardware with a single integrated solution. By leveraging the power of the HMI Board, engineers can now achieve the full capabilities of HMI, IoT, and control functionalities seamlessly.
The HMI Board incorporates Renesas’ high-performance RA6M3 chip and benefits from RT-Thread and LVGL's robust software ecosystem. This combination not only provides exceptional hardware performance but also offers a wide range of software resources. With this powerful combination, developers can effortlessly create cutting-edge GUI smart hardware products.
But that’s not all. The HMI-Board comes equipped with a 2M Flash large-capacity main control chip RA6M3, featuring built-in modules like 2D acceleration, JPEG encoder/decoder, and LCD controller to help with graphic application development. Plus, with an onboard TFT display and audio interface, developers can flex their skills in the HMI field. And let’s not forget about IoT connectivity: the HMI-Board has an onboard Ethernet interface and high-speed WIFI module, keeping the development board connected to the cloud 24/7. The HMI-Board also supports various control methods, including the CAN interface, Arduino interface, and two PMOD interfaces. This allows developers to easily expand various peripherals and achieve more flexible control methods. With the HMI-Board development board, creating GUI smart hardware products has never been easier.
And now, we are thrilled to announce the Embedded GUI Contest, organized by RT-Thread, Renesas, and LVGL! We cordially invite engineers from around the world to participate and demonstrate their talent in developing innovative and intuitive Graphical User Interfaces (GUIs) for embedded systems.
Apply Now: https://forms.gle/WCGdtMU5yv5YcuTM8

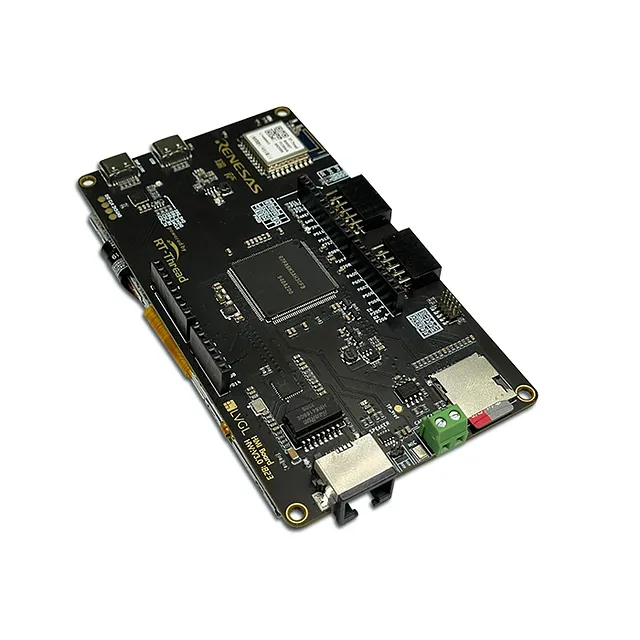


Contest Details:
Contest Hardware Platform: HMI Board
Contest Software Platforms: Open Source RT-Thread RTOS & LVGL
Contest Timeline:
Application Period: June 29— July 15
Contest Period: July 20 — September 15
Judging Period: September 16- September 26
Winners Announcement: September 26
How to Participate:
- Fill out the Application Form with your personal details and project proposal.
- Submit your application before the deadline of July 15.
Contest Benefits:
* Free Hardware: We are providing 80 pieces of the HMI Board as free hardware to selected attendees.
* Collaboration Opportunities: Engage with fellow engineers, RT-Thread experts, and industry professionals throughout the contest period.
* Showcasing Your Skills: Demonstrate your proficiency in developing exceptional GUIs for embedded systems.
* Recognition and Prizes: The top contestants will receive recognition for their outstanding work, along with exciting prizes.
Contest Guidelines:
- Participants must use the provided HMI Board as the hardware platform for their projects.
- The project must be based on RT-Thread RTOS and the GUI development must be based on LVGL.
- Submissions should be original and developed specifically for this contest, and make it open source.
- Projects will be evaluated based on innovation, functionality, usability, and aesthetics.
Prizes:
First Prize: Cash Prize 5000 CNY *1
Second Prize: Cash Prize 2000 CNY *2
Third Prize: Cash Prize 500 CNY *5
🌐Stay Connected: Make sure to follow RT-Thread on our official media platforms to stay updated on the latest contest news, important updates, and helpful resources:
Twitter: https://twitter.com/rt_thread
Facebook: https://www.facebook.com/RT-Thread-IoT-OS-110395723808463
LinkedIn: https://www.linkedin.com/company/73004322
Youtube: https://www.youtube.com/channel/UCdDHtIfSYPq4002r27ffqPw
Join us in this exciting contest and let your creativity shine! This is a fantastic opportunity to showcase your GUI development skills, gain recognition, and win amazing prizes. Get ready to revolutionize the world of embedded systems!
From June 1st to June 3rd, developers from around the world gathered virtually for the 2023 RT-Thread Global Tech Conference. This annual event, organized by the Open Source RT-Thread Organization, brought together experts in AI, RISC-V, embedded systems, IoT, security, applications, development environments and tools, and industry insights to share their knowledge and experience.
The conference was a resounding success, with over 50 presentations(Global Session and China Session) and more than 30,000 online attendees. The presentations covered a wide range of topics and were given by experts and RT-Thread Community developers in their respective fields. Attendees had the opportunity to learn about the latest developments in RT-Thread basic software technology and innovative practices.
Some of the highlights of the conference included talks on the convergence of AI and IoT by Renesas, Infineon’s RT-Thread MCU support, RISC-V Everywhere, LVGL GUI, WCH RISC-V MCU, RT-Thread 5.0.0, RTOS vs Bare Metal from Eclipse Foundation, OpenHW Core V Ecosystem, AI and machine learning on embedded devices, PSA security certification for IoT systems, development tools for RT-Thread, and best practices for developing embedded applications. The conference also closely followed the theme of“Making Developers the Protagonists.”We were honored to have Stefan Nikolaj, Loay Yari, Hima Mullamangalam, Dr. Gu Yuanjie, Stanley Lwin, Md Khairul Alam Taifur, Narashiman P, Manzel Seet, Dr. Cheah Wei Leow, Juan Antonino Flores, and Zou Jiachi join us to share their amazing projects that work with RT-Thread. They also presented hands-on showcases where attendees could learn how to use RT-Thread to develop their own projects. Here we would like to express our heartfelt gratitude to all the partner speakers and developer speakers who shared their knowledge and expertise with us.
The conference was hosted by Clive Maxfield (Max), who introduced RT-Thread as an open-source embedded real-time operating system with a wealth of middle-tier components and a robust hardware and software ecosystem. Since its creation in 2006, RT-Thread has powered over 1.8 billion devices across a wide range of industries.
During the conference, several exciting new developments about RT-Thread were announced. These included the release of RT-Thread V5.0.0, which merges the RT-Thread Smart (Microkernel Version) branch onto the Main branch; the expansion of the RT-Thread Software Platform to offer over 600 software packages with over 11 million downloads; and the addition of over 335 BSPs on its platform.
The conference also featured a number of Partners and Media Partners. Partners included Renesas Electronics Corporation, Infineon Technologies, RISC-V Foundation, LVGL, STMicroelectronics, WCH Microelectronics, OpenHW Group, ISCAS, Eclipse Foundation, Arm, PSA Certified, and 100 ASK. Media Partners included CNX-Software, CSDN, Elecfans, Electromaker, HackerNoon, EmbeddedComputing, Hackster, Packt, and Embedded. Packt, and Singapore Metacamp, .
The 2023 RT-Thread Global Tech Conference was a huge success. The Open Source RT-Thread Organization would like to thank all speakers, partners, and attendees for making this event possible. We look forward to seeing you all again next year!


Mark your calendars for June 1st to June 3rd and get ready to be blown away by the 2023 RT-Thread Global Tech Conference! We can’t wait to share all the juicy details about this incredible event.
Don’t miss out — register for free here: https://bit.ly/404xwI5
Join us for a virtual adventure (Global Session) as we explore 26 fantastic topics in AI, RISC-V, embedded systems, IoT, security, applications, development environments and tools, industry insights, and so much more. Take a peek at the agenda below:
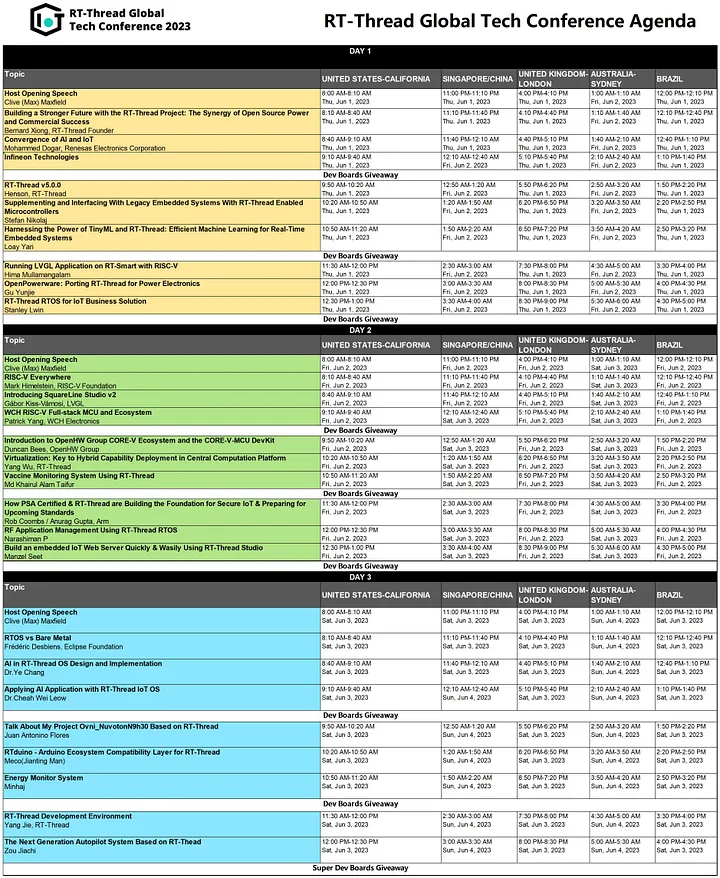

Dev Boards Giveaway
Win a Dev Board! We’re giving away RT-Thread inside Dev Boards to lucky participants randomly throughout the conference — three times a day! And on June 3rd, we’ll give away a Super Luxury Dev Board Package to include all types of dev boards. So stay tuned and keep an eye on the conference — you could be the lucky winner! Free register here: https://bit.ly/404xwI5
Registration Giveaway
1st Round of the 2023 RGDC Giveaway
We’re giving away Ten RISC-V Instruction Desk Mats to the Random Registration. Now register for the 2023 RT-Thread Global Tech Conference to get the chance to win the RISC-V Instruction Desk Mat: https://bit.ly/404xwI5
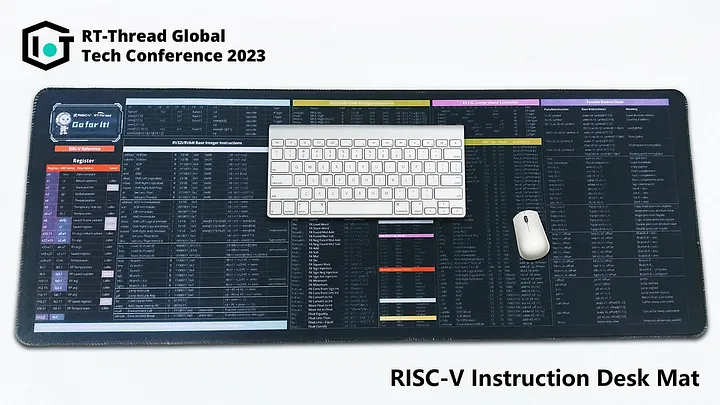
2nd Round of the 2023 RGDC Giveaway
Packt is sponsoring 5 e-books for 5 Lucky Registrations, free register to win: https://bit.ly/404xwI5
3rd Round of the 2023 RGDC Giveaway
RT-Thread is giving away 5 RT-Thread × Renesas × LVGL HMI Board for 5 Lucky Registrations for the 2023 RT-Thread Global Tech Conference, free register to win: https://bit.ly/404xwI5


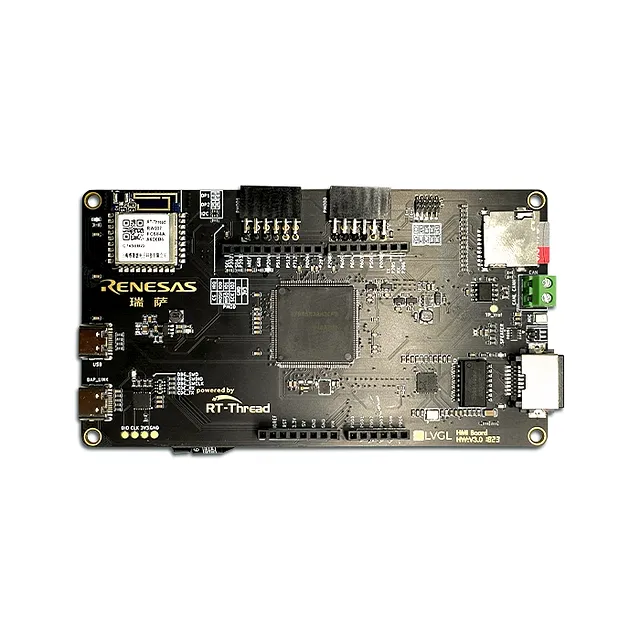

RT-Thread Contact Info:
Website: https://www.rt-thread.io
Github: https://github.com/RT-Thread
Twitter: https://twitter.com/rt_thread
Facebook: https://www.facebook.com/RT-Thread-IoT-OS-110395723808463
Youtube: https://www.youtube.com/channel/UCdDHtIfSYPq4002r27ffqPw
Introduction:
This is a high-cost-performance graphic evaluation kit brought to you by RT-Thread in collaboration with Renesas and LVGL. Say goodbye to traditional HMI + main control board hardware and hello to the full capabilities of HMI + IoT + control with just one set of hardware. With Renesas’ high-performance RA6M3 chip and RT-Thread’s software ecosystem at its core, the HMI Board packs a punch with its strong hardware performance and rich software ecosystem. This makes it easier than ever for developers to create cutting-edge GUI smart hardware products.Introduction:
This is a high-cost-performance graphic evaluation kit brought to you by RT-Thread in collaboration with Renesas and LVGL. Say goodbye to traditional HMI + main control board hardware and hello to the full capabilities of HMI + IoT + control with just one set of hardware. With Renesas’ high-performance RA6M3 chip and RT-Thread’s software ecosystem at its core, the HMI Board packs a punch with its strong hardware performance and rich software ecosystem. This makes it easier than ever for developers to create cutting-edge GUI smart hardware products.
But that’s not all. The HMI-Board comes equipped with a 2M Flash large-capacity main control chip RA6M3, featuring built-in modules like 2D acceleration, JPEG encoder/decoder, and LCD controller to help with graphic application development. Plus, with an onboard TFT display and audio interface, developers can flex their skills in the HMI field. And let’s not forget about IoT connectivity: the HMI-Board has an onboard Ethernet interface and high-speed WIFI module, keeping the development board connected to the cloud 24/7. The HMI-Board also supports various control methods, including CAN interface, Arduino interface, and two PMOD interfaces. This allows developers to easily expand various peripherals and achieve more flexible control methods. With the HMI-Board development board, creating GUI smart hardware products has never been easier.


Discover Its Amazing Advantages and Features:
When you hear “HMI screens,” what comes to mind? For many, it’s configuration screens or serial screens. These screens are known for their efficient GUI development and are widely used in industries such as automation and healthcare. But there’s a catch: the hardware cost for HMI + main control board mode can be high, and the GUI development can be simple and inflexible. That’s why RT-Thread has teamed up with Renesas and LVGL to introduce a new HMI Board development mode that replaces traditional HMI + main control board hardware. With just one set of hardware, you can achieve the full capabilities of HMI + IoT + control. And with Renesas’ high-performance RA6M3 chip and RT-Thread’s software ecosystem, the HMI Board boasts not only powerful hardware performance but also a rich software ecosystem. This makes it easier than ever for developers to create cutting-edge GUI smart hardware products.
Video Demo
Get it now for only $25 during our limited pre-sale (shipping fees not included).
Take advantage of our special price from May 16th to May 23rd, 2023. To reserve your board, simply fill out our form and we’ll send you an email with payment information once we receive your order. Please note that shipping fees are not included, but we’ve partnered with EMS to ensure affordable shipping rates.


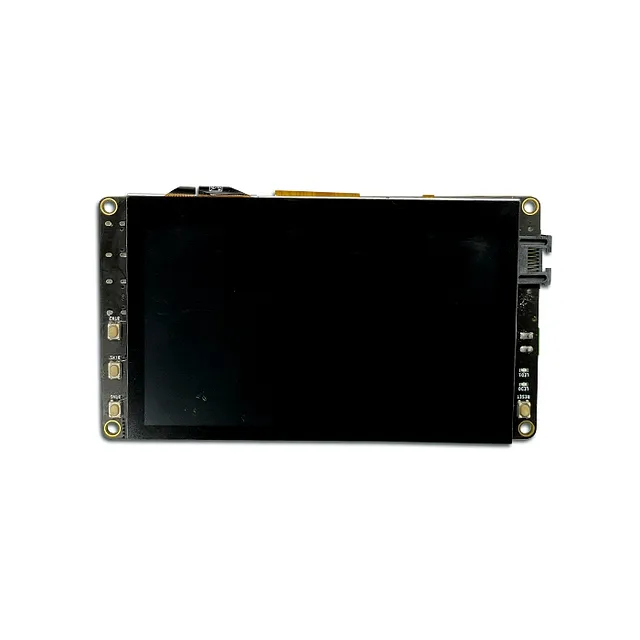
Hardware Framework

- RA6M3(R7FA6M3AH3CFB): Cortex-M4F core, 120Mhz main frequency, with 2MB Flash/640KB RAM, integrated TFT controller, 2D accelerator, and JPEG decoder.
- 4.3 inch LCD (RGB 888)
- On-board emulator
- Ethernet
- RW007 (SPI high-speed WIFI)
- USB-Device
- TF Card
- CAN
- 1 microphone, 1 speaker
- Arduino expansion interface
- 2 PMOD expansion interfaces
- 4 buttons: 3 user buttons, one reset button
Extension Interface Description
The HMI-Board has rich expansion interface support, including one Arduino interface and two PMOD interfaces. The specific pin definitions are as follows:

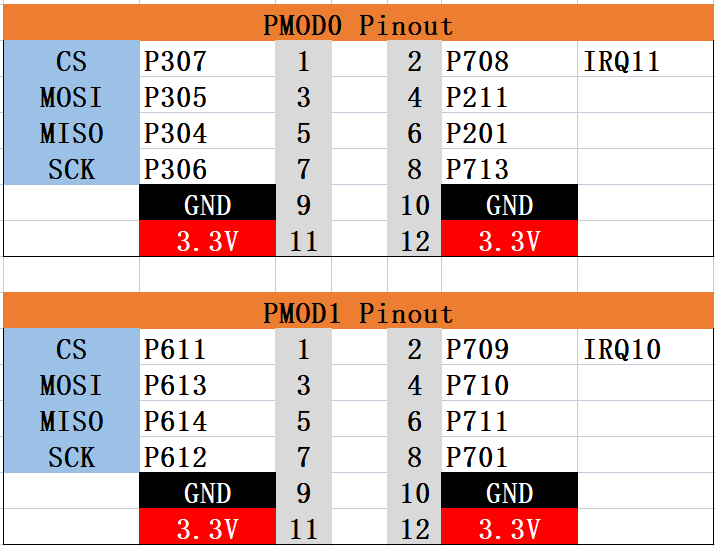
Development Board Example List
The HMI-Board comes pre-burned with the RT-Thread 5.0.0 release version and has the Finsh component enabled by default (connected to the DAP-Link virtual serial port). It also comes with a series of demo examples.
● LVGL official demo
● Video player
● Factory firmware
There is also a series of examples scheduled to be added soon.
● OTA remote upgrade
● Ardunio compatibility layer
● Webnet gateway: Built-in web server, after successful networking, it can display basic information about the development board through a web page and perform simple control of the onboard LED of the development board. And display the control results on the screen in real time.
RT-Thread is giving away 5 RT-Thread × Renesas × LVGL HMI Board for 5 Lucky Registrations for the 2023 RT-Thread Global Tech Conference, free register to win: https://bit.ly/404xwI5

RT-Thread Contact:
Website: https://www.rt-thread.io
Github: https://github.com/RT-Thread
Twitter: https://twitter.com/rt_thread
Facebook: https://www.facebook.com/RT-Thread-IoT-OS-110395723808463
Youtube: https://www.youtube.com/channel/UCdDHtIfSYPq4002r27ffqPw

We’re thrilled to announce that the 2023 IoT Contest, organized by the Open Source RT-Thread Organization in partnership with NXP Semiconductors, STMicroelectronics, and WCH Electronics, has received an overwhelming number of entries. A huge thank you to everyone who entered and helped make this contest a success!
We’re thrilled to announce that the 2023 IoT Contest, organized by the Open Source RT-Thread Organization in partnership with NXP Semiconductors, STMicroelectronics, and WCH Electronics, has received an overwhelming number of entries. A huge thank you to everyone who entered and helped make this contest a success!
Out of the many applications we received, 75 entries have been selected to participate in the contest. If your proposal wasn’t chosen this time around, don’t worry! Stay tuned to RT-Thread for more contests and opportunities in the future.
In other exciting news, the 2023 RT-Thread Global Tech Conference will be held from June 1st to June 3rd. This conference brings together developers from around the world to focus on the latest developments in RT-Thread basic software technology and innovative practices. Our goal is to help developers perfect their skills, encourage the use of technology to create value, and provide a platform for communication and collaboration. Register for free to join us: https://bit.ly/404xwI5

A big congratulations to our final participants! An email has been sent to you with further details. If you don’t see it in your inbox, be sure to check your junk mail folder.
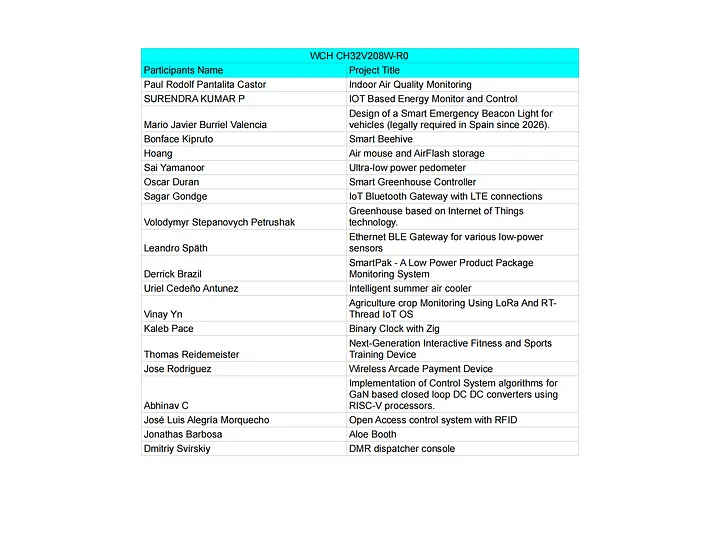
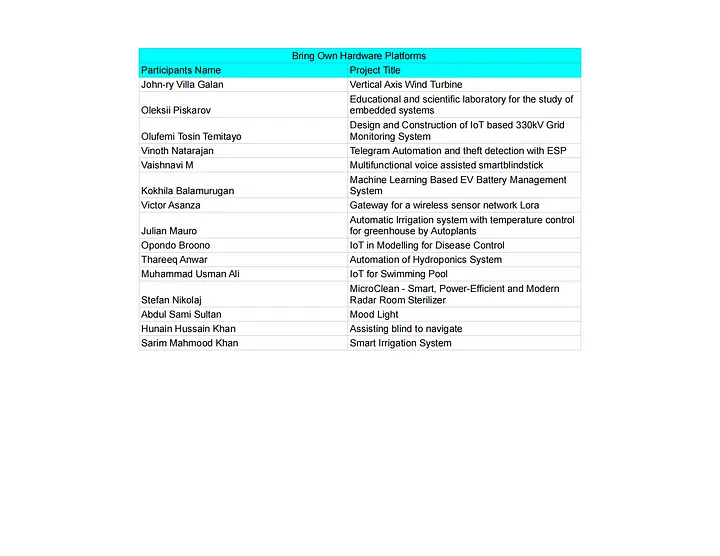
RT-Thread Contact:
Website: https://www.rt-thread.io
Github: https://github.com/RT-Thread
Twitter: https://twitter.com/rt_thread
Facebook: https://www.facebook.com/RT-Thread-IoT-OS-110395723808463
Youtube: https://www.youtube.com/channel/UCdDHtIfSYPq4002r27ffqPw

The RT-Thread Global Tech Conference (RGTC) is an annual event that brings together developers from around the world to focus on the latest developments in RT-Thread basic software technology and innovative practices. Our goal is to help developers perfect their skills, encourage the use of technology to create value, and provide a platform for communication and collaboration.
The RT-Thread Global Tech Conference (RGTC) is an annual event that brings together developers from around the world to focus on the latest developments in RT-Thread basic software technology and innovative practices. Our goal is to help developers perfect their skills, encourage the use of technology to create value, and provide a platform for communication and collaboration.
In 2022, the RGTC lasted for six action-packed days, with two sessions: one in China from May 27th to May 29th and a global session from June 1st to June 3rd. With over 60 presentations and more than 20,000 attendees, it was a resounding success.
In 2023, we’re continuing our commitment to collaborating with developers to help them gain knowledge, exchange information, and share best practices. The conference will be held online from June 1st to June 3rd and is completely free to attend. Don’t miss out on this amazing opportunity!
Time: June 1- June 3, 2023, Online & Free
Free Register: https://bit.ly/404xwI5
1st Round of the 2023 RGDC Giveaway
We’re giving away Ten RISC-V Instruction Desk Mats to the Random Registration. ��� Now register for the 2023 RT-Thread Global Tech Conference to get the chance to win the RISC-V Instruction Desk Mat: https://bit.ly/404xwI5
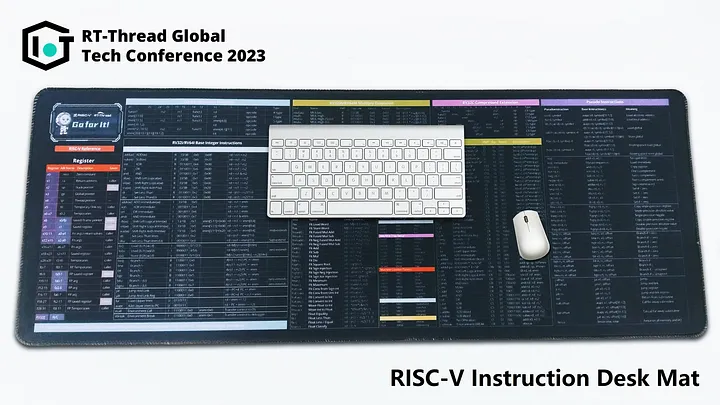
2nd Round of the 2023 RGDC Giveaway
Packt is sponsoring 5 e-books for 5 Lucky Registrations, free register to win: https://bit.ly/404xwI5

3rd Round of the 2023 RGDC Giveaway
RT-Thread is giving away 5 RT-Thread × Renesas × LVGL HMI Board for 5 Lucky Registrations for the 2023 RT-Thread Global Tech Conference, free register to win: https://bit.ly/404xwI5
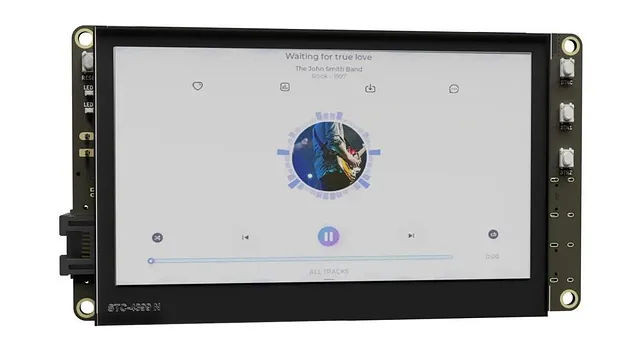
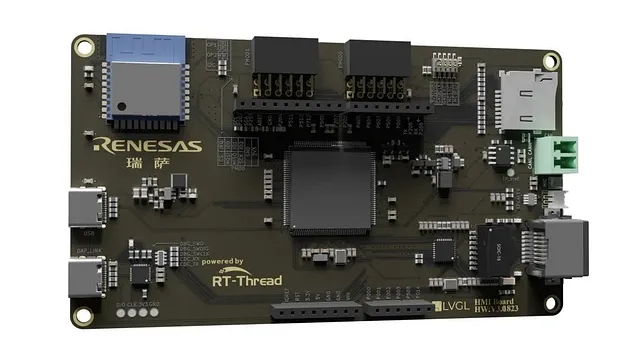
RT-Thread Contact:
Website: https://www.rt-thread.io
Github: https://github.com/RT-Thread
Twitter: https://twitter.com/rt_thread
Facebook: https://www.facebook.com/RT-Thread-IoT-OS-110395723808463
Youtube: https://www.youtube.com/channel/UCdDHtIfSYPq4002r27ffqPw
We’re so delighted to share with you that the RT-Thread v5.0.0 is officially launched.
We’re so delighted to share with you that the RT-Thread v5.0.0 is officially launched.
➢ RT-Thread Source Code:
➢ RT-Thread v5.0.0 Release Note:
RT-Thread 5.0.0 merges the RT-Thread Smart(Microkernel Version) branch onto the Main branch, so the RT-Thread Smart will be maintained with the mainline version in the future; v 5.0.0 adds RT-Thread Smart features and supports user mode; In addition, in order to add atomic characteristics, the scheduler file is functionally split; At the component level, the tmpfs file system is added, musl libc is supported, and POSIX support has been improved. At the BSP level, about 40+ BSPs have been added to v5.0.0.
For more details about the release notes, please click Here.
RT-Thread Smart on V5.0.0
Enable the Smart features on RT-Thread, the project becomes a hybrid microkernel operating system, referred to as RT-Smart or Smart. RT-Smart separates the application from the kernel to form a separate user-mode application with a separate address space (4G independent address space on 32-bit systems). Here are the detailed instructions for using the Smart on version 5.0.0:
RT-Smart Platform
Supported BSP List:
● qemu-vexpress-a9
● qemu-virt64-aarch64
● qemu-virt64-riscv
● raspberry-pi
● imx6ull-100ask-smart
● imx6ull-artpi-smart
Enable RT-Smart
Open the RT-Thread source code, open Env in the BSP path that supports Smart, configure the Smart feature, and enable “RT-Thread Kernel→ Enable RT-Thread Smart (microkernel on kernel/userland)”:
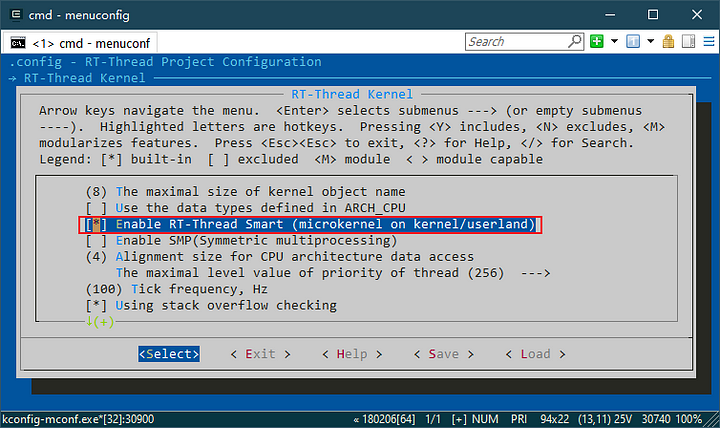
Smart User-mode Application Feature
Smart user-mode applications are independent of the kernel and do not exist in RT-Thread source code, and the user-mode application functions as follows:
● Support basic application loading
● Support POSIX PSE51 standard interface
● Support peripherals
● Support network function
● Support RT-Thread native interface
● Support for GNU applications
Smart User-mode Application Example
User-mode applications are located at https://github.com/RT-Thread/userapps, and the following is an application example:
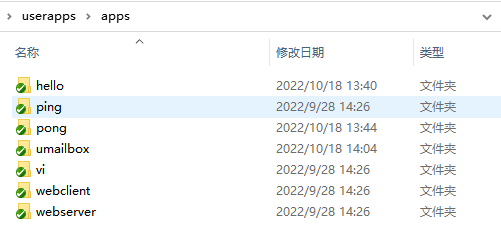
Compile Application
Use scons for compilation in the userapps directory, when the compilation is successful, you will get a series of executable elf files in the root folder, as shown in the figure below, which is the executable file generated by the compilation of multiple user-mode application examples under userapps.
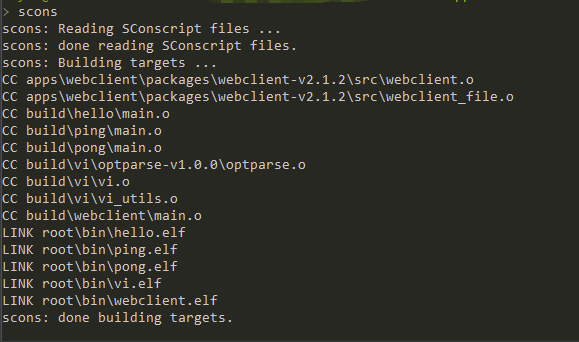
Create SD Card
In the userapps\tools\fatdisk directory, there is a FAT Format tool `fatdisk.exe` to package files in FAT format, which we can use to package the files we want to store in the QEMU SD card into sd.bin files.
Copy the root directory under userApps to the env\tools\fatdisk directory, and double-click to execute fatdisk.exe to generate a new sd.bin file.
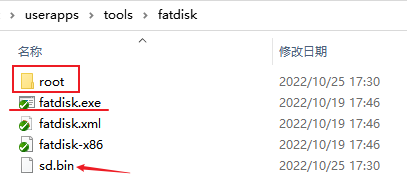
RT-Smart on VSCode
RT-Smart is supported on Visual Studio Code, open the vscode, and search “rt-thread smart” in the extension, and click Install to get the RT-Smart plugin on vscode.
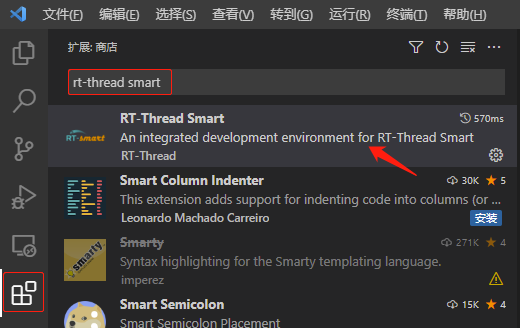
The smart plug-in SDK management interface is as follows
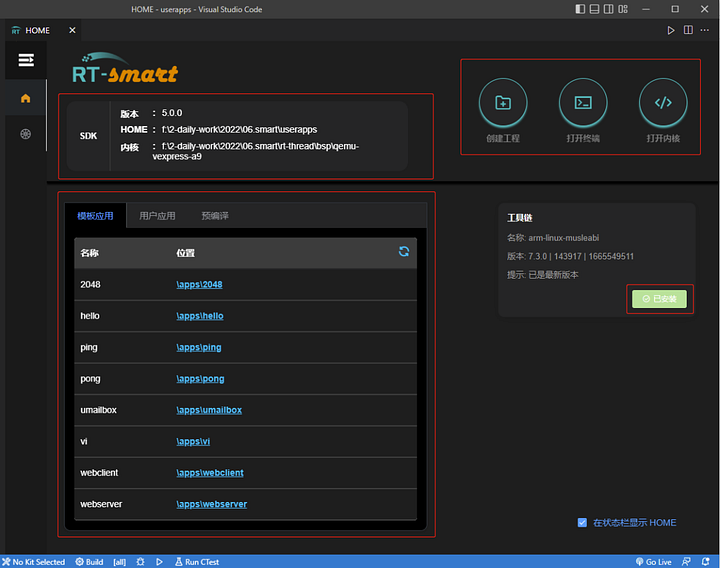
Open the application and start compiling and installing the application.
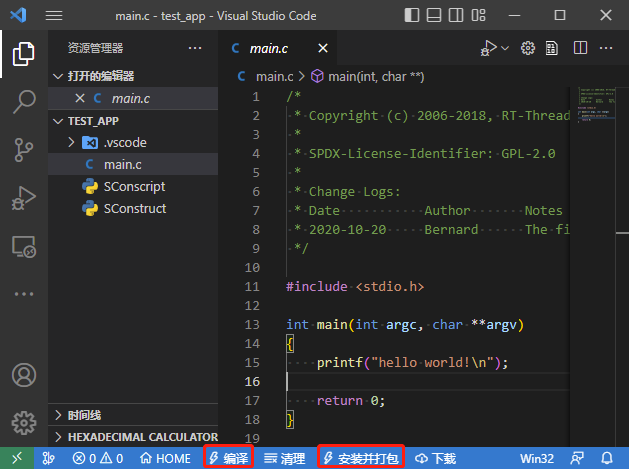
Smart Toolchain Download
In Smart toolchain
- Method 1: Use the command to download under the userapps/tools path: python get_toolchain.py [platform]
- Method 2: Click “Install Toolchain” in the Smart plugin.
Smart on GNU Applications
Smart supports POSIX interfaces, so porting GNU to Smart is quite easy.
- Method 1: Manually add an application project and add GNU applications to the application project.
- Method 2: Use the RT-Thread Smart plugin to directly create an application project and add GNU applications.
v5.0.0 Contributors Highlight:
We very much appreciate the support from the Community and the Partners to make the new version arrrive. A huge thank you to ANDREW LI-Nordic, Alexey Brodkin, BreederBai, BruceOu, CaiYiming0503, Fan Yang, Frank Buss, Harrypotter-zhs, KurisaW, Lei Peng, Maihuanyi, Misthao, Moss, NU-LL, NationsHuanghanbin, SNOWA, ShaquilleLiu, Stanley Lwin, WCX, Wayne Lin, YangZhongQing, Yifan, Yifang, Ylne, Yohozzy, YuQi, Yunjie Gu, ZXY_LINUX, Zhang WenBin, Zxy, a1012112796, andrew li, betesla, bin, breederbai, bzrobotics, ccx-lan, chenbin182, chenhy0106, childerxxx, chinky, emuzit, fan.ji, flyingcys, goldengrandpa, hg0720, jonas, kylongmu, letian, lhylhylhy6, liYony, linshire, liyangyang, lpy, luobeihai, mingmiaojing, myshow2258, myshowtogo, self-confident neko, sheltonyu, slhuan, songw4232, spaceman, supperthomas, tangzz98, tuduweb, vandoul, wangfuan, wdfk-prog, winfenggao, xiao xie, xiaoguang_ma, xjy, xqyjlj, xuhonghao, yandld, yangfasheng, yuanzihao, zhaohaisheng, zhugengyu, zilong, huifeidezhu, dadundexiaofangche, yang xi, liangsheng, luosisongdiaoderen, zhushicheng, man jianting(Meco), NXP, Renesase, WCH, Nuvoton, Nationstech, Geehy, XHSC, Mindnotion, Artery Technology, Qingdao Eastsoft, Bouffalo, Openluat, FeiTeng, Institute of Software Chinese Academy of Sciences PLCT Lab. Thank you all.
Welcome to experience v5.0.0 and feedback on any of your ideas!
Visit our main repository and give it a star⭐ if you haven’t already: https://github.com/RT-Thread/rt-thread
2023 RT-Thread Global Tech Conference Registration Opens. We welcome engineers from all over the world to join an exclusive journey to learn all about the latest advancement in IoT and embedded development!
Free Register: https://bit.ly/404xwI5

RT-Thread Contact:
Website: https://www.rt-thread.io
Github: https://github.com/RT-Thread
Twitter: https://twitter.com/rt_thread
Facebook: https://www.facebook.com/RT-Thread-IoT-OS-110395723808463
Youtube: https://www.youtube.com/channel/UCdDHtIfSYPq4002r27ffqPw

Dear Participants. On behave of the Contest Partners and Contest Host of the Embedded GUI Event, we want to send a massive thanks to anybody who participated in our contest and helped make it a success! Thank you all for your creativity and passion which is evident in each project you turned in!
We’re proud to announce our Winners.
1st Prize:
Fabian Näf
VUHFRadio https://github.com/NotBlackMagic/VUHFRadioGUI
2rd Prize:
Marcelo Varanda
Guitar Pedals https://github.com/Varanda-Labs/rt-thread/tree/guitar-pedals
Qiao Jijun
Desktop Electronic Albums https://github.com/piaoxuebingfeng/rt-thread-lvgl-album
3rd Prize:
Yu Jianghao
On-board ADAS Driver Assistance Panel https://github.com/CoreBoxer/ADAS_panel
Juan antonino flores
A Protocol for Lot Control of Different IoT Devices https://github.com/jeancode/Ovni_NuvotonN9h30/
Ding Ning
Smart Control Gateway https://github.com/dingning/rt1060_lvgl.git
Cheng Jili
Portable Device Inventory Management System https://github.com/chengjili/components-lib
Song Yituo
ElectronBili https://gitee.com/sytnocui/ElectronBili
Thanking each of you for trusting us and supporting us to date. Our upcoming contest will start soon. Get ready, you just might be the subsequent winner.
RT-Thread Contact:
Website: https://www.rt-thread.io
Github: https://github.com/RT-Thread
Twitter: https://twitter.com/rt_thread
Facebook: https://www.facebook.com/RT-Thread-IoT-OS-110395723808463
Youtube: https://www.youtube.com/channel/UCdDHtIfSYPq4002r27ffqPw
RT-Thread Env is an auxiliary tool with a TUI (Text-based user interface) used to create an RT-Thread project.
Release Notes:
- Fix concurrent compile issue (scons -j12) and add the win32py module
- Python 2.7.18 (the final version of the Python2, 32-bit/64-bit)
- gcc-arm-none-eabi-10.3–2021.10-win32
- Requests (2.27.1), scons (3.1.2) modules upgraded to the latest
- Other built-in modules, pip installation modules upgraded to the latest
Download RT-Thread Env: https://www.rt-thread.io/download.html?download=Env
RT-Thread Env tutorial video: https://youtu.be/dEK94o_YoSo
Visit our main repository and give it a star⭐ if you haven’t already: https://github.com/RT-Thread/rt-thread
RT-Thread Contact:
Website: https://www.rt-thread.io
Github: https://github.com/RT-Thread
Twitter: https://twitter.com/rt_thread
Facebook: https://www.facebook.com/RT-Thread-IoT-OS-110395723808463
Youtube: https://www.youtube.com/channel/UCdDHtIfSYPq4002r27ffqPw
Today, we’re introducing RT-Thread V4.1.1. This release adds support for some new performance and fixes some issues.
We want to acknowledge and thank the following community members for their contributions to RT-Thread, they are:
100ask-Alen, Aligagago, BreederBai, BruceOu, CaocoWang, Chester guo, Dengguiling, Fan Yang, Forest-Rain, FrankTan, Freey0, GPSBabel, GUI, HubretXie, Isaac Rose, Jamie, Jiang Runnan, Jianhui Zhao, JonasWen, Judd, Kevin Liu, Martin, Meng, Miaowulue, MysticBoy, NationsHuanghanbin, Not Black Magic, Stanley Lwin, Steven-LiuSF, SunJ, Ting Liu, Wayne Lin, Wu Han, Yang sheng, Yanlineng, Yunjie Gu, Zhang Jianfei, a1012112796, blta, breederbai, cha331, changzehai, charlown, chenbin, chinky, chunyexixiaoyu, cmbjxxiao, dongly, emuzit, gbcwbz, hipeanut, jianbojason, jiezhi320, levizhxl, lgnq, liyangyang, liuhy, luhuadong, qipingqiu, rewine, ririyeye, sheltonyu, shinu, shiwa, snikolaj, solar_li, supperthomas, tangzz98, tfx2001, thewon86, ueJone, wang0huan, wolfJane, woody, wudiyidashi, wugensheng, xfwangqiang, xiaoxiaolisunny, xinyigao, xjy198903, zhouji, zuozuojia, DaDunDeXiaoFangChe, Liang Sheng, Chen Yingchun and Meco. NXP Semiconductors、Renesas Electronics、WCH Electronics、Nuvoton Technology、Nations Technologies、HPMicro、Geehy Semiconductor、XIAOHUA Semiconductor、Qingdao Eastsoft, and Chinese Academy of Sciences PLCT Laboratory.
Thanks to all contributors and companies who share their time, energy, and talent to help RT-Thread. Thank you very much!
1、Kernel
The kernel part adjusts the following settings according to the usage requirements:
- Adjust the default stack size space for 64-bit CPUs
- Tick clock adjustment, set the default Tick frequency to 1000Hz
- Add secure STDLIB functions and replace the implementation of STDLIB in the C library by default
- Optimize for scheduling scenarios for multiple threads according to priority and time slice
2、Components
The component section continues to be optimized according to the existing main line, including:
- SFUD updates to accommodate more FLASH
- Continuous updates to the POSIX interface
- Device driver content updates, updates related to serialundefined sdioundefined wlan, and so on
- The AT command is supported as the SERVER side of the network and has been sampled using the ESP8266 module
- Testcase adds C++, a test case for a commonly used interface for POSIX
3、CPU&BSP
Support for BSP:
- Add support for an Infineon development board, the cypress board CY8CKIT-062S2–43012
- Improve qemu emulator and simulator emulator, simulator emulator has been added and adapted to sal functions on Windows and can be used for network programming work
- Maintenance and upgrade of existing BSPs, including ST, WCH, Nuvoton, Nations Technologies, Geehy Semiconductor, ChipOn, and many other development boards
- Compared to the RT-Thread V4.1.0, this version has more support for the Arduino software compatibility layer, several development boards are now supporting the Arduino software
New Added BSP:
- at32f413, at32f415-start, at32f435-start, at32f437-start
- cypress-psoc6-cy8cproto-4343w
- ESP32_C3
- gd32vf103r-start, gd32vf103v-eval
- hc32f4a0
- imxrt1021-nxp-evk, imxrt1170-nxp-evk
- rockchip-rk3568
- microchip, samc21, same54, same70, saml10
- n32g45xvl-stb
- ch32v103r-evt, ch569w-evt, ch32f103c8, ch32f203r-evt
- stm32f103–100ask-mini, stm32f103–100ask-pro, stm32wle5-yizhilian-lm402
4、Tools
- Take PLATFORM to replace CROSS_TOOL to differentiate between different compilation platforms
- Add support for the xmake toolchain, to compile projects using the xmake tool
For more details please check out the Release Log
Download V4.1.1: https://github.com/RT-Thread/rt-thread/releases/tag/v4.1.1
Visit our main repository and give it a star⭐ if you haven’t already: https://github.com/RT-Thread/rt-thread
RT-Thread Contact:
Website: https://www.rt-thread.io
Github: https://github.com/RT-Thread
Twitter: https://twitter.com/rt_thread
Facebook: https://www.facebook.com/RT-Thread-IoT-OS-110395723808463
Youtube: https://www.youtube.com/channel/UCdDHtIfSYPq4002r27ffqPw

The 6-day long RT-Thread Tech Conference started on May 27 for the China Session 3 days and on June 1 we continued the Global Session. The 6-day long event closed on June 3, has a total of 60 topics featured, and with over 22000 online attendees. We’re so grateful with the enthusiasm and contribution that comes from community contributors, manufacturing partners, universities, and enterprises.
It's every one of you making the open-source RT-Thread IoT OS project powerful. Wish all of us a lot of enthusiasm, energy, shared trust, and resolve on our way towards achieving a better future for open source.
Welcome to build, contribute, submit PR, and anything to help RT-Thread grows! RT-Thread Github Repository: https://github.com/RT-Thread/rt-thread
If you missed the event, here's a recap: https://youtu.be/vvfbXh8RAl0
The slides will be shared on RT-Thread Club soon, join the Club. https://club.rt-thread.io/
RT-Thread Contact Info:
Website: https://www.rt-thread.io
Github: https://github.com/RT-Thread
Twitter: https://twitter.com/rt_thread
Facebook: https://www.facebook.com/RT-Thread-IoT-OS-110395723808463
Youtube: https://www.youtube.com/channel/UCdDHtIfSYPq4002r27ffqPw

As the time for the 2022 RT-Thread IoT OS Global Tech Conference approaches, we’re happy to attach more details to this conference so you’ll know what to expect.
Free Register: http://bit.ly/3GNujSQ
The virtual conference will feature 29 trending topics, starting from June 1 to June 3. Here’s the Agenda:
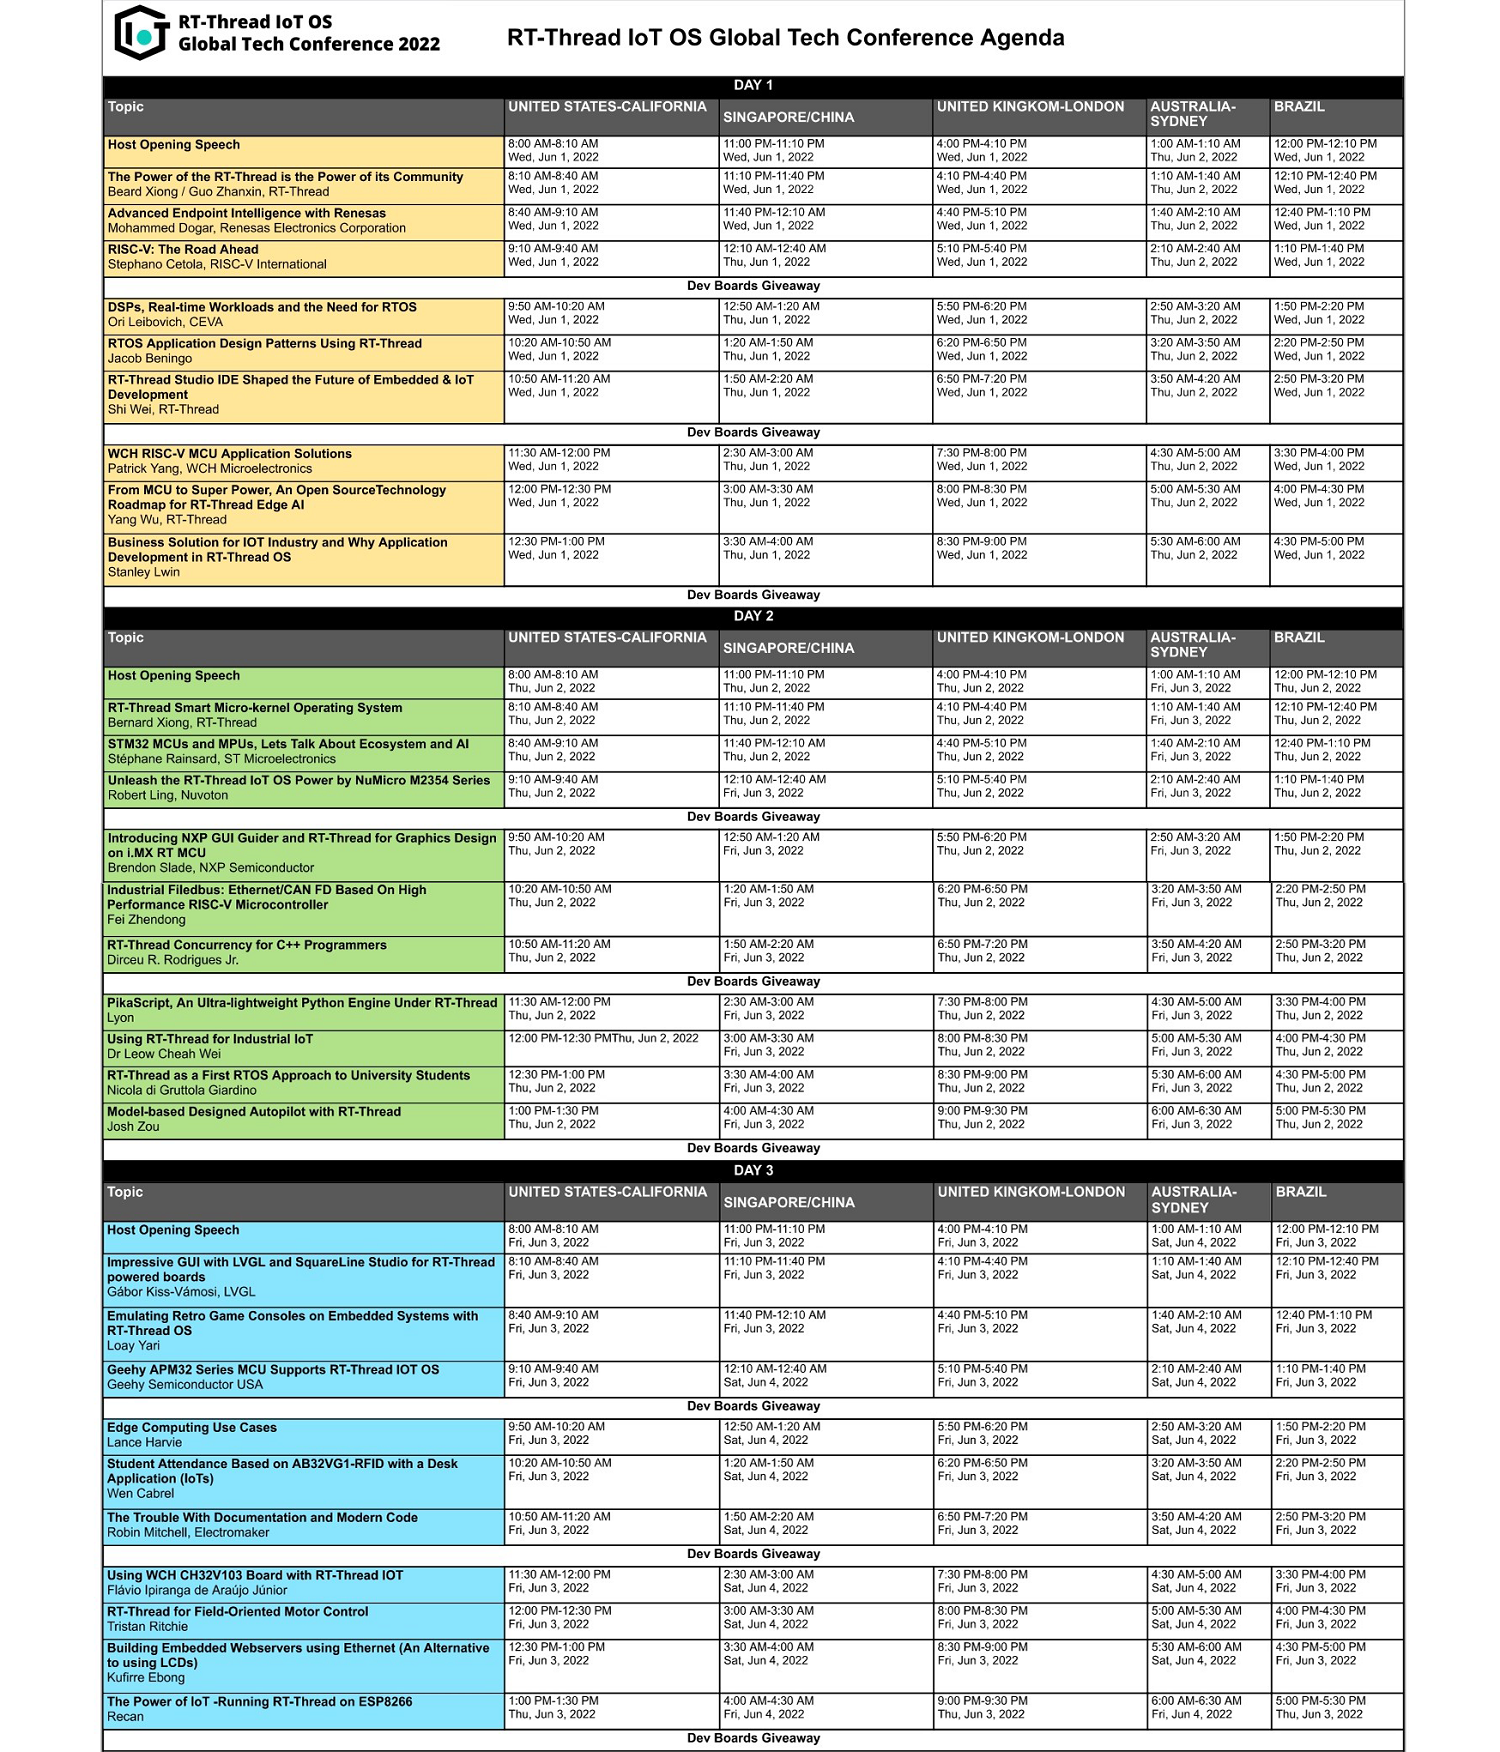
Dev Boards GiveAway
We’ll randomly giveaway the RT-Thread inside Dev Boards for participants, each day 3 times, and on June 3, we’ll have a Super Luxury Dev Boards Package to give away, so keep closely with the conference and stay tuned, you’re the lucky one!
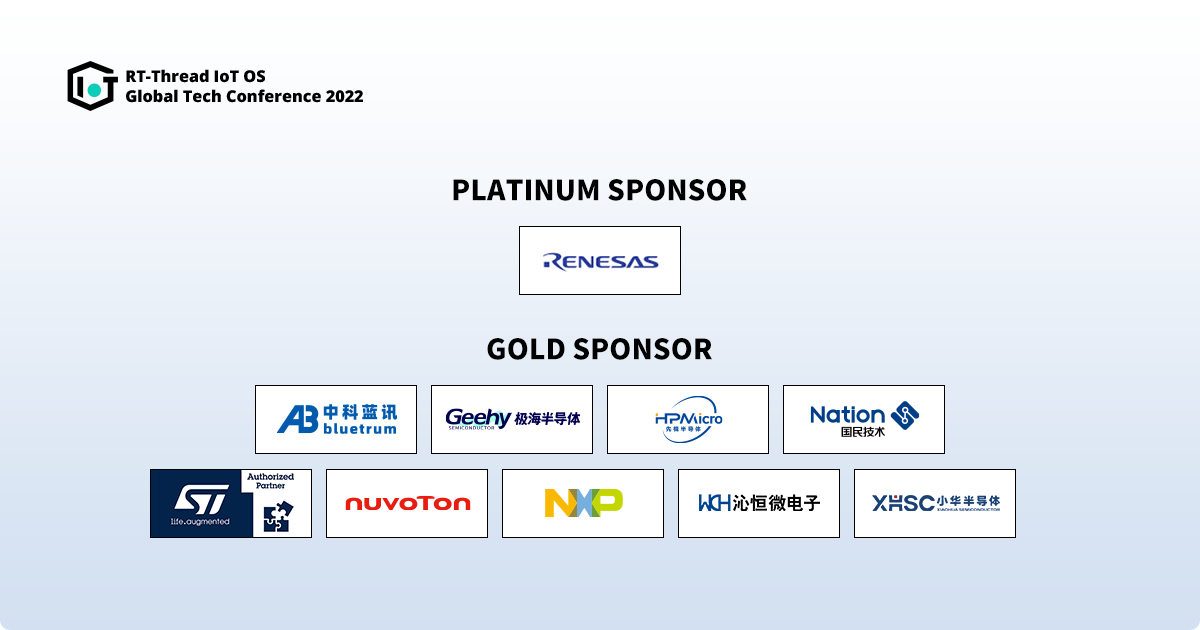
If you haven’t registered for the conference, click here to join us, and save the calendar! Free Register: http://bit.ly/3GNujSQ
About Open Source RT-Thread IoT OS Project
RT-Thread is an embedded real-time operating system, with its rich middle-tier components and great hardware & software ecosystem delivering great support for the Internet of Things (IoT) industry. Born in 2006, till now, RT-Thread has powered 1.5 Billion devices, applied in Wearable Devices, Smart Home Appliances, Energy, Automotive Electronics, Medical Electronics, Consumer Electronics, and many other industries.
RT-Thread, a community-powered open source project, we also want to take this time to thank all contributors who shared their time, energy, and talent to help RT-Thread grow! Working alongside the 150K+ community developers strongly inspires RT-Thread to continue exploring and delivering the Best Class of IoT operating system.
Aims to Let Open-source Project Benefit More People!
RT-Thread Contact Info:
Website: https://www.rt-thread.io
Github: https://github.com/RT-Thread
Twitter: https://twitter.com/rt_thread
Facebook: https://www.facebook.com/RT-Thread-IoT-OS-110395723808463
Youtube: https://www.youtube.com/channel/UCdDHtIfSYPq4002r27ffqPw

2022 RT-Thread IoT OS Global Tech Conference is scheduled for June 1–2. We’re looking for cool and creative embedded and IoT ideas. Check out our call for proposals & apply today!
https://forms.gle/WUX6oGaVgzk7r6fb6
A quick recap of the 2021 RT-Thread IoT OS Global Tech Conference, please check out RT-Thread YouTube Channel: https://youtu.be/nFiuTqH1P7I
RT-Thread Contact:
Website: https://www.rt-thread.io
Github: https://github.com/RT-Thread
Twitter: https://twitter.com/rt_thread
Facebook: https://www.facebook.com/RT-Thread-IoT-OS-110395723808463
Youtube: https://www.youtube.com/channel/UCdDHtIfSYPq4002r27ffqPw

That’s a wrap! Thanks to 1500 People for registering RT-Thread IoT OS Global Tech Conference virtually on Sep16-Sep17. We had over 20 topics presented, featured on the open-source RT-Thread OS projects and the new development RT-Smart Micro-Kernel OS, RISC-V ecosystems and associated manufacturers introduced, STM32 ecosystems, embedded projects showcase, IoT security, trending technical knowledge such as AI, ROS, Rust, Micropython, and more!
Thanks to all speakers who shared their time and expertise! Thanks to all developers who attended this conference, posted comments to share with each other. Also, we want to thank the platform Dzone, Electronmaker, Embarcados, GFOSS, Hackernoon for helping us to share the conference.Thank you all for making this conference a huge success!
The recorded videos of each presentation will be shared soon. Make sure that you’re following RT-Thread social media platforms to stay up to date with everything that’s going on!
YouTube | Twitter | Facebook | LinkedIn
Please also take one minute to fill out the after-conference survey. Your feedback would be very precious and valuable for open source projects!
https://forms.gle/8LaoNUyWZsRvvdD2A
We also prepared the Embedded Get Started Guide E-Book for each participant, the E-book will be sent to your email right after receiving your email address from the survey form.
About RT-Thread IoT OS:
RT-Thread is an embedded real-time operating system, with its rich middle-tier components and great hardware & software ecosystem delivered great support for the Internet of Things (IoT) industry. Born in 2006, till now, RT-Thread has powered 1 Billion devices, applied in Wearable Devices, Smart Home Appliances, Energy, Automotive Electronics, Medical Electronics, Consumer Electronics, and many other industries.
RT-Thread, a community-powered open source project, we also want to take this time to thank all contributors who shared their time, energy, and talent to help RT-Thread growing! Working alongside the 100K+ community developers strongly inspires RT-Thread to continue exploring and delivering the Best Class of IoT operating system.
Aims to Let Open-source Project Benefits More People!
RT-Thread Contact:
Website: https://www.rt-thread.io
Github: https://github.com/RT-Thread
Twitter: https://twitter.com/rt_thread
Facebook: https://www.facebook.com/RT-Thread-IoT-OS-110395723808463
Youtube: https://www.youtube.com/channel/UCdDHtIfSYPq4002r27ffqPw
As the time for RT-Thread IoT OS Global Tech Conference approaches, we’re happy to attach more details to this conference so you’ll know what to expect. The virtual conference will feature 20+ trending topics, range from the latest developments in open-source RT-Thread IoT OS projects to new fields of activities.
Join us Now: https://bit.ly/3zb5E7c
As the time for RT-Thread Io OS Global Tech Conference approaches, we’re happy to attach more details to this conference so you’ll know what to expect. The virtual conference will feature 20+ trending topics, range from the latest developments in open-source RT-Thread IoT OS projects to new fields of activities.
Join us Now: https://bit.ly/3zb5E7c
Agenda:
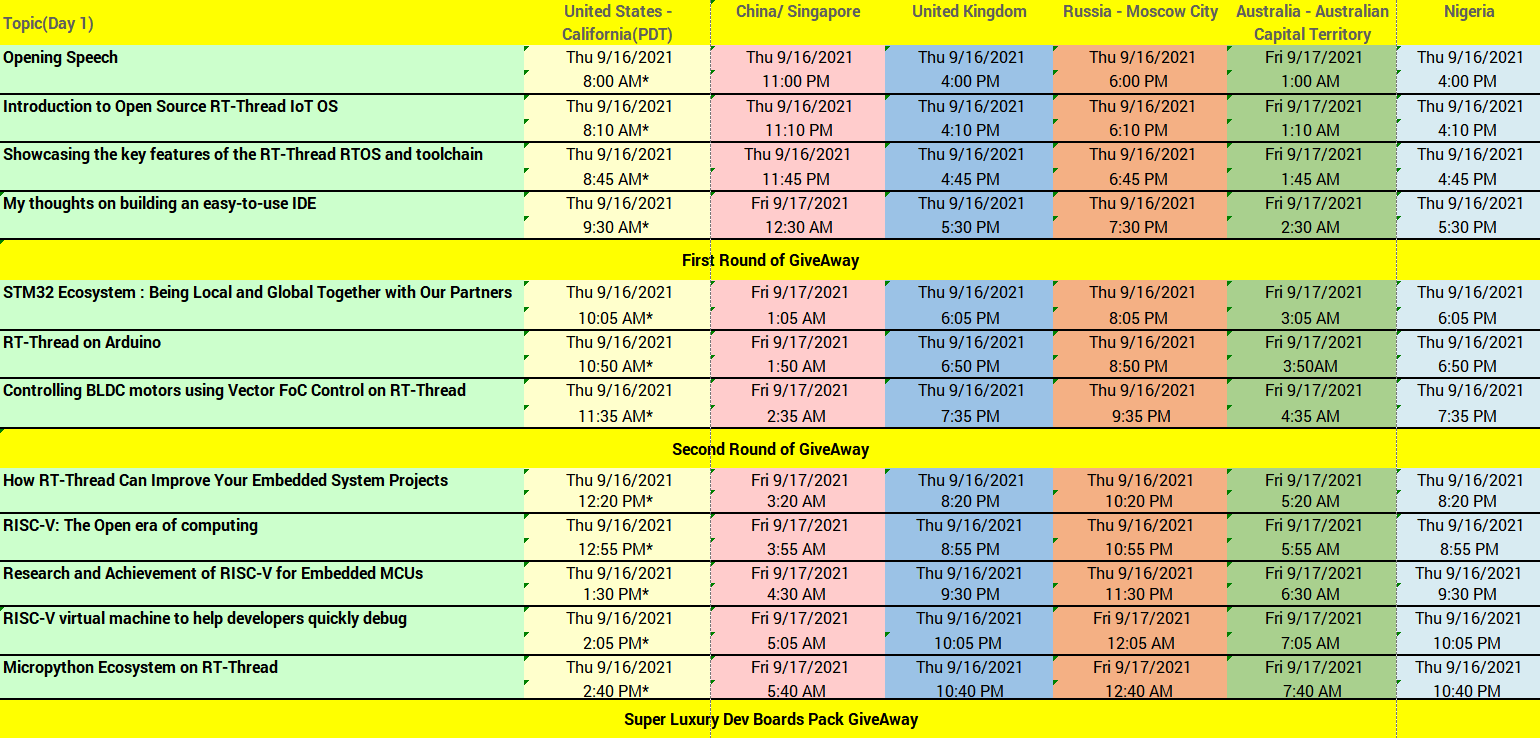

Join us Now: https://bit.ly/3zb5E7c
GiveAway:
1. All participants will receive an Embedded Get Started Guide E-Book after the conference.
2. Dev Boards GiveAway
We’ll randomly giveaway the RT-Thread inside Dev Boards for participants, each day for 5 times, 3 times in a random time during the conference and 2 times in a fixed time as listed on Agenda, so keep closely with the conference and stay tuned, you’re the lucky one!
3. Super Luxury Dev Boards Pack GiveAway
At the end of the day, we’ll give away A Super Luxury Dev Boards Pack that includes many Super Cool Dev Boards.
If you haven’t registered for the conference, click here to join us, and save the calendar! Free Register: https://forms.gle/8W1j2ZhCSLKFfyFQ8
RT-Thread IoT OS Global Tech Conference Partners:


RT-Thread Contact Info:
Website: https://www.rt-thread.io
Github: https://github.com/RT-Thread
Twitter: https://twitter.com/rt_thread
Facebook: https://www.facebook.com/RT-Thread-IoT-OS-110395723808463
Youtube: https://www.youtube.com/channel/UCdDHtIfSYPq4002r27ffqPw
The first-ever RT-Thread IoT OS Global Tech Conference will be holding from September 16–17,2021 features embedded technologies, new projects showcase, community contributors track. We welcome embedded developers from across different countries to come together to exchange ideas, showcase projects, identify solutions, discuss future strategies, and provide mutual learning opportunities on a wide variety of topics, let’s exploring embedded technologies.
Free Register: https://forms.gle/8W1j2ZhCSLKFfyFQ8
About RT-Thread:
RT-Thread is an embedded real-time operating system, with its rich middle-tier components and great hardware & software ecosystem delivered great support for the Internet of Things (IoT) industry. Born in 2006, till now, RT-Thread has powered 1 Billion devices, applied in Wearable Devices, Smart Home Appliances, Energy, Automotive Electronics, Medical Electronics, Consumer Electronics, and many other industries.
RT-Thread, a community-powered open source project, we also want to take this time to thank all contributors who shared their time, energy, and talent to help RT-Thread growing! Working alongside the 100K+ community developers strongly inspires RT-Thread to continue exploring and delivering the Best Class of IoT operating system.
& Let open-source project benefits more people!
Call for Speakers 2021
The Call for Speakers is Opening!
Submission Link:
https://forms.gle/ZFB3zww5spUWuziY6
Submission Deadline: August 8, 2021
Speaker Notification: August 16, 2021
Enquiry Email: contact@rt-thread.org
Register to Conference:
https://forms.gle/8W1j2ZhCSLKFfyFQ8
Some Photos of RT-Thread Community Activities in 2021:

Every Contribution Counts Tremendously For Open Source Community!
RT-Thread Contact:
Website: https://www.rt-thread.io
Github: https://github.com/RT-Thread
Twitter: https://twitter.com/rt_thread
Facebook: https://www.facebook.com/RT-Thread-IoT-OS-110395723808463
Youtube: https://www.youtube.com/channel/UCdDHtIfSYPq4002r27ffqPw
RT-Thread Studio IDE v2.1.0 is releasing! let’s head to see what’s NEW in its v2.1.0.
Make Your Own Board Supported Packages!
RT-Thread Studio V2.1.0 offers a tool associated with tutorials, which helps developers create the BSP visually. Developers can now easily make a board support package (BSP) and upload it online via SDK Manager. The BSP tool supports configuring graphically the information of dev boards, documentation, and projects. The prompt of every configuration item is shown in front of the interface to help you understand. Also, this time, the Studio team gives a sweet thought. They make the configuration information is available for preview! Check out this tutorial to make a BSP by yourself.
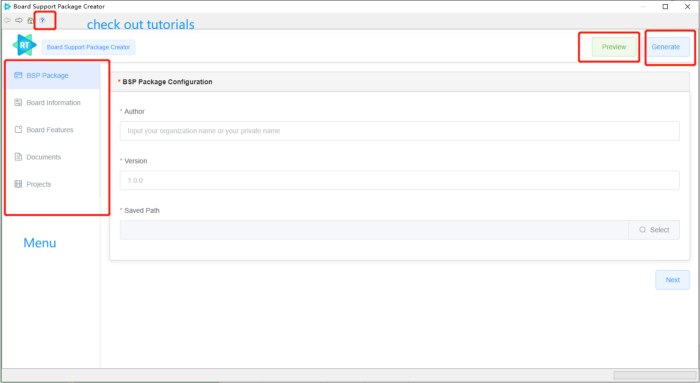
40+ Fresh BSPs Online
More than 40 New board support packages are supported in RT-Thread Studio V2.1.0, so we now have a total of 70 BSPs, covering eight vendors such as Allwinner, AlphaScale, ArteryTek, Bluetrum, GigaDevice, MicroChip, MindMotion, NXP, ST, TI, Synwit. In particular, the RT-Thread V4.0.3 source resource pack has been added on RT-Thread Studio V2.1.0.
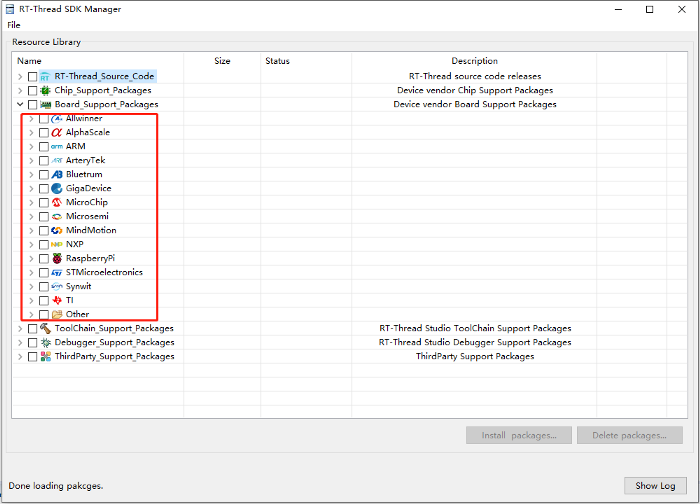
Support MDK Development
RT-Thread Studio v2.1.0 supports bilateral synchronous co-development with the MDK project. You can import an existing RT-Thread MDK project directly into RT-Thread Studio, and the configuration of the MDK will be automatically synchronized with the RT-Thread Studio project. RT-Thread Studio provides a bilateral synchronization mechanism that allows the project to switch between MDK and RT-Thread Studio at any time. The MDK configuration feature is also supported to perform configuration items such as C/C++, ASM, Linker and automatically synchronized with MDK projects when the configuration is completed. If you modify some configurations on the MDK, you can manually trigger synchronization at RT-Thread Studio to sync the modified configurations with RT-Thread studio projects.
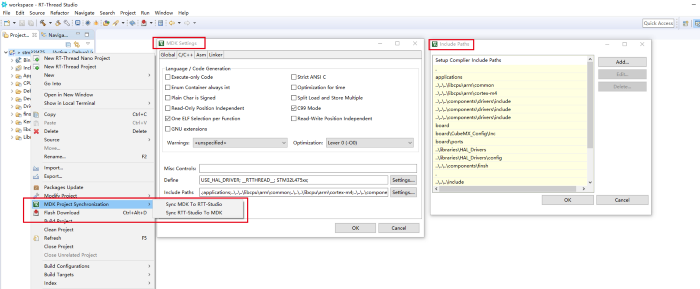
Support CubeMX Development
RT-Thread Studio v2.1.0 is also in collaboration with STM32CubeMX, where you can open CubeMX Settings directly in RT-Thread Studio. After configuration, click the button GENERATE CODE, and the code generated in CubeMX will automatically be copied into the RT-Thread Studio project directory, no further modifications are required. Then it is automatically added to the compilation. We only need to compile, download and debug programs as usual. Check out this tutorial for more information:
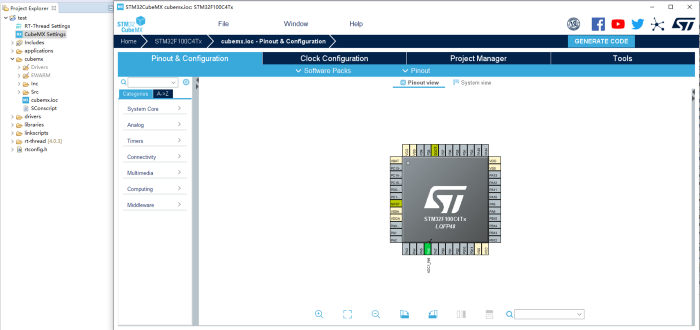
Perfect and Add A New QEMU Simulator
QEMU in RT-Thread Studio v2.1.0 has added two simulators for the stm32f401 and the stm32f410 series respectively. You can download the latest version of QEMU in SDK Manager. When configuring QEMU, select the emulator in the pull-down box of the Emulator configuration bar. The configuration interface has also made some updates: First, the configuration of the serial port was added in this version. When a different serial is selected, the standard IO device is relocated to the corresponding serial port. Second, SD Card Memory is now optional and compatible with situations where an SD card is not required. More importantly, the commands such as -show-cursor are moved to Extra Command, where you can customize the parameters of these commands to make QEMU more flexible to use.
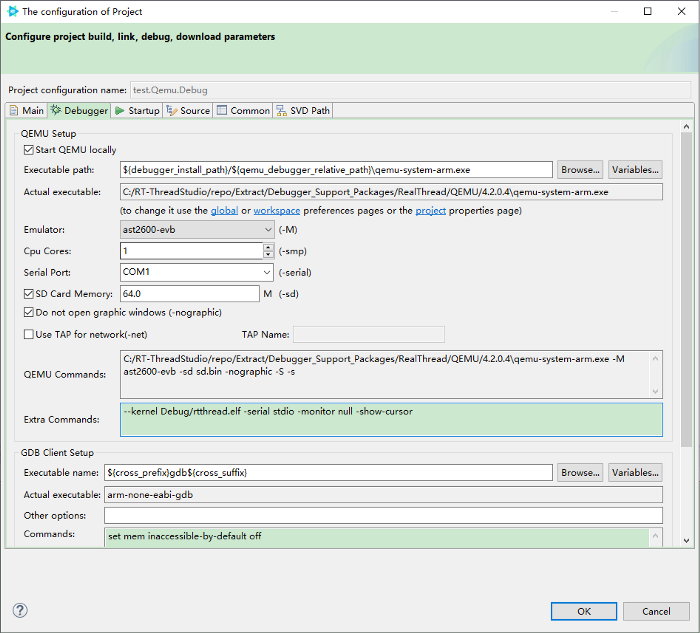
Download RT-Thread Studio V2.1.0
Ideas for RT-Thread Studio, talk with us.
Questions when using RT-Thread Studio, create a post to ask in RT-Thread Club!
RT-Thread Contact Info:
Website: https://www.rt-thread.io
Github: https://github.com/RT-Thread
Twitter: https://twitter.com/rt_thread
Facebook: https://www.facebook.com/RT-Thread-IoT-OS-110395723808463
Youtube: https://www.youtube.com/channel/UCdDHtIfSYPq4002r27ffqPw
The Raspberry Pi Pico is now an official target in the RT-Thread Studio IDE, and third-party RP2040 boards are likely to follow shortly.
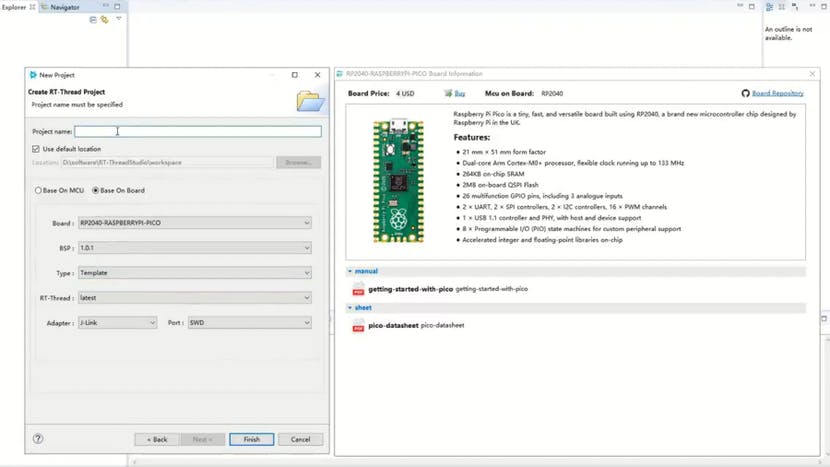
RT-Thread, an open source real-time operating system (RTOS) designed for the Internet of Things (IoT), has become the latest platform to boast support for Raspberry Pi's freshly-launched RP2040 microcontroller — and the increasing number of third-party development boards on which it appears.
Launched late last month, the RP2040 is the first microcontroller to come from Raspberry Pi — and the first product of its in-house application-specific integrated circuit (ASIC) team. Designed for high performance at a low cost, the part arrived with an official C/C++ software development kit (SDK) and MicroPython port — and since then a number of other platforms, including CircuitPython and Arduino IDE, have been confirmed, not to mention a wealth of RP2040-powered third-party boards to go alongside the official Raspberry Pi Pico.
Now, RT-Thread has confirmed that its open source real-time operating system (RTOS), which began development in 2006 and has been ported to architectures ranging from x86 and Arm to RISC-V and Xtensa, is supported on the RP2040 — and, by extension, on RP2040-based development boards including the Raspberry Pi Pico.
"Pico is now available in RT-Thread Studio IDE," the organization announced today. "[We're] looking to make Raspberry Pico development simple and all in one-stop."
At your request! @Raspberry_Pi PICO is now available in RT-Thread Studio IDE! Looking to make Raspberry Pico development simple and all in one-stop.
— RT-Thread IoT OS (@rt_thread) February 1, 2021
Meet the latest updates: https://t.co/vSqsQtMvoc#RP2040 #Embedded #OpenSource #Programming #RTOS pic.twitter.com/Qdc2nrPsbQ
The latest release of the RT-Thread Studio integrated development environment (IDE) allows the Raspberry Pi Pico to be selected as a target device for a project, bringing in the latest RT-Thread RTOS build and support for serial-wire debug (SWD) on the Pico's SWD header. Once third-party RP2040 boards hit the open market, they're likely to appear alongside the Pico in short order.
The latest version of RT-Thread Studio IDE, with RP2040 support, is now available on the official website.
Source: Gareth Halfacree
RT-Thread Contact Info:
Website: https://www.rt-thread.io
Github: https://github.com/RT-Thread
Twitter: https://twitter.com/rt_thread
Facebook: https://www.facebook.com/RT-Thread-IoT-OS-110395723808463
Youtube: https://www.youtube.com/channel/UCdDHtIfSYPq4002r27ffqPw
We are thrilled to announce the release of RT-Thread v4.0.3 at the beginning of 2021.
RT-Thread RTOS 4.0.3 Release Highlights
Kernel
- Add the global macro definition of
__RTTHREAD__ - Add options of algorithms for user stack
- Improve the stability of process scheduler in UP and SMP systems
- Clean the resources before the current thread exits.
- Fix bugs on kernel timer and IPC
- Fix the issue in
delay_util() - Remove invocations of
rt_system_object_init()andrt_system_tick_init()in kernel - Remove the configuration macro
RT_USING_FINSH
Components
Filesystem
- Add support for Device files in DFS
- Update elmfat to R0.14 patch 1
- Fix existing issues
Network Relatives
- Improve the SAL component, add the configuration option
SAL_INTERNET_CHECKto enable or disable network state check - Improve the AT component to support multiple network cards. Fix the issue of memory leak in some scenarios
- Improve the DHCP feature
- Fix existing issues
Driver Framework
- Add the interface
rt_pin_get()to PIN drivers - Update the RT-Thread PM framework to version 2.0
- Add more manufacturer types and customized commands support in sensor drivers
- Improve the USB framework. Fix the issues about USB HOST driver and device recognition in MAC OS
- Fix existing issues
BSP
- Add 15 BSPs for STM32 series
- Add 25 BSPs for non-STM32 chips
- Improve the drivers for STM32 BSPs
- Improve the loogson BSPs, add more drivers
- Improve raspi4–32 BSP, add drivers of DMA, BSC, DSI LCD/Touch, waveshare SPI LCD/Touch, Watchdog, HDMI, SDIO, GPIO interrupts
- Add READMEs in English for BSPs commonly used abroad
- Fix existing issues
Development Tool
- Add Studio IDE dist features for STM32 BSPs
- Add C++ support for Eclipse objects
- Keep the user-defined lib configuration after the execution of
--target=Eclipse - Optimize the process to generate
rtconfig.hby running scons--menuconfig - Update building.py and add the option
tackanalysis - Fix the error in
makeimg.pywhen running in Linux
Download RT-Thread v4.0.3 source code
Read Full Release Notes!
RT-Thread Contact Info:
Website: https://www.rt-thread.io
Github: https://github.com/RT-Thread
Twitter: https://twitter.com/rt_thread
Facebook: https://www.facebook.com/RT-Thread-IoT-OS-110395723808463
Youtube: https://www.youtube.com/channel/UCdDHtIfSYPq4002r27ffqPw
WE ARE IN DECEMBER and 2021 is just around the corner, we are so thrilled to release RT-Thread Studio v2.0 before the end of Dec 2020. First things first, we want to thank RT-Thread community developers who contributed their time, energy, and talent to help RT-Thread Studio progress by giving us feedback, great suggestions, and 100% supports.
RT-Thread Studio Integrated Development Environment (IDE) was launched in 2019, with a powerful graphic configuration system and 270+ out-of-box software packages, and a wide range of components resources. All of this offers a way for developers to simplify the complexity of software development. Now let’s head to New Features of RT-Thread Studio V2.0!
-General Project Wizard
V2.0 provides General Project Wizard to support more platforms, frameworks, boards, examples and libraries.
-Support remote J-Link downloading and debugging.
In the process of debugging via J-Link, some RT-Thread community developers have feedback that some equipment they are debugging has potential safety risks, for example carrying high voltages, which makes remote debugging necessary. This version of RT-Thread provides remote downloading and debugging supports. Connect J-Link to the machine and start the JLinkRemoteServer, modify the debugging configuration on the local machine to specify the IP connection mode and IP address. After this, you could control the remote J-Link to download and debug programs from thousands of miles away.
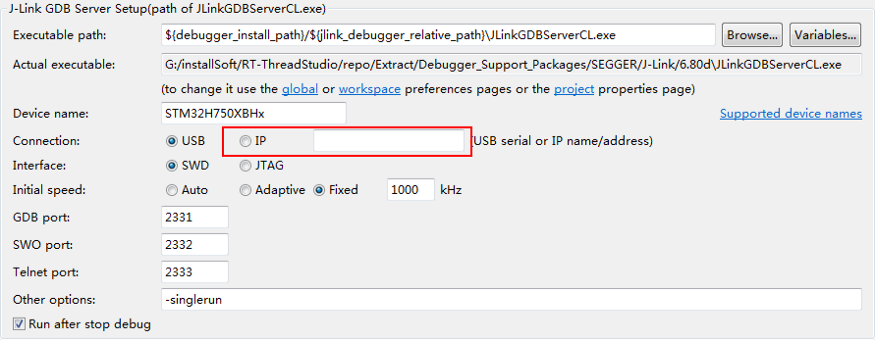
-Simple way to view Dev Board details
In previous versions, the details and the documents of the dev board only present while creating a project. After the project is generated it is very inconvenient to track these resources again. Now an entry for viewing the development board details and documents is reserved in the project, double-click can easily to check out all the details.
-QEMU supports network simulation
In v2.0, STM32F4 QEMU network simulation is available, making it possible to develop network applications without the STM32F4 development board at hand.
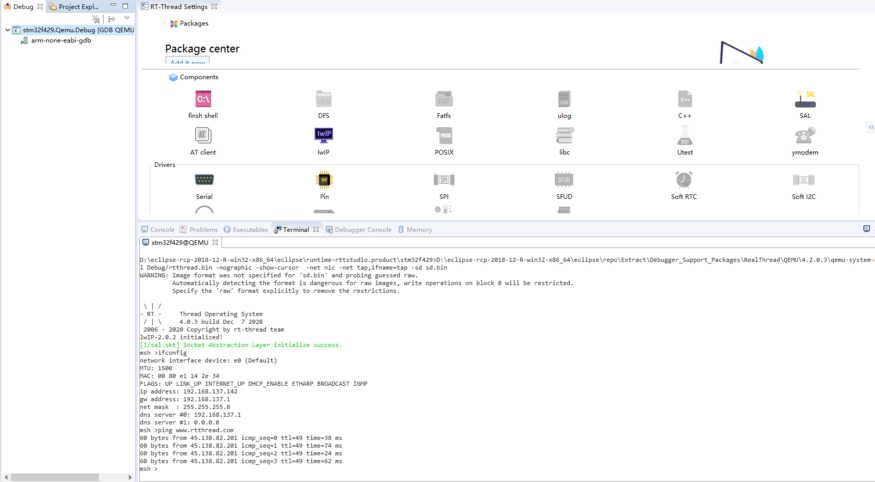
-Support Rebuild
Sometimes we need to clean the project and then rebuild the project from a fresh start. In previous versions, we needed to perform two steps in sequence. Now we only need to click the Rebuild button on the toolbar, to carry out the entire cleanup and rebuild process in one step.
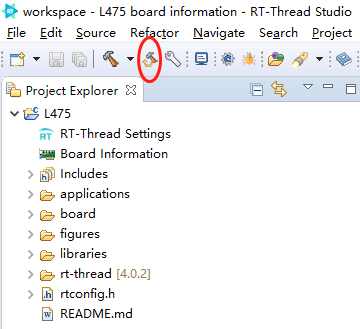
-RT-Thread Studio IDE V2.0 supports 270+ RT-Thread software packages in English
Download it Now!
Note that even if you have installed RT-Thread Studio before, the new v2.0 needs you to download a fresh one from the RT-Thread website, you are not suggested to internally upgrading.
RT-Thread Contact Info:
Website: https://www.rt-thread.io
Github: https://github.com/RT-Thread
Twitter: https://twitter.com/rt_thread
Facebook: https://www.facebook.com/RT-Thread-IoT-OS-110395723808463
Youtube: https://www.youtube.com/channel/UCdDHtIfSYPq4002r27ffqPw
Hi Community Developers:
RT-Thread creates a place for you to ask questions, share experiences, raise your skillset, and make progress together with many many open-source advocates in RT-Thread Club. Join us now to win 10 Points!
What is RT-Thread Club?
1. Ask Questions and Get Your Questions Answered!
RT-Thread offers 5 independent sections [RT-Thread Standard] [RT-Thread Nano] [RT-Thread Smart] [RT-Thread Studio IDE] [Embedded], providing developers with a full ranged platform to learn embedded development. Create posts according to question type on the corresponding section.
2. Share You Knowledge
Sharing knowledge and inspiration is important in opensource community, we highly encourage you to write articles, get your thoughts organized, and spread your knowledge to empower more people. Meanwhile, when you share with others, it helps deepen your own knowledge and engrains what you know. It's a win-win.
3. Apply Experts to Share Your Professional Expertise
You might have a comprehensive knowledge of or skill in a particular area, RT-Thread creates the Experts Channel for you, apply to be the experts in your area, and your profile will be shown on the Community Expert Page, developers can directly ask for your help! Share your professional expertise to help more people and build your reputation in the OpenSource community!
Playing with RT-Thread Community Now!
Registration Rewards:
By registering RT-Thread community from 10th Dec to 20th Dec, you’ll receive 10 Points and it will be distributed to your RT-Thread Community account from 21st Dec.
RT-Thread Points Exchange Center will soon be released, it is a platform for you to Exchange your points into Community Gifts, Amazon Gift Cards, and more!
→ Register Now! RT-Thread Club
RT-Thread Contact Info:
Website: https://www.rt-thread.io
Github: https://github.com/RT-Thread
Twitter: https://twitter.com/rt_thread
Facebook: https://www.facebook.com/RT-Thread-IoT-OS-110395723808463
Youtube: https://www.youtube.com/channel/UCdDHtIfSYPq4002r27ffqPw
Innovation Drives the Future
With a lot of market research and 2 years of Hard Work Development, the RT-Thread Research & Development Team successfully developed the RT-Thread Smart Micro-Kernel Operating System. RT-Thread Smart is aimed primarily at mid- to high-end processors with MMU(Memory Management Unit), providing a more competitive operating system-based software platform for different industries.
Market Positioning
RT-Thread Smart is positioned as a professional high-performance micro-kernel operating system for real-time applications, to benefit the industries in Security( such as IPC Camera), Gateway, Industrial Control, On-board Device, Consumer Electronics and so on. Among the division of traditional IoT operating systems, a micro-kernel operating system is the only one that can fill the gap between traditional RTOS and large operating system Linux, achieving the best balance among real-time, cost, security, start-up speed, and so on.
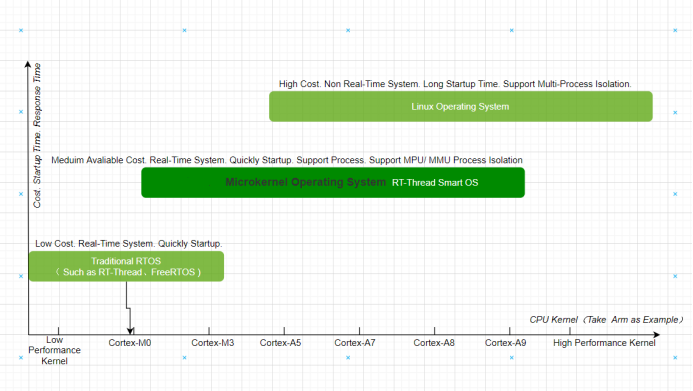
Implementation Principles
Compared to macro kernel structure, the Micro-kernel contains an efficient kernel, several separate system service components and drivers.
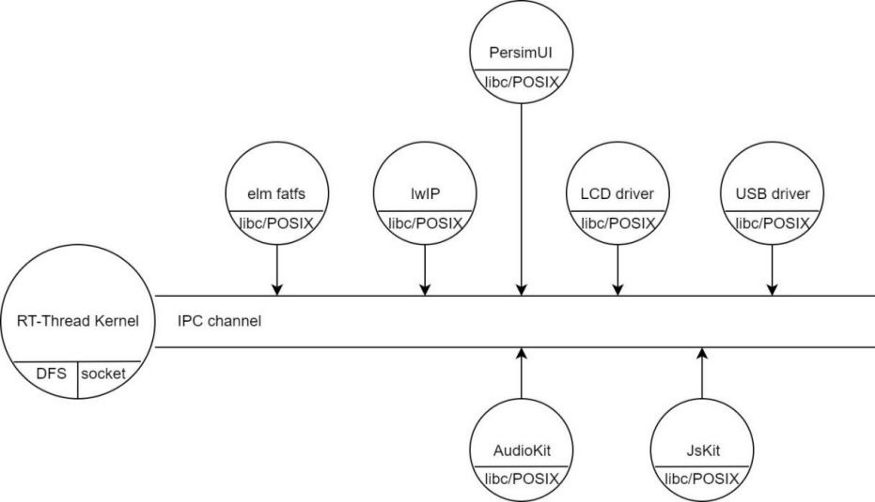
Micro-kernel supports putting system service components or drivers into kernel states to run on demand, for achieving a better performance.
Micro-kernel also supports to move most of the system components and drivers of the system outside the kernel, to run as a separate service process, and interacting with the service process through messages.
This reduces the coupling between the components and the kernel, making the kernel design more concise. Meanwhile, the inter-process resources are isolated so that the failure of individual services will not affect the normal function of the kernel and other services, making the system more secure and reliable.
RT-Thread Smart shows extraordinary performance on resource consumption, start-up time and real-time features.
Resource consumption:The compressed RT-Thread Smart kernel is 217 KB in size, the root file system 127 KB and memory usage 1.9 MB.
Start-up time:With the full supports of filesystems, network protocol stacks and multimedia, it takes 3 to 5 seconds for RT-Thread Smart to finish the startup process. If without running any functional components RT-Thread Smart only requires less than 500 ms to start up. If the persimmon UI component is integrated, the time that the whole system needs from power on to the UI running is about 1.7 seconds.
Real-time:The interrupt latency is less than 1 us, which meets most application cases with strict real-time requirements.
RT-Thread Smart is a lite kernel with its system services running in the user mode. It supports the traditional RT-Thread API to inherit the existing software environments. RT-Thread Smart is also built through `scons`, which makes it easy to integrate RT-Thread online software packages. What’s more, POSIX interfaces are supported to port Linux applications on it.
Meanwhile, the RT-Thread self-developed one-stop development tool RT-Thread Studio IDE fully supports RT-Thread Smart, which lowers the barriers to use and improves work efficiency.
As always, RT-Thread Smart will be open-source and applies Apache License v2.0. The code will be released in October.
RT-Thread Contact Info:
Website: https://www.rt-thread.io
Github: https://github.com/RT-Thread
Twitter: https://twitter.com/rt_thread
Facebook: https://www.facebook.com/RT-Thread-IoT-OS-110395723808463
Youtube: https://www.youtube.com/channel/UCdDHtIfSYPq4002r27ffqPw
RT-Thread OpenSource Internet of Things(IoT) operating system has self-developed a one-stop development tool: RT-Thread Studio.
RT-Thread Studio IDE has an easy-to-use graphical configuration system and a wealth of software packages and components resources. RT-Thread Studio has the features of project creation and management, code editing, SDK management, RT-Thread configuration, build configuration, debugging configuration, program download, and debug. Also, it combined the graphical configuration system with packages and component resources, reducing the duplication of work, and improving the development efficiency.
Now, RT-Thread Studio IDE V1.1.3 is released.
With support for QEMU simulator and DAP-LINK debugger. Check out how QEMU simulator and DAP-LINK debugger works in RT-Thread Studio.
QEMU Simulator
QEMU is s cross-platform simulator, capable of simulating the execution environments of various evaluation boards, which has been integrated into RT-Thread Studio. Now the following features are supported:
-
Create the project based on QEMU by default
-
Configure the command-line arguments for QEMU via GUI
-
Debug programs by inserting breakpoints
Hardware available in QEMU:
-
MPU
-
Hardware FPU
-
Clock
-
UART1
-
FLASH
-
Touch Screen
-
SRAM
-
CCM SRAM
-
FMC
-
RGB565 LCD interface
QEMU Simulator DEMO
DAP-LINK
DAP-LINK is an open-source programmer maintained by the ARM official. It was called CMSIS-DAP and implements the standard CMSIS-DAP protocol. It’s now integrated into RT-Thread Studio to support:
-
Downloading programs on all series of Cortex-M chips
-
Debugging programs on all series of Cortex-M chips
DAP-LINK DEMO
What’s Next?
QEMU would support
-
Network
-
Storage devices, like SD and FLASH
-
RGB888 LCD interface
-
To show the program execution and support graphic interface with the board outlook
DAP-LINK would support
-
More interfaces to download and debug programs
Download RT-Thread Studio and give it a try, let us know what you think?
RT-Thread Contact Info:
Website: https://www.rt-thread.io
Github: https://github.com/RT-Thread
Twitter: https://twitter.com/rt_thread
Facebook: https://www.facebook.com/RT-Thread-IoT-OS-110395723808463
Youtube: https://www.youtube.com/channel/UCdDHtIfSYPq4002r27ffqPw
What is RT-Thread Studio IDE:
RT-Thread Studio is a one-stop development tool that has an easy-to-use graphical configuration system and a wealth of software packages and components resources, which is built to make the IoT development more simple and efficient.
RT-Thread Studio has the features of project creation and management, code editing, SDK management, RT-Thread configuration, build configuration, debugging configuration, program download and debug. Also it combines the graphical configuration system with packages and component resources, reduces the duplication of work, and improves development efficiency.
What’s New in Version 1.1:
1. Compared with version 1.0 that only supports the STM32F1 series, the whole STM32 series are supported in the new version 1.1.
2. RT-Thread configuration mode includes framework configuration and tree configuration. With framework configuration, components or software packages are easy to be enabled by clicking the corresponding icons; Under tree configuration, all the configuration options are organized into a tree diagram and the search function is added to the right-click menu, which is convenient to locate a specific option.
3. In addition to supporting the STM32 series of chips, RT-Thread Studio now also supports
the chip manufacturers to add chips.
The current SDK manager contains the resource
packages for the STM32F1 and STM32F4 by default.
If users want to use other chips, they can install the corresponding resource packages
first.
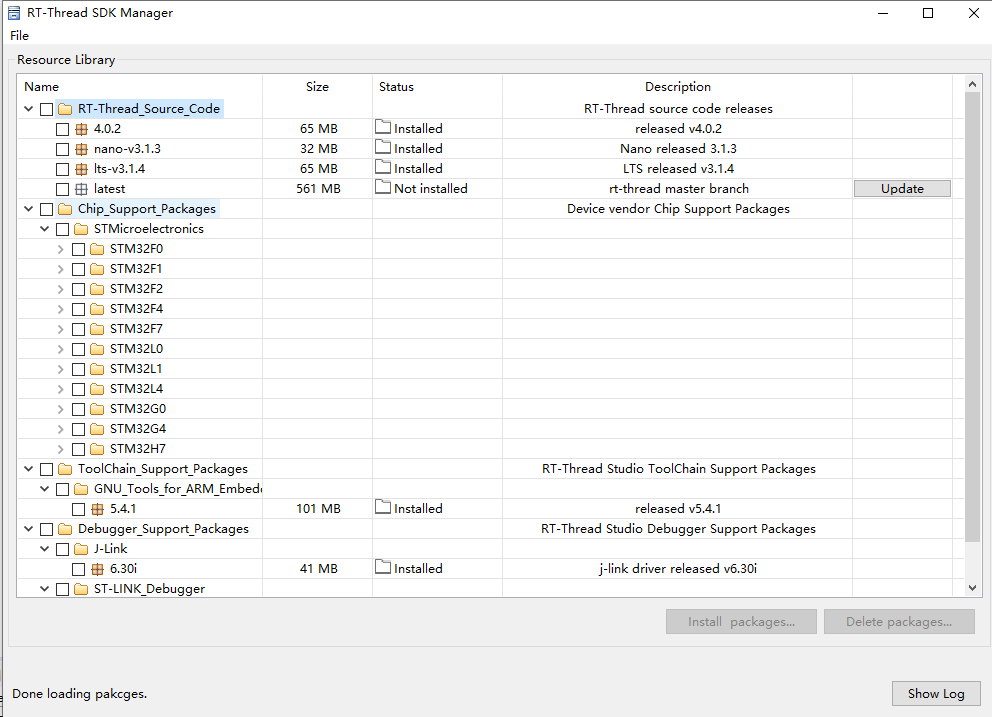
4. Add a concise mode for the compiler output, which can be turned on or off by clicking the switch button at the compiling window. The usage of ROM and RAM can also be printed in the compiling window.
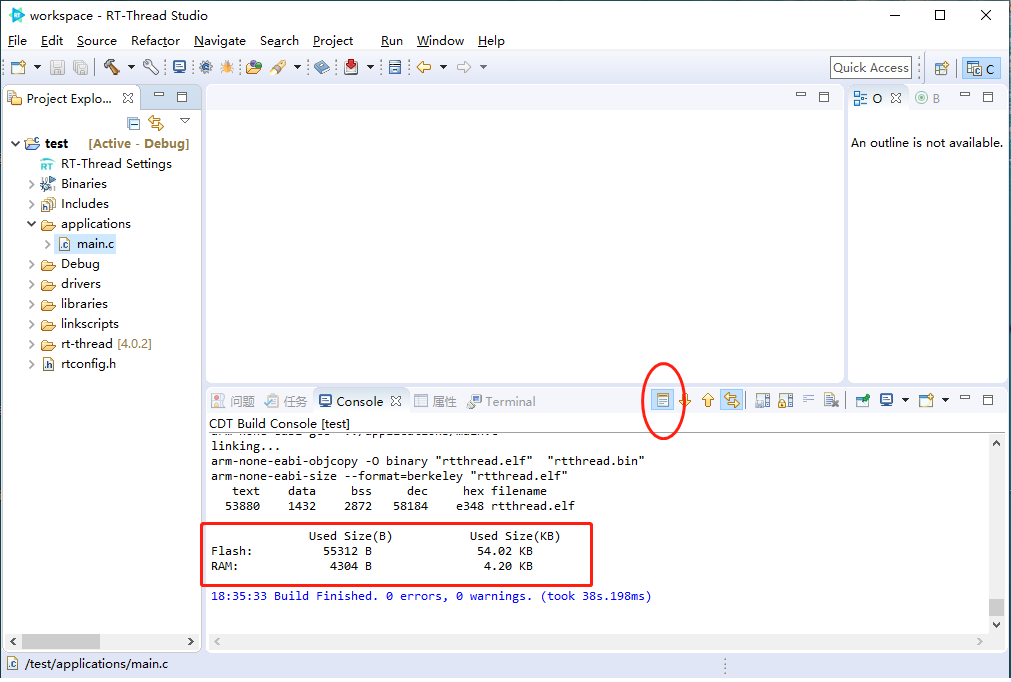
5. In addition to the RT-Thread Studio project, MDK and IAR projects are available to be imported directly.
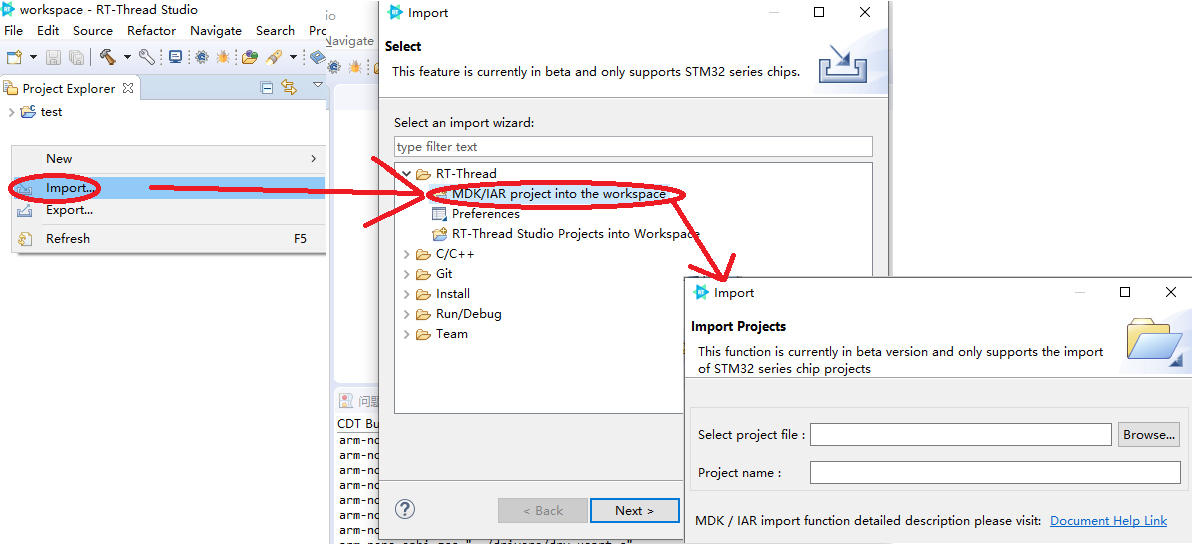
6. Add a new DevStyle theme with a beautiful color scheme.
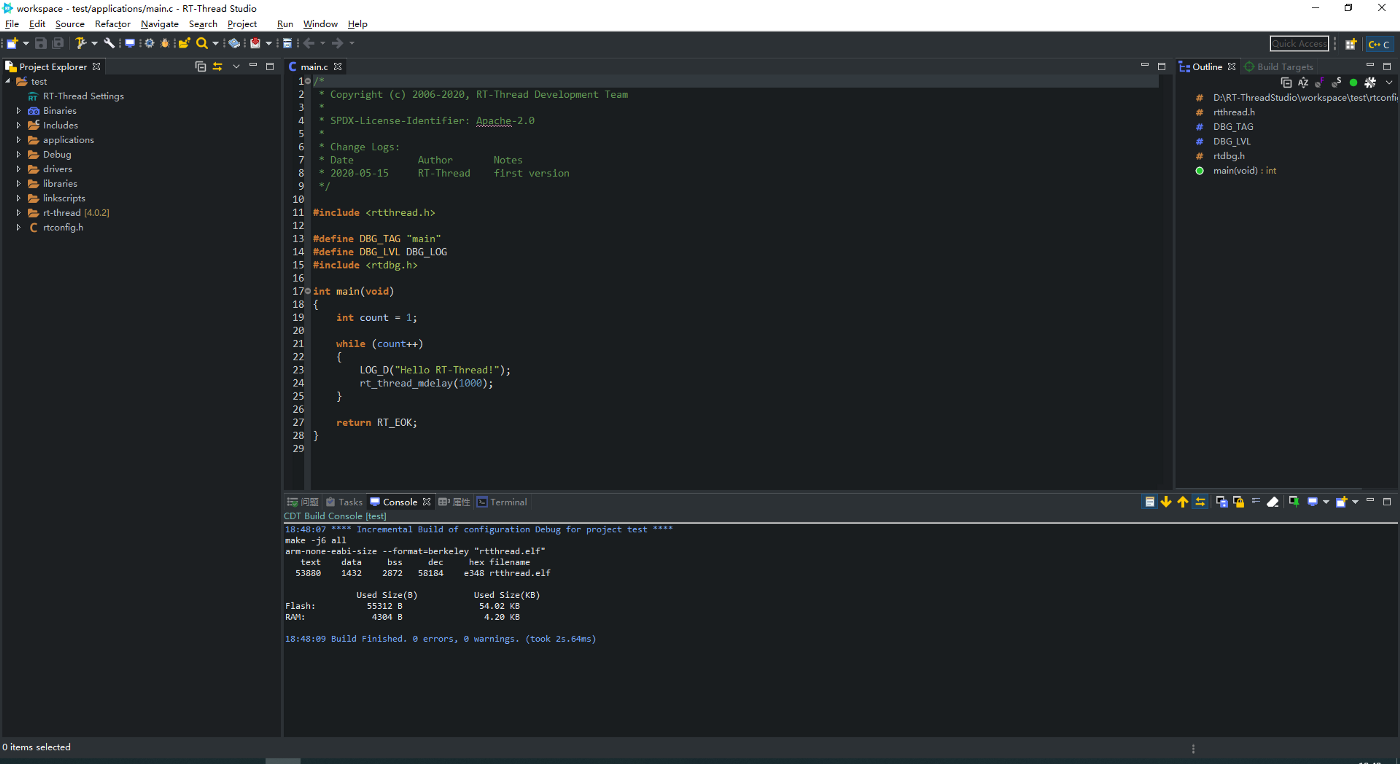
7. Add the code analysis feature and offer the preference configuration to support analyzing code, showing the causes and locations of errors and warnings.
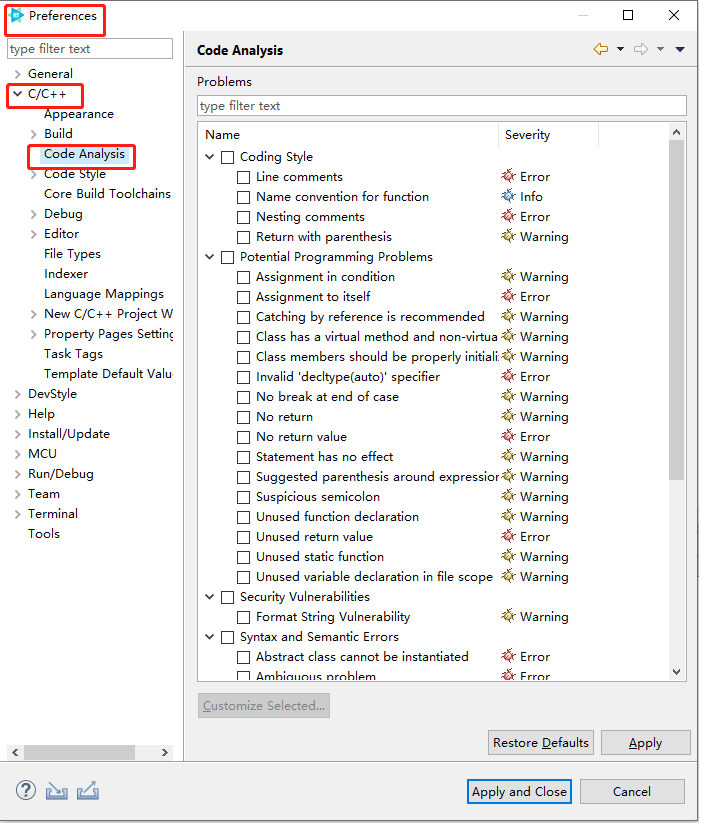
Here’s the RT-Thread Studio IDE V1.1 tutorial. Check out this video to quickly get started with RT-Thread Studio V1.1.
RT-Thread Contact Info:
Website: https://www.rt-thread.io
Github: https://github.com/RT-Thread
Twitter: https://twitter.com/rt_thread
Facebook: https://www.facebook.com/RT-Thread-IoT-OS-110395723808463
Youtube: https://www.youtube.com/channel/UCdDHtIfSYPq4002r27ffqPw
With the joint efforts of RT-Thread, NXP and Arm, and based on the Arm Cortex-M33 processor, RT-Thread has achieved PSA security certification and PSA functional API certification, this achievement verified that RT-Thread build in security. As always, RT-Thread is committed to providing developers with a more secure, easy-to-develop, and component-rich operating system software platform.
The certification process has also helped RT-Thread to further improve security in various areas, including the addition of ARM Cortex-M33 security architecture adaptation to achieve TrustZone functionality; Porting TFM components to enhance the security of the software framework; Enable more secure OTA solutions, including firmware encryption, firmware verification, tamper-proof, etc. Supports SSL(Secure Socket Layer) mechanism to ensure the data is secure and will not be tampered during the communication. Security is the most critical part of the RT-Thread ecosystem, RT-Thread will continue working hard on this.
Meanwhile, RT-Thread just launched the global website in English, making it easier for the global developers to catch the project updates and the technical documentation. Come and check it out: https://www.rt-thread.io/
About RT-Thread:
RT-Thread was born in 2006, it is an open source, neutral, and community-based real-time operating system (RTOS). RT-Thread has the characteristics of very low resource occupancy, high reliability, high scalability, so it can not only be used in sensing nodes, wireless connection chips and other resource-constrained scenes, but also is widely used in gateway, IPC, smart speakers and many other high-performance applications. RT-Thread is also an IoT operating system with it's rich middle-tier components and great hardware and software ecosystem, it has almost every key basic components required for IoT devices, such as network protocols, file systems, low power management, etc.
For more information about RT-Thread, please visit: https: www.rt-thread.io
You can also connect with us on Twitter: https://twitter.com/rt_thread.